Contact Us : 800.874.5346        International: +1 352.375.0772

Gleim Learning Support

Integrate Professor-Led Accounting/AvLearn into Your Learning Management System

On this page, you will find step-by-step instructions on how to fully integrate Gleim Professor-Led Accounting (P-Led AC) / AvLearn into your Learning Management System (LMS.)

This three-step process requires the LMS administrator, professor, and students to complete their instructions in order, i.e., students cannot complete their portion before the LMS administrator and professor have done theirs.

If you encounter any issues, please contact support@gleim.com for support.

Canvas

LMS Administrators

If you are a returning user with an existing Developer Key, you can reuse your Client ID to connect any of your new Canvas courses to your Professor-Led groups. Skip ahead to instructions for professors to connect a new Canvas course to your Professor-Led group(s).

If you are a new user, proceed to Step 1 of these instructions.
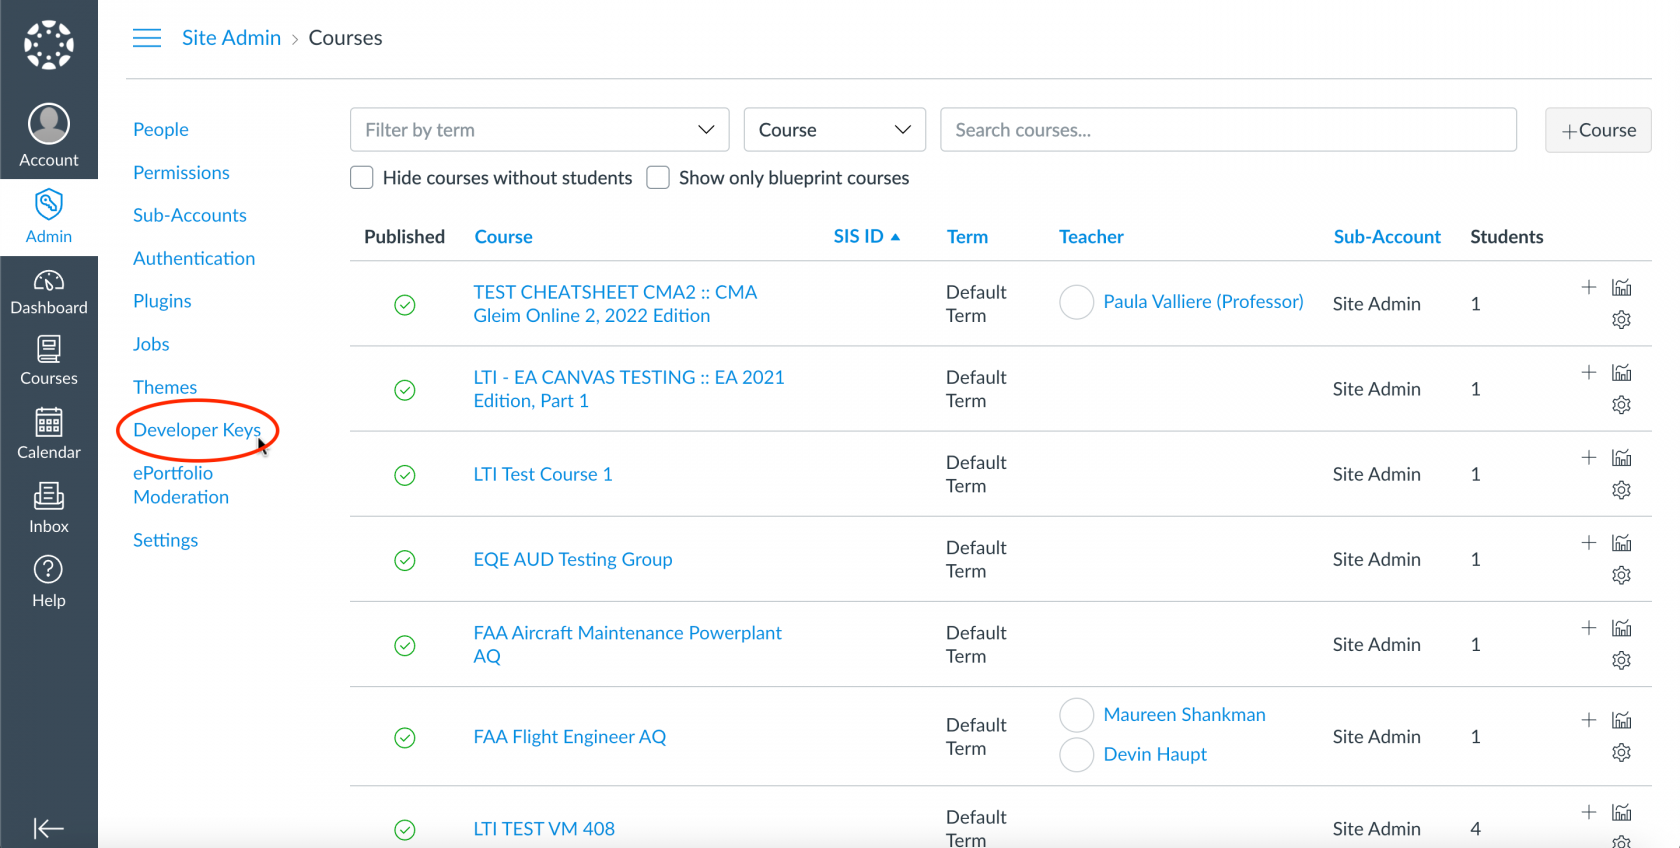
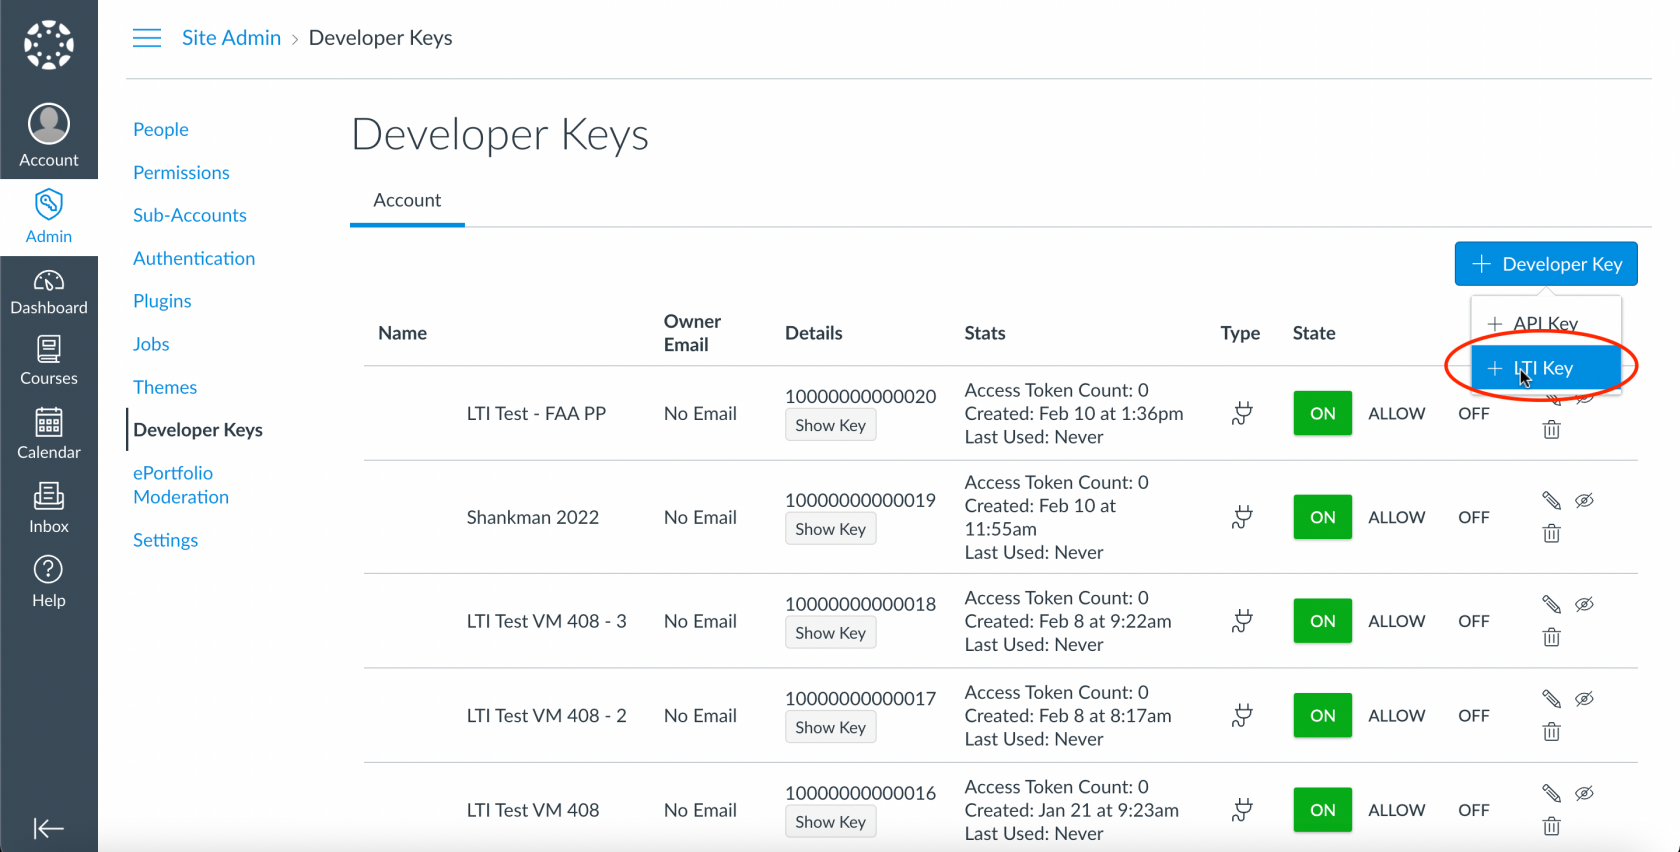
  1. Go to Canvas. On the left side menu, click on the “Admin” tab, then “Site Admin” to navigate to the “Developer Keys” option.
  2. In the top right of the page, select “Developer Key” and add a new LTI Key.
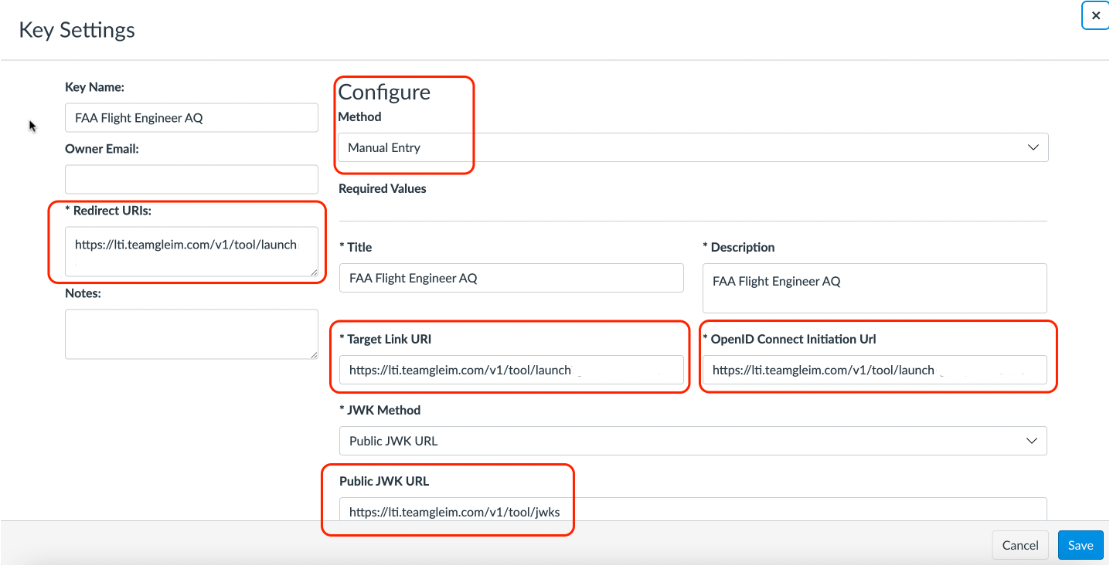
  3. Within the “Method” dropdown menu, select “Manual Entry.” Enter the rest of the fields using the Tool configuration values below.
    Key Name: It is highly recommended to give the tool a unique meaningful name, such as the name of the P-Led group or the course. Fill in this information in the Key Name, Title, and Description fields.
    Target Link URL: https://lti.teamgleim.com/v1/tool/launch
    OpenID Connect Initiation URL: https://lti.teamgleim.com/v1/tool/launch
    Redirect URLs: https://lti.teamgleim.com/v1/tool/launch
    JWK Method: Public JWK URL
    Public JWK URL: https://lti.teamgleim.com/v1/tool/jwks
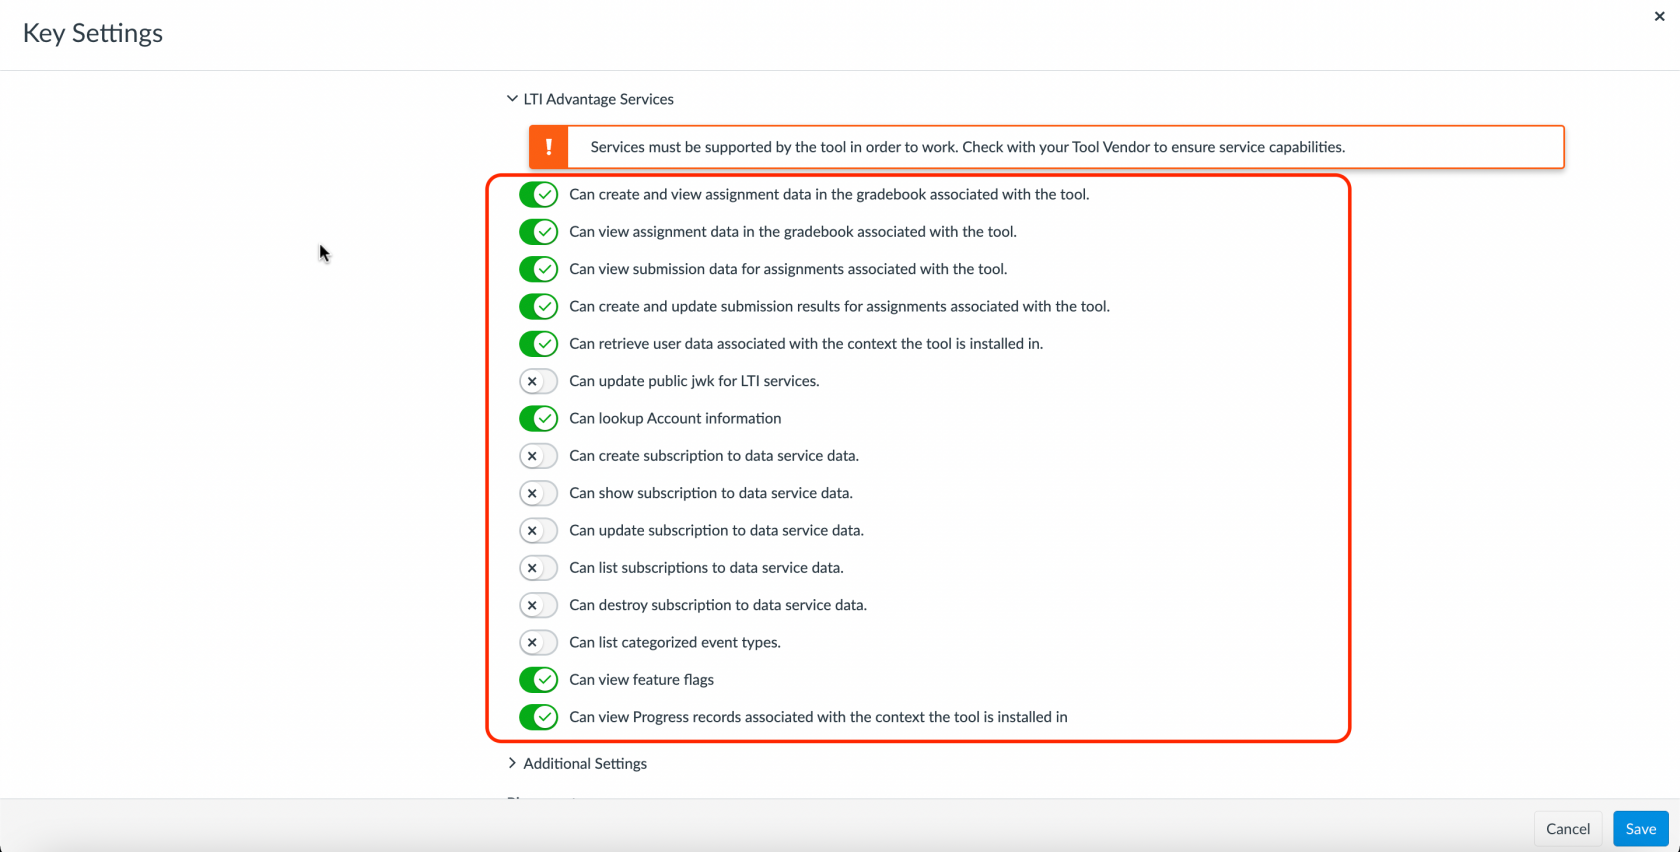
    • a. Scroll down and open “LTI Advantage Services.” Enable all of the settings seen below, which must be selected for the Gleim LTI service to work.
      • Can create and view assignment data in the gradebook associated with the tool.
      • Can view assignment data in the gradebook associated with the tool.
      • Can view submission data for assignments associated with the tool.
      • Can create and update submission results for assignments associated with the tool.
      • Can retrieve user data associated with the context the tool is installed in.
      • Can lookup Account information
      • Can view feature flags
      • Can view Progress records associated with the context the tool is installed in
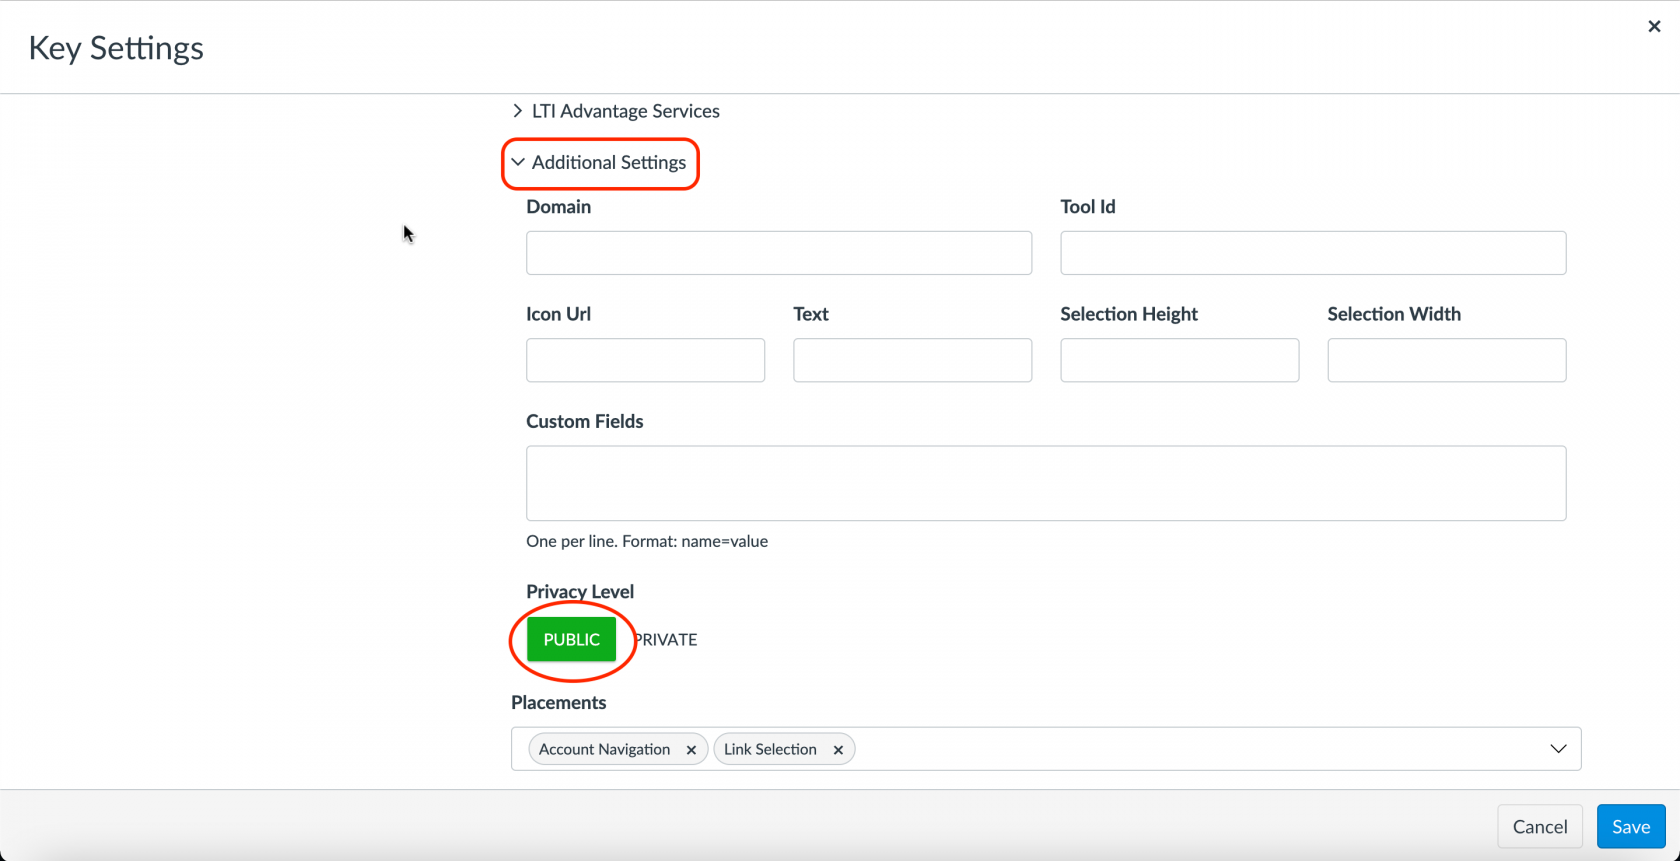
    • b. Below the “LTI Advantage Services” dropdown menu, open “Additional Settings” and set the Privacy Level as “Public.” Click “Save.”
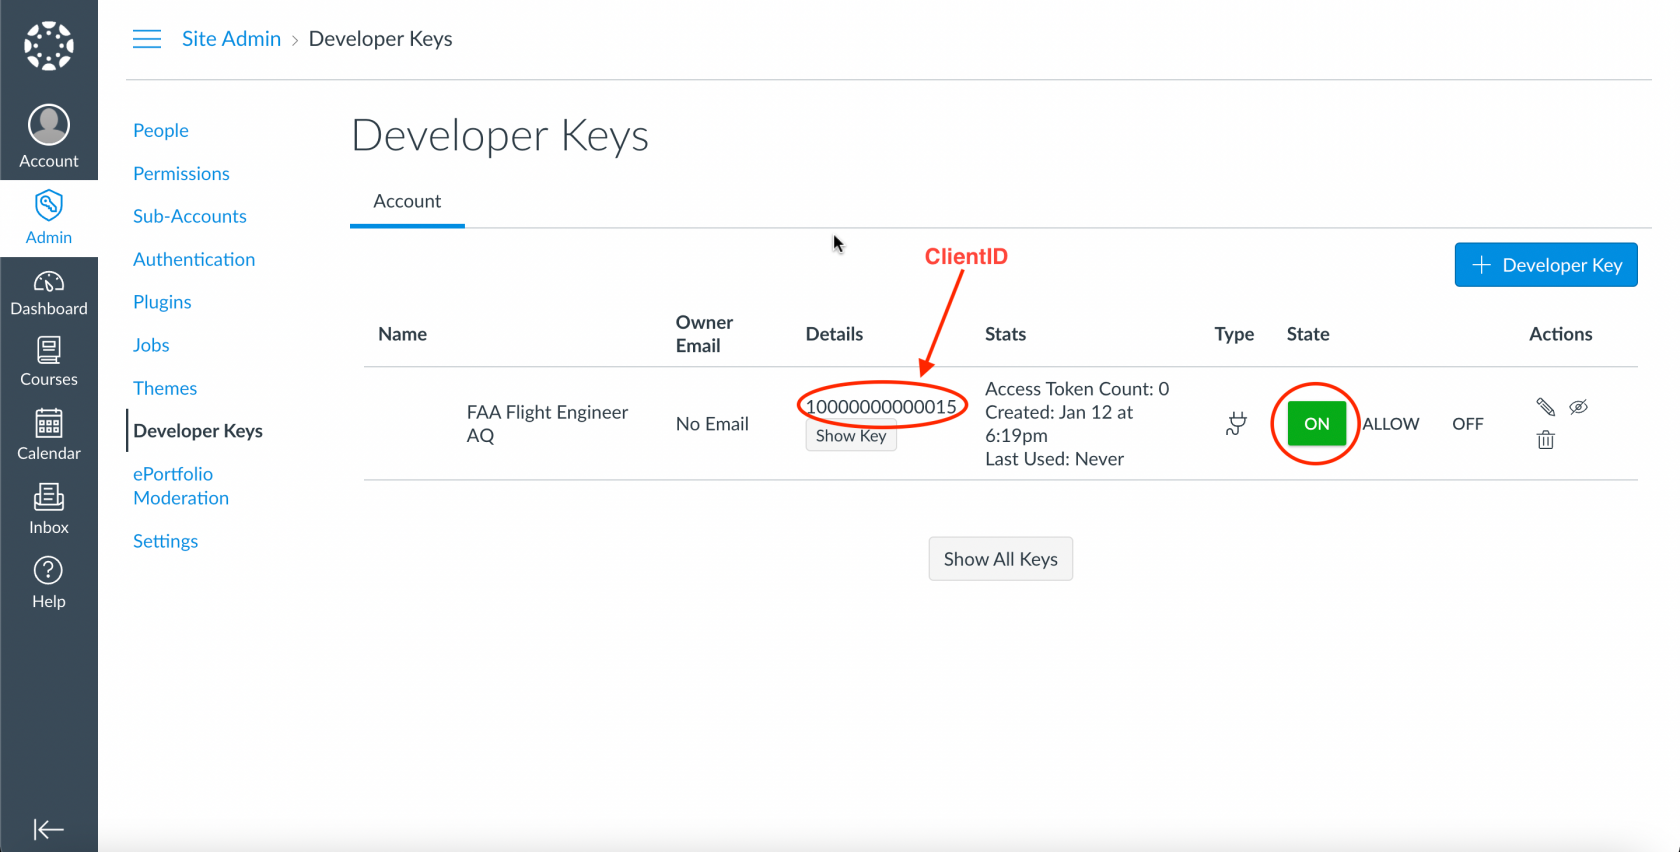
  4. Click the “ON” button next to the LTI Key you just created to switch the key state to “ON.” You will be asked to confirm your action via a pop up message. Once you confirm, the button should turn green.
  5. Record the value under the Details column as the “Client ID.” You should permanently record this Client ID for your school in an accessible place because this value will be reused every time you connect a new LMS course to Gleim LTI after you create this Developer Key.
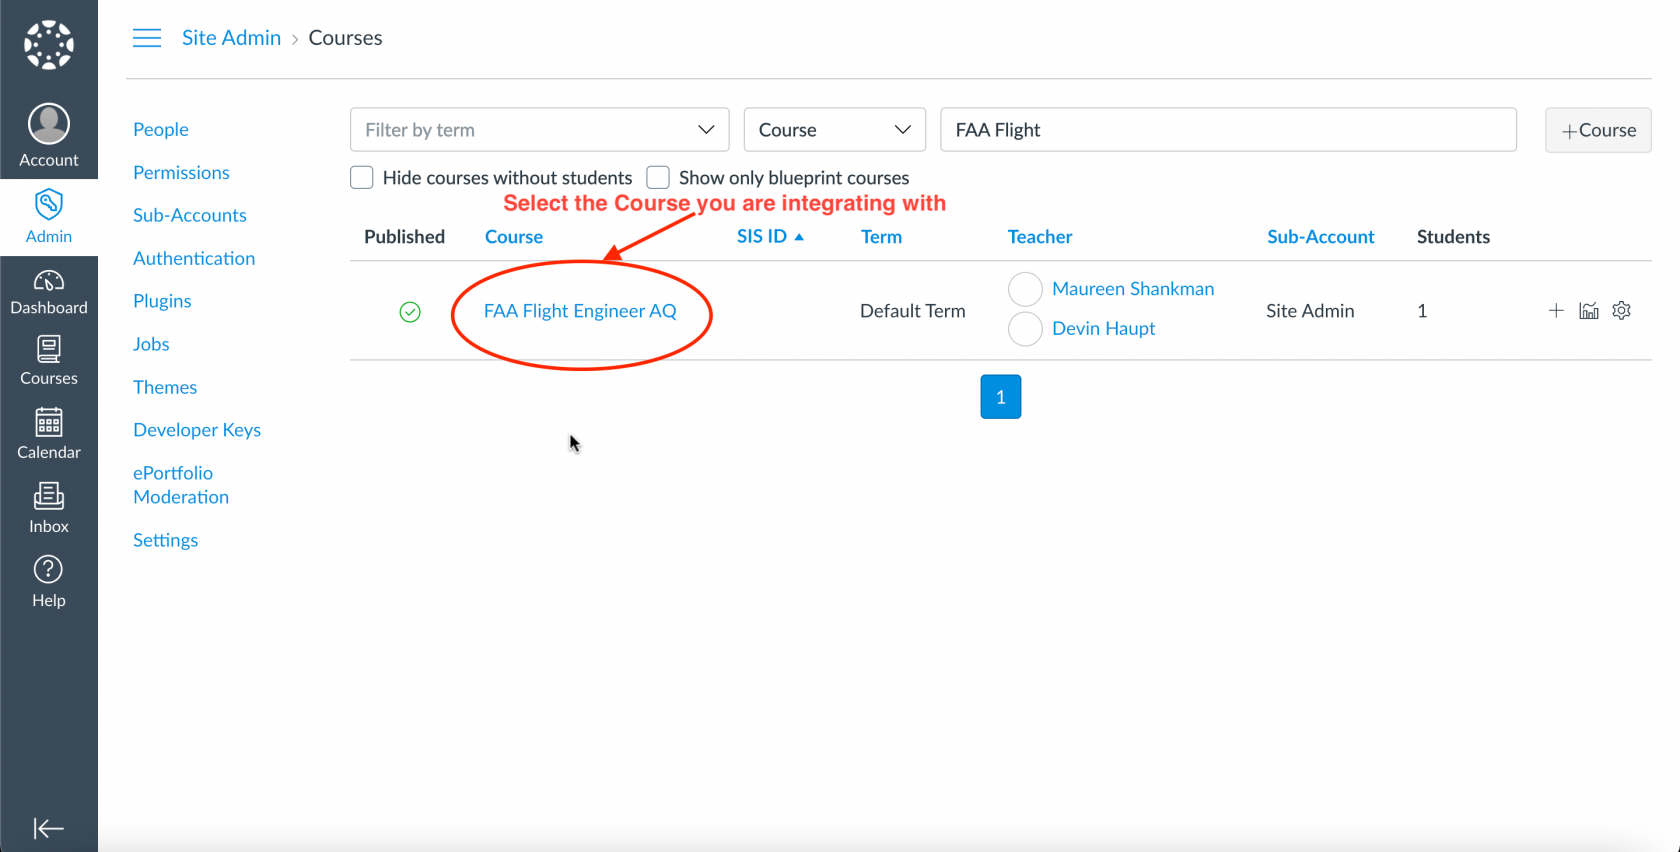
  6. Next, click the “Courses” button in the left menu. Navigate to and select the course you are integrating your Professor-Led AC / AvLearn group with.

    Alternatively, you may click on the Admin Account Name (e.g., Site Admin) to access the Courses tab and select the course you want to integrate.

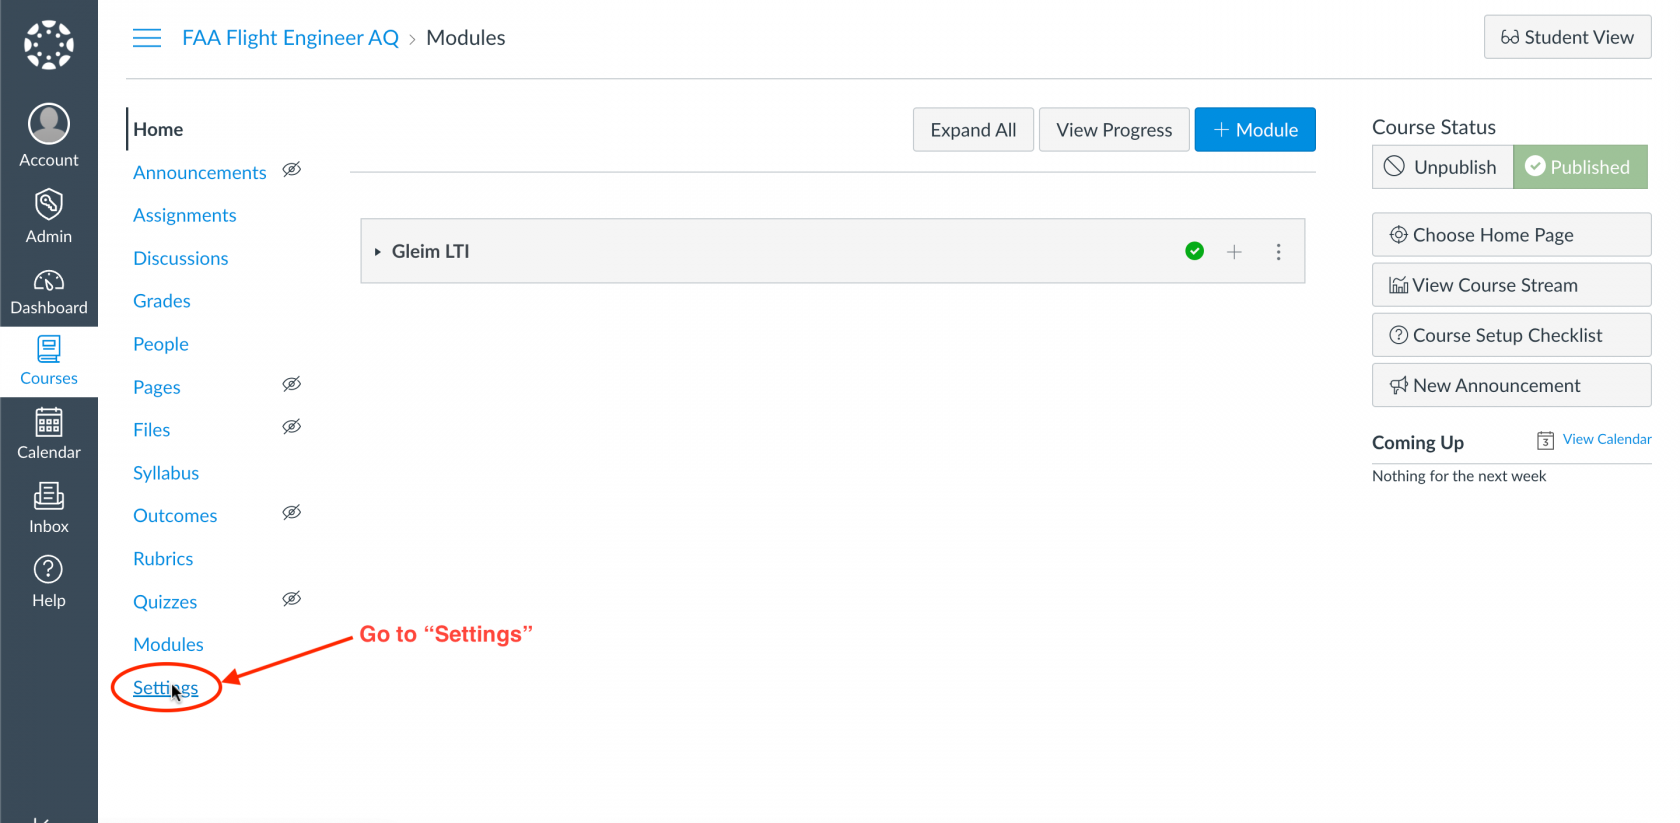
  7. Within the course, go to “Settings.”
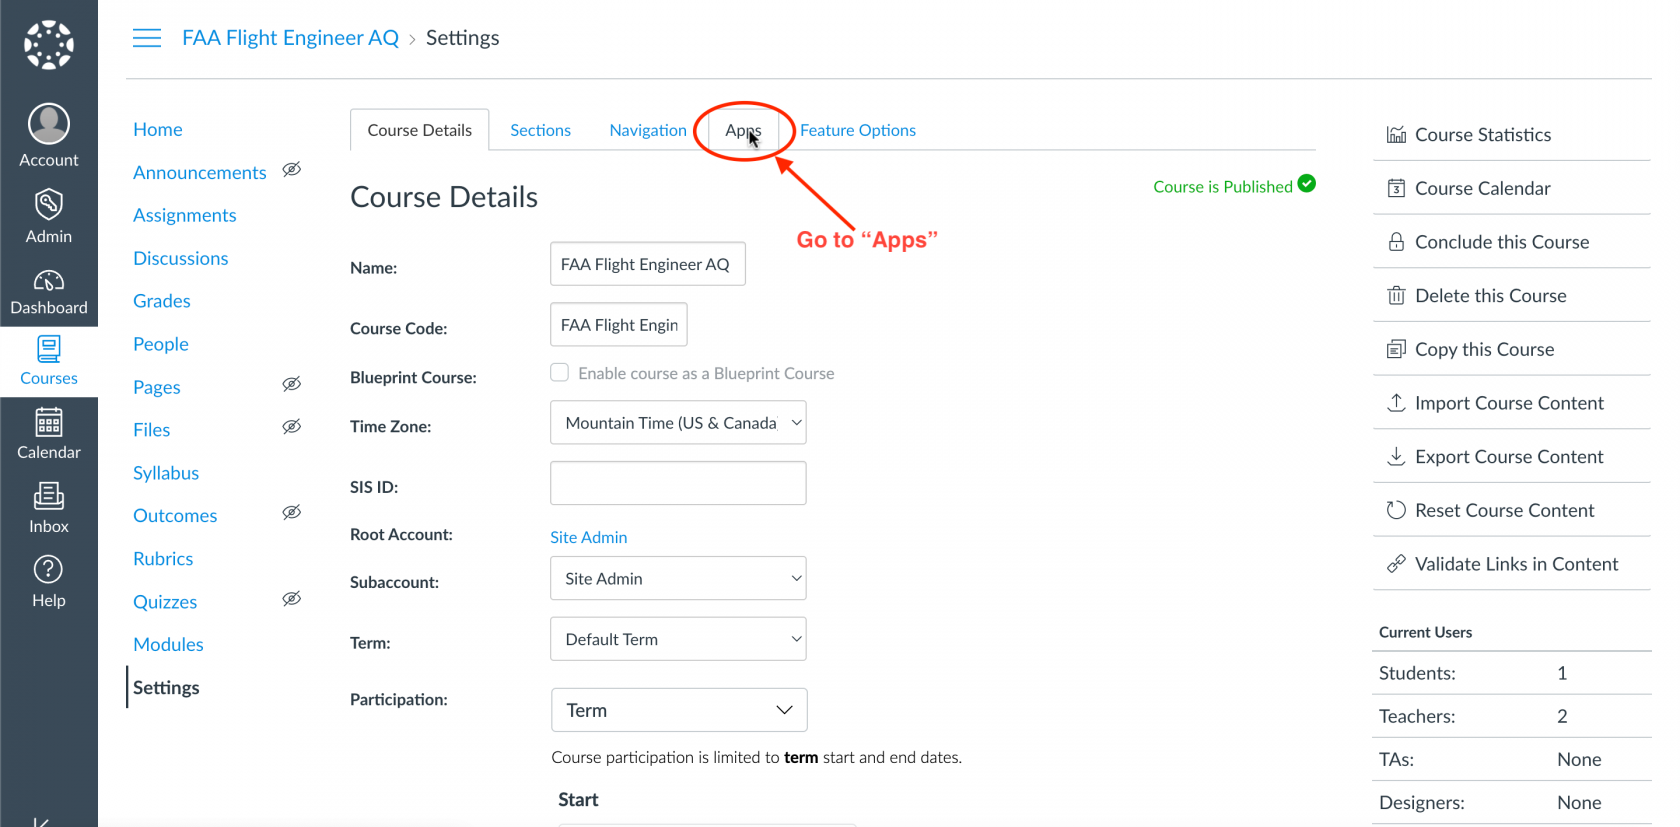
  8. Click on the “Apps” tab.
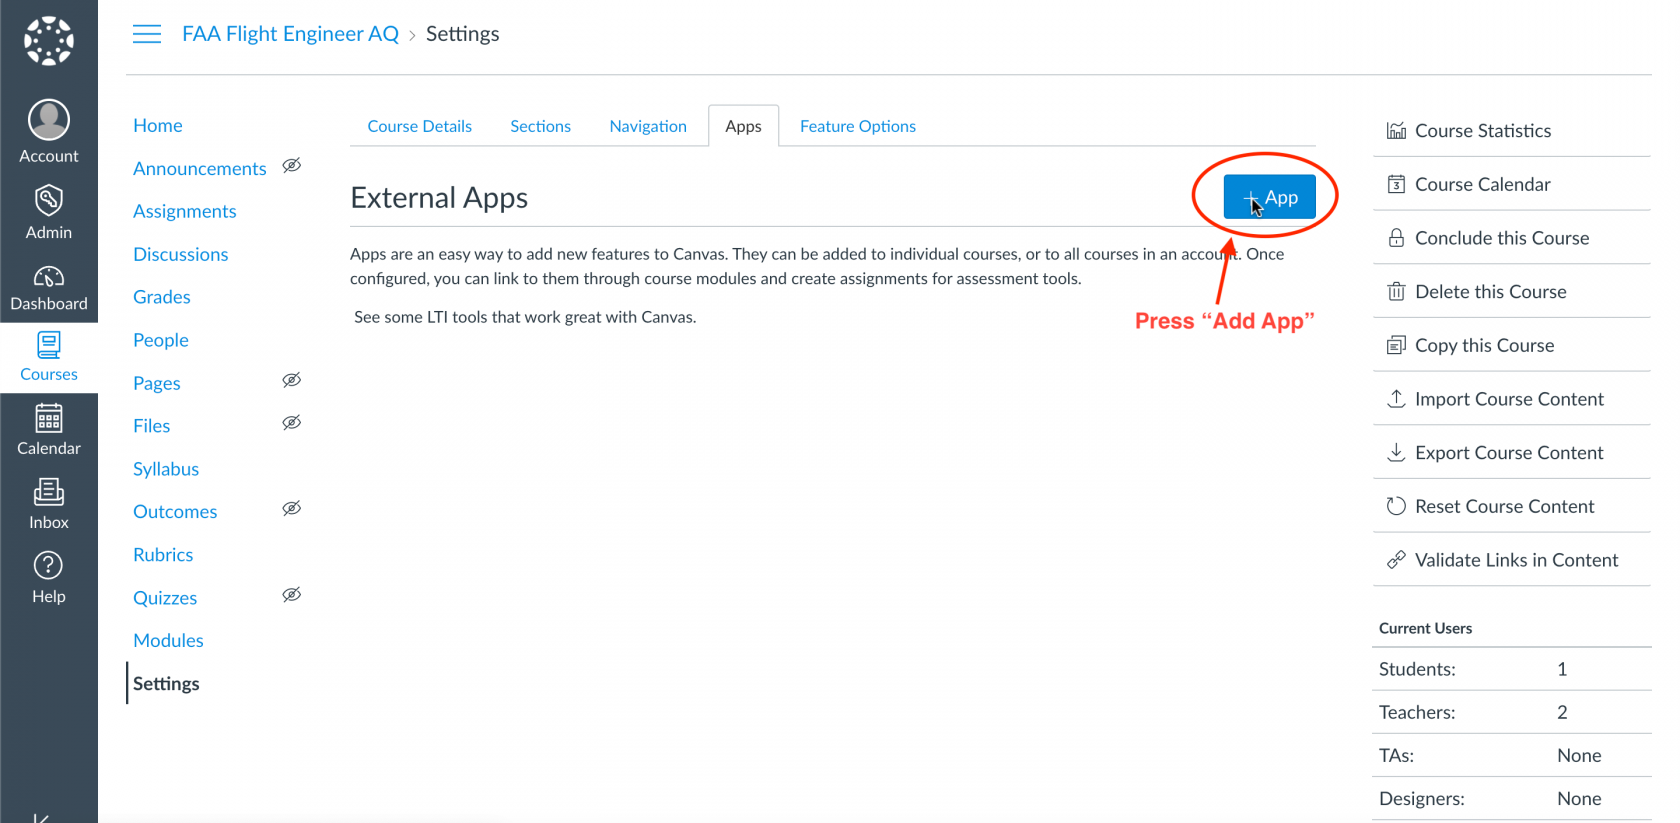
  9. Click the blue “Add App” button on the top right of the “Apps” tab.
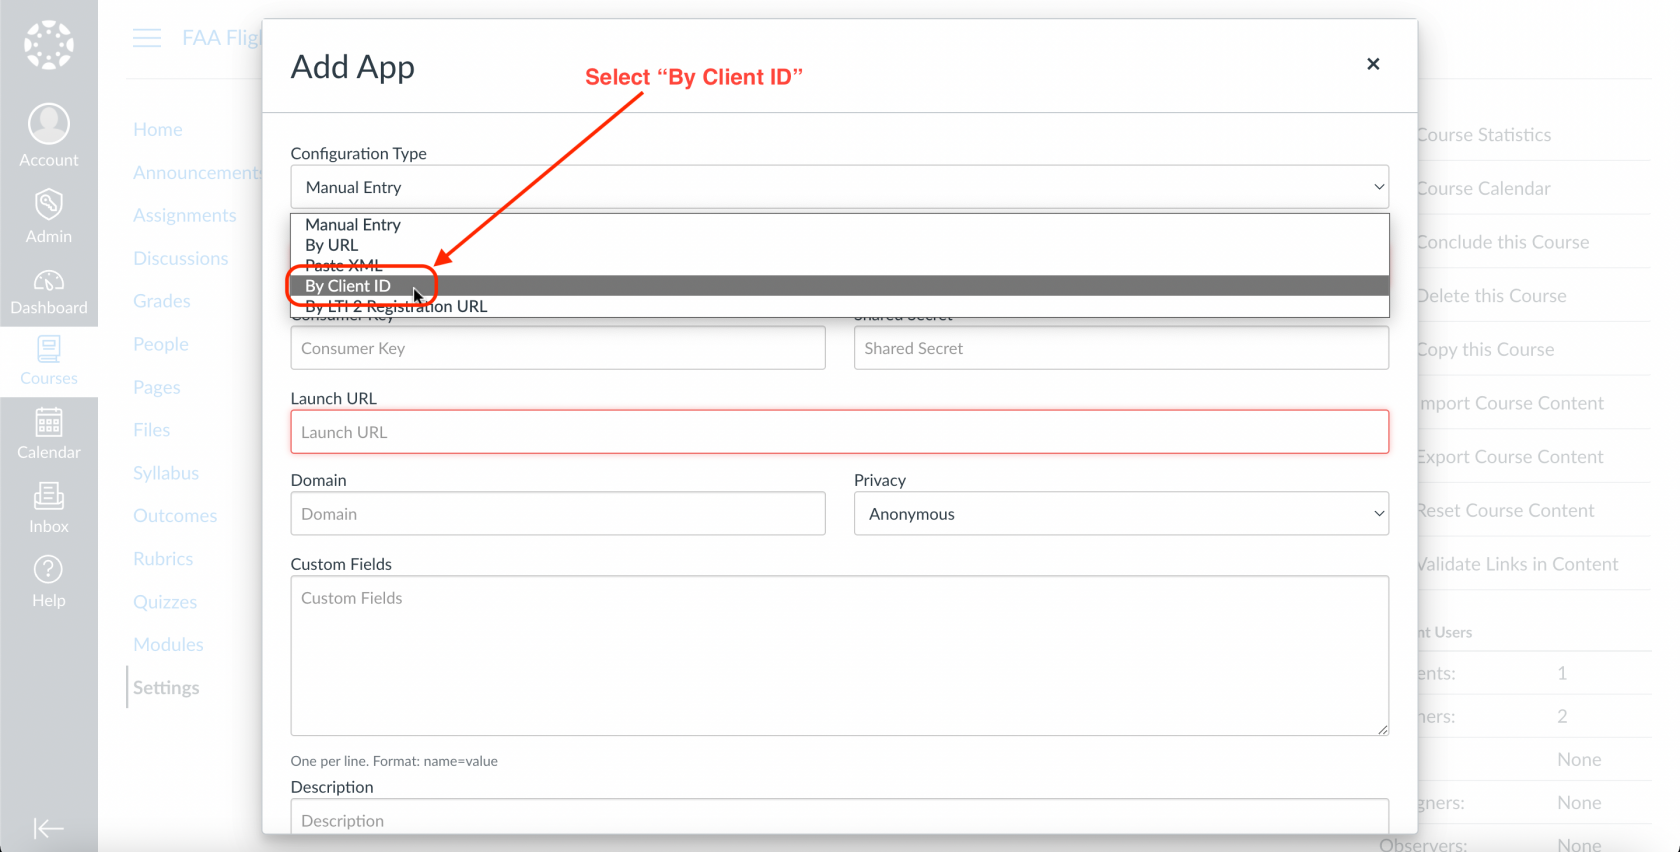
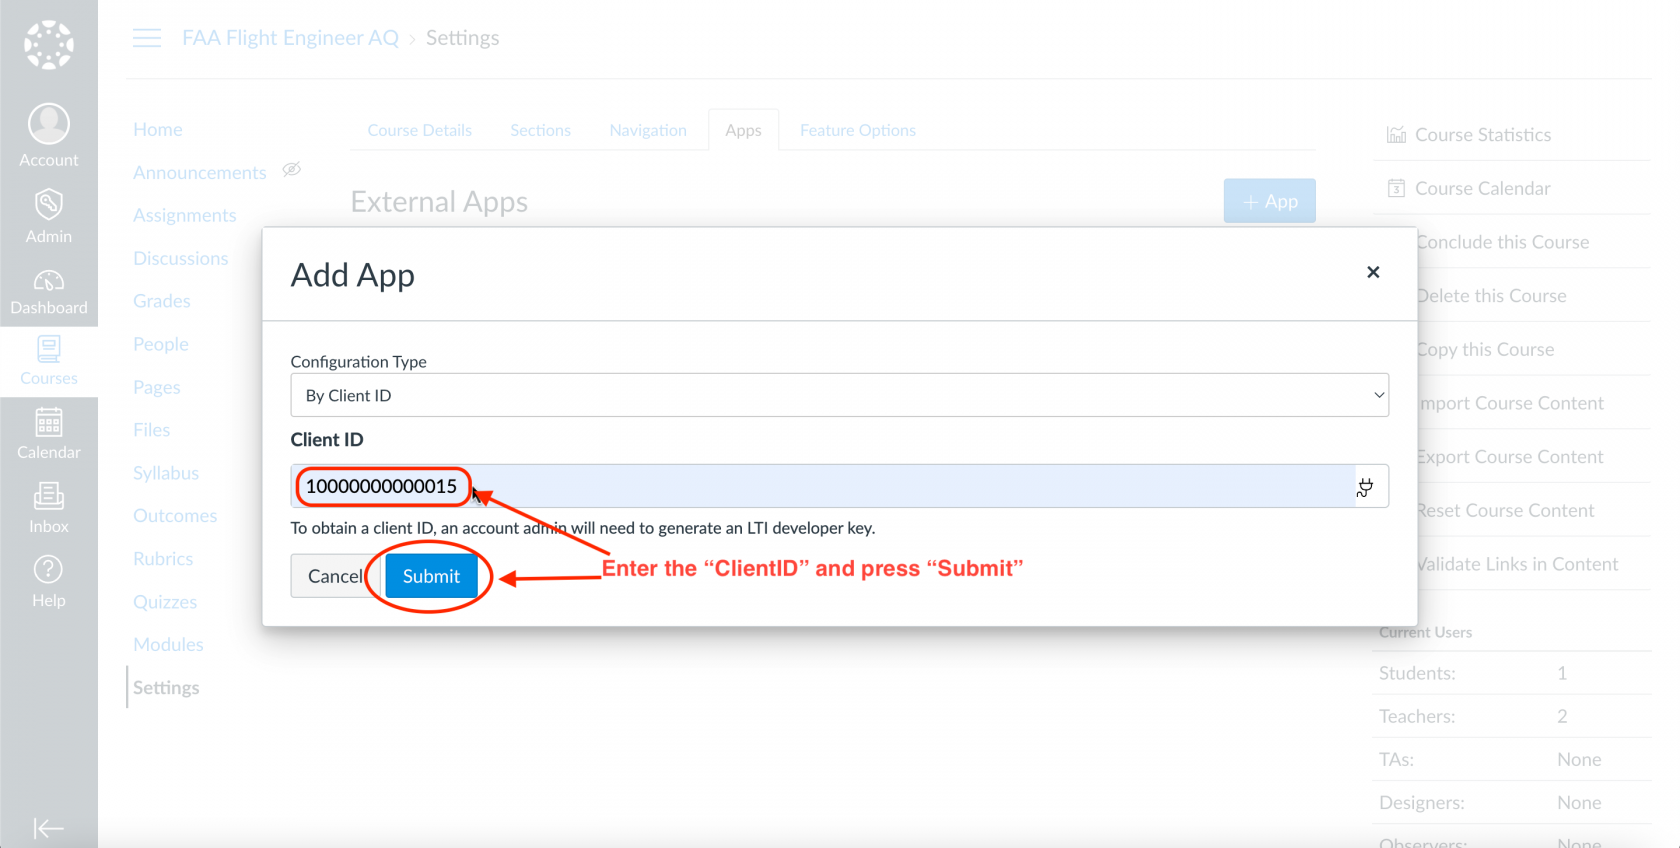
  10. Change the Configuration type to “By Client ID.”
  11. Enter the Client ID you recorded in Step 4 and press “Submit.”
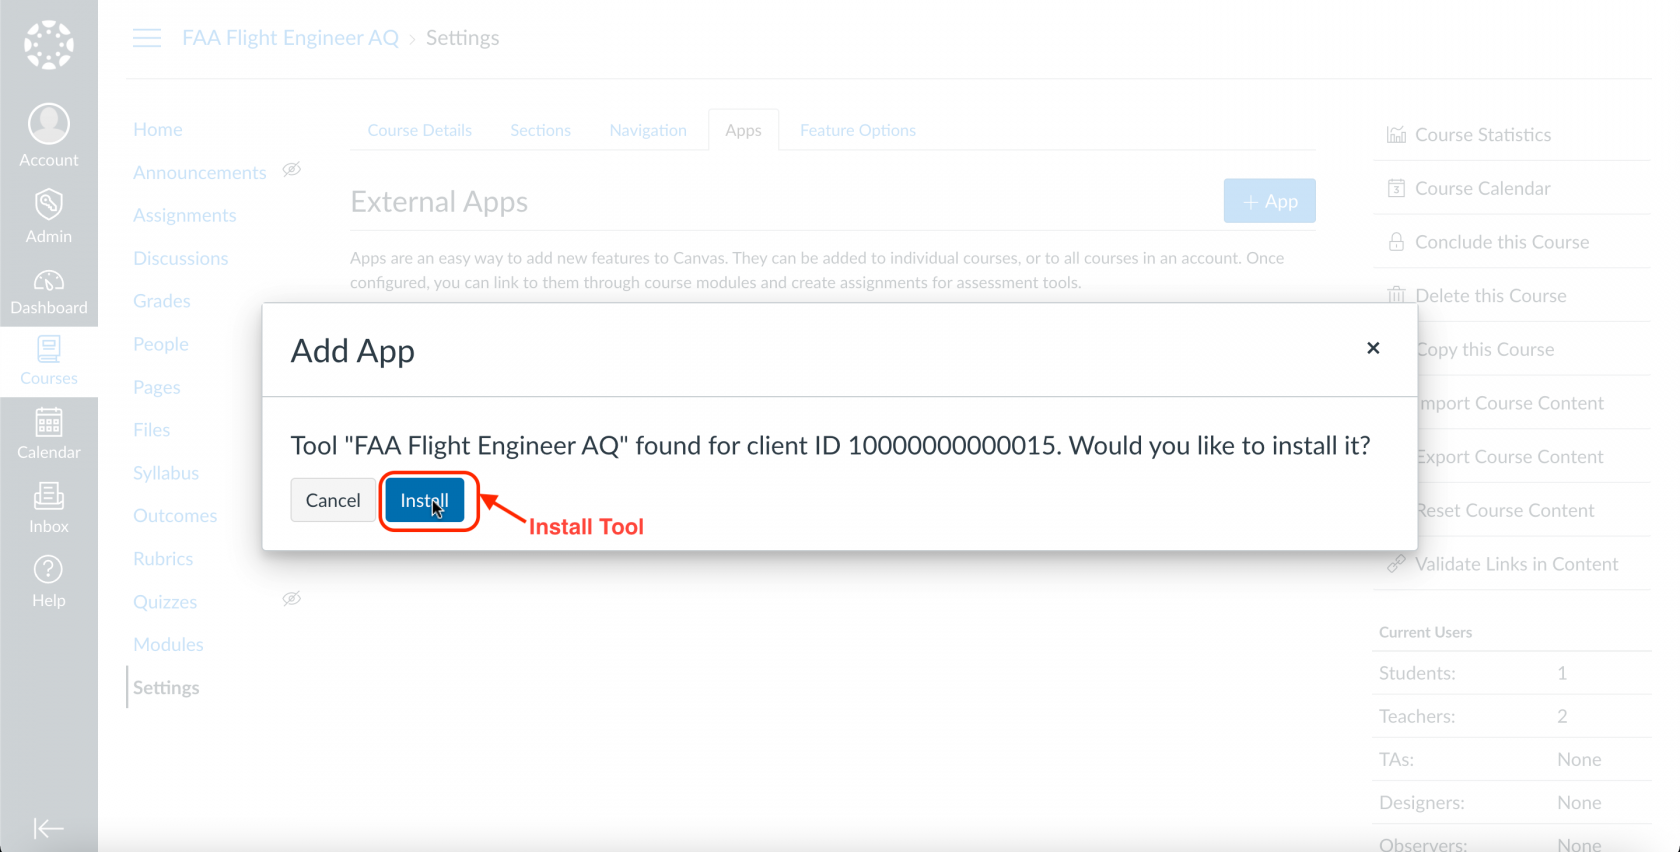
  12. Click the blue “Install” button to install the tool.
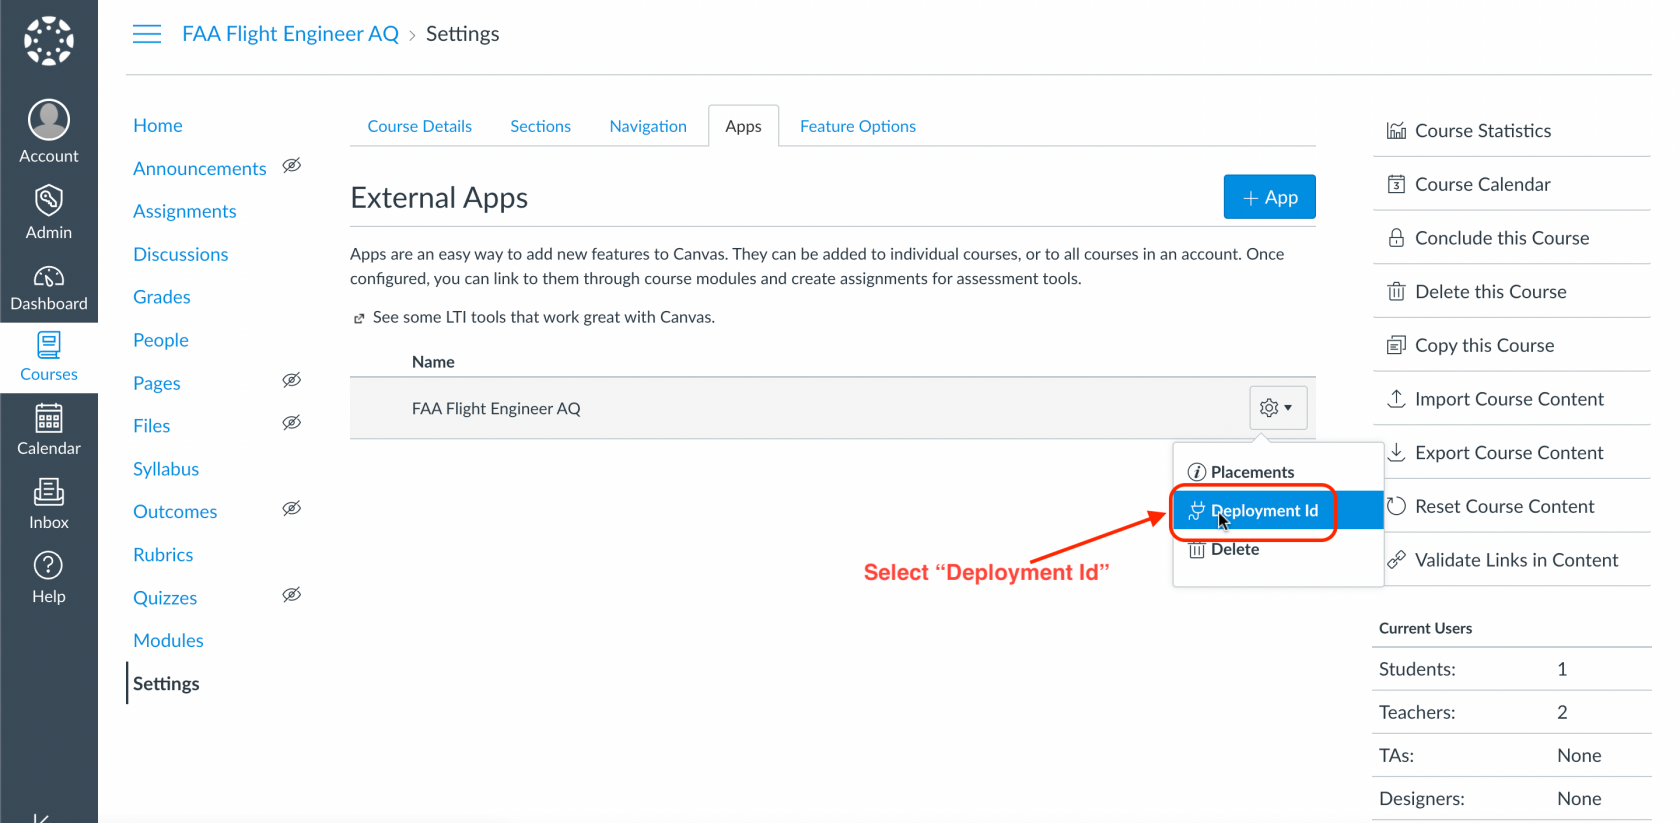
  13. Click the “Settings” gear icon for the tool installed in the previous step, and select “Deployment ID.” Record the deployment ID for a future step.

Professors

  1. On Canvas, select the course you want to connect.
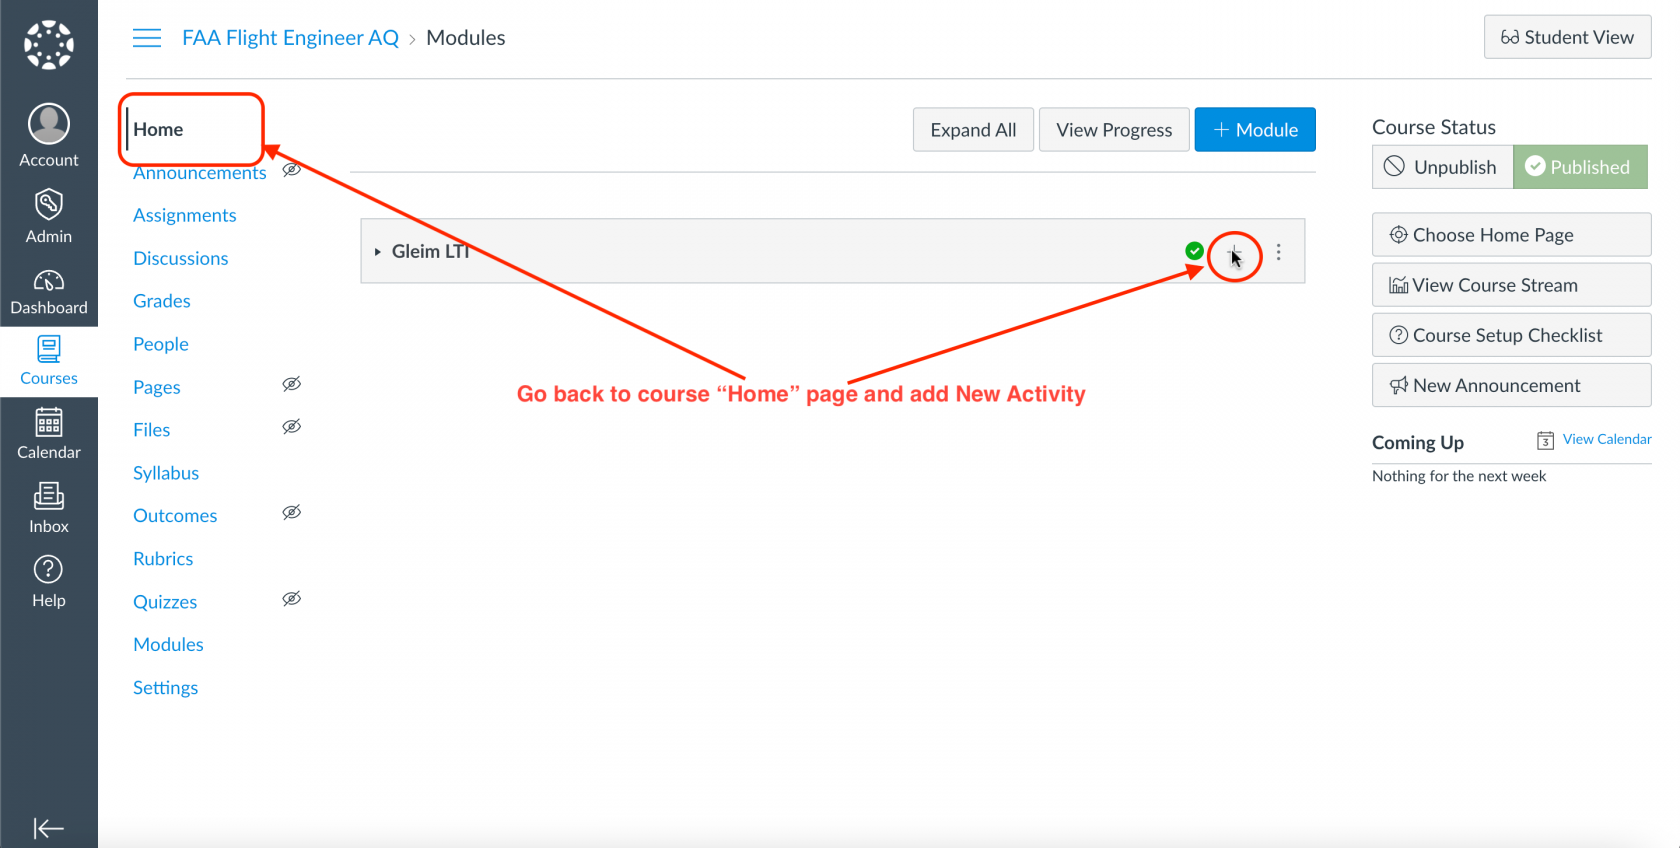
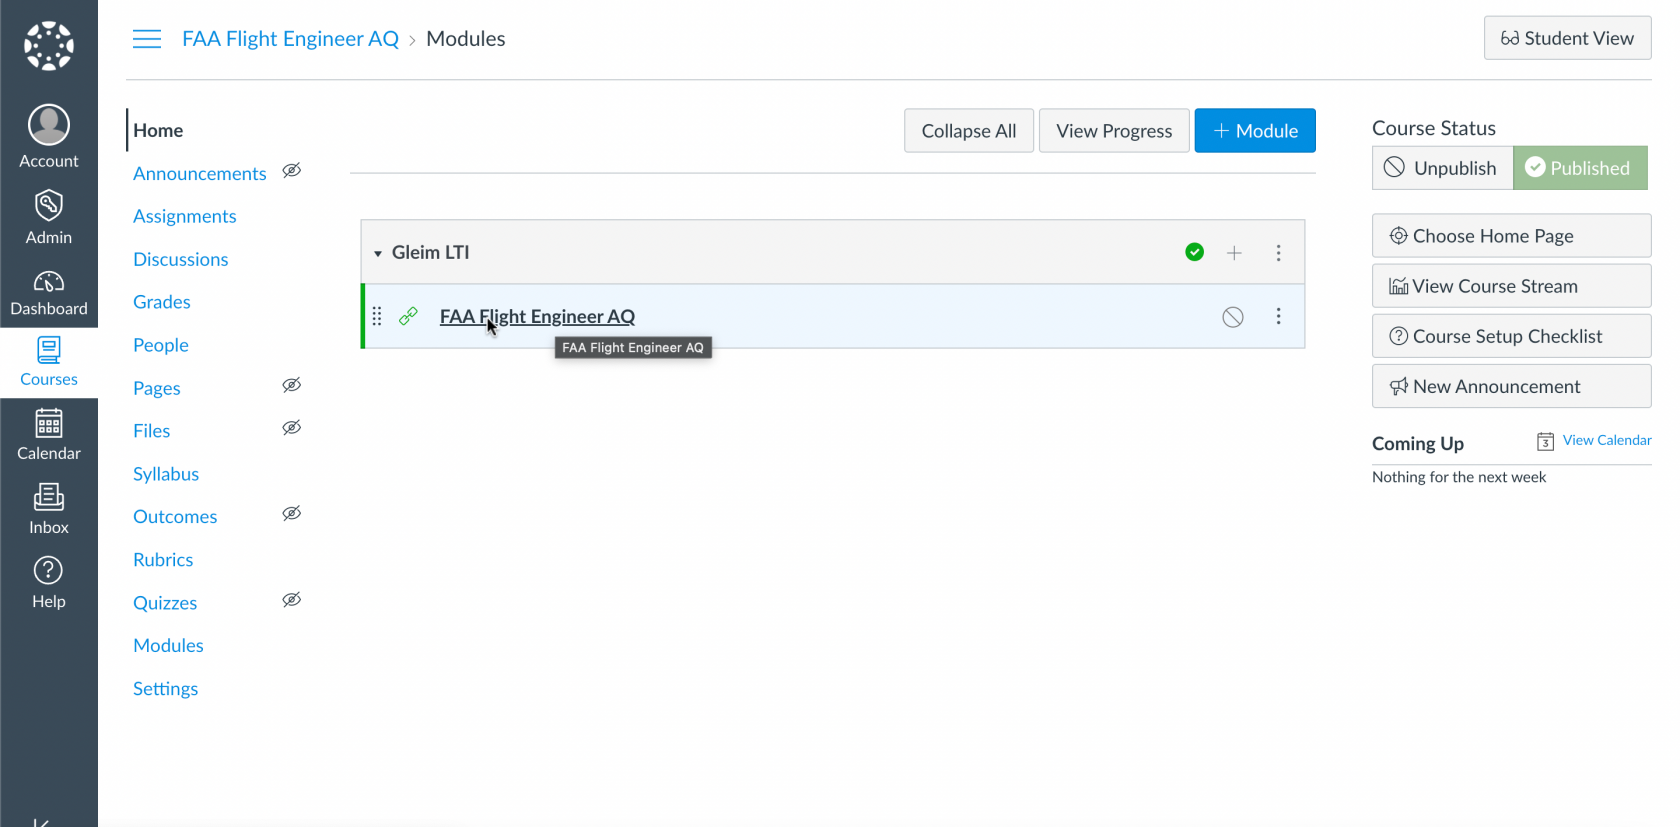
  2. Once you are on the course ‘Home’ page, click the blue + Module button. Create a module labeled “Gleim LTI,” and click “Add Module.”
  3. In the Gleim LTI module, click the plus sign to add a new activity.

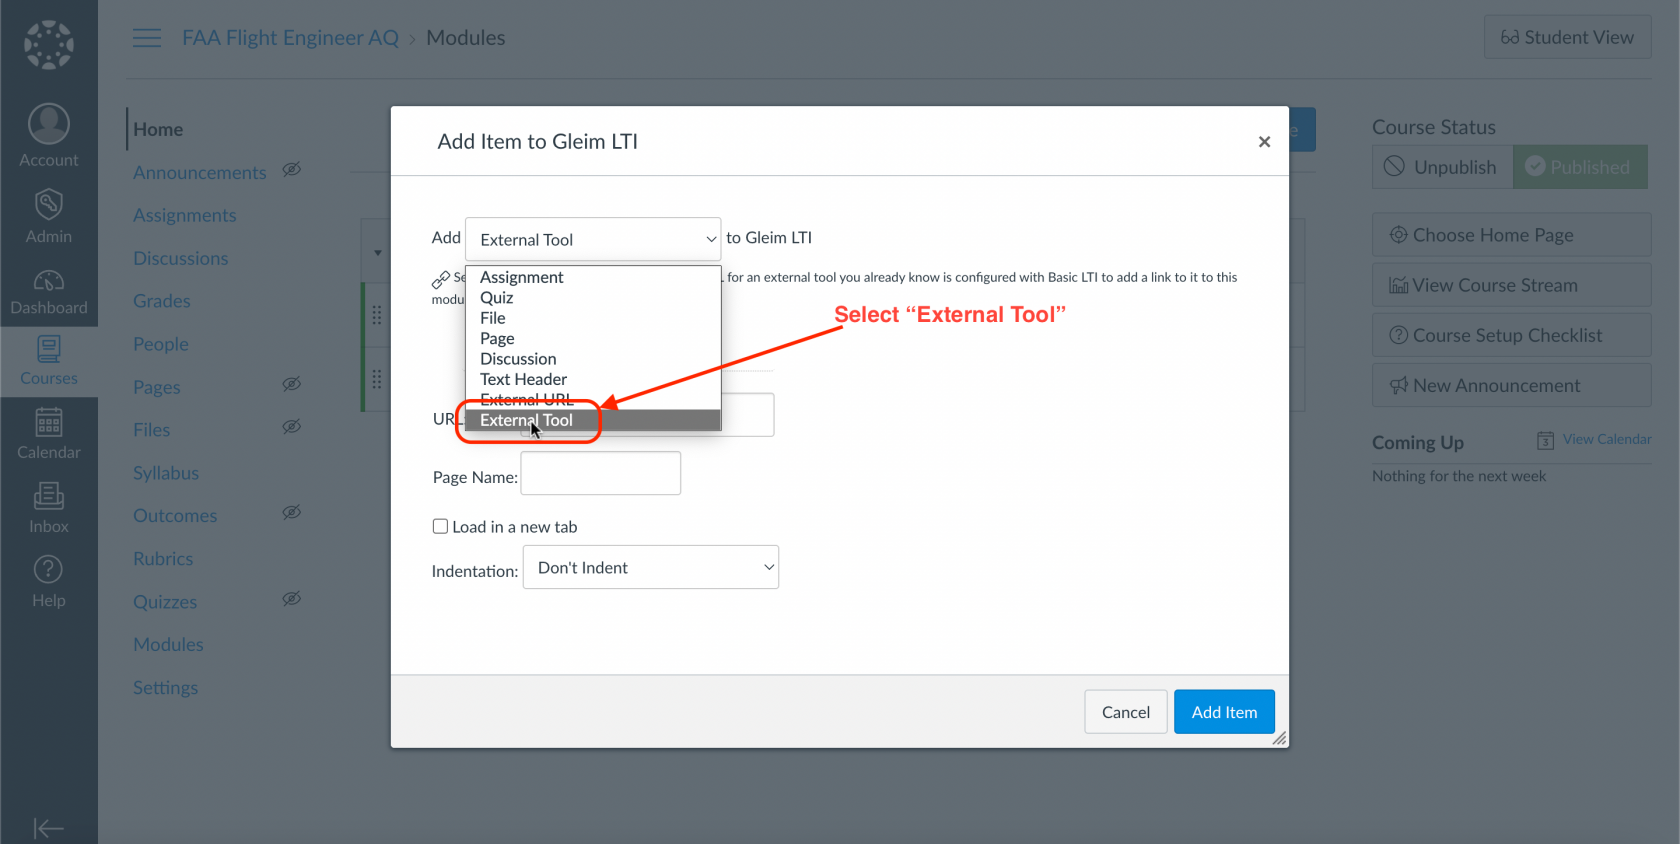
  4. Select “External Tool” from the dropdown menu.
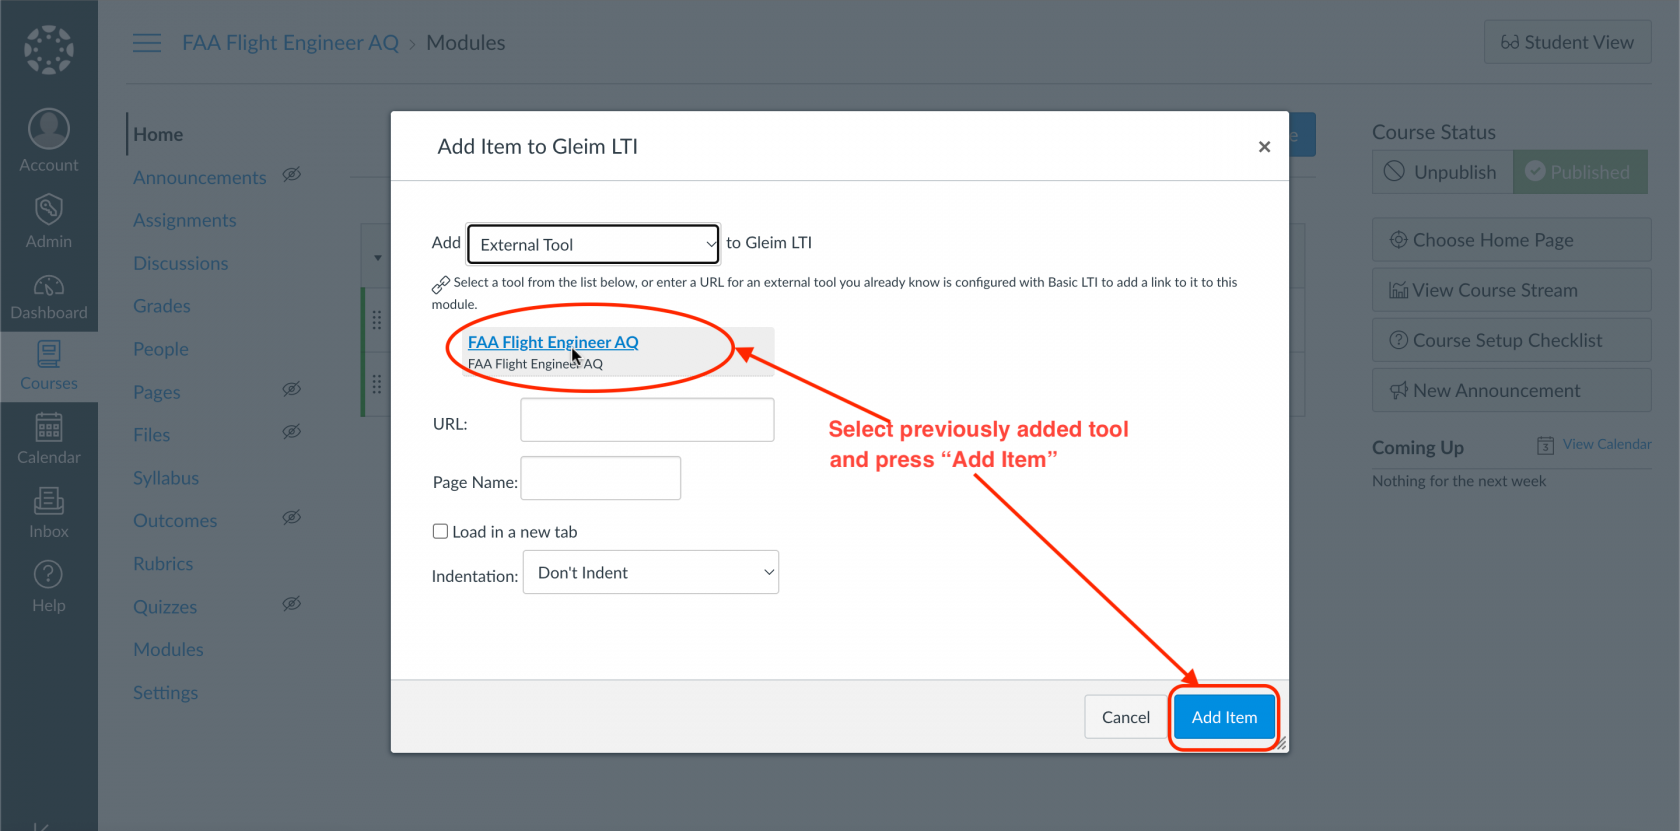
  5. Select the tool installed by your administrator, then click the blue “Add Item” button.
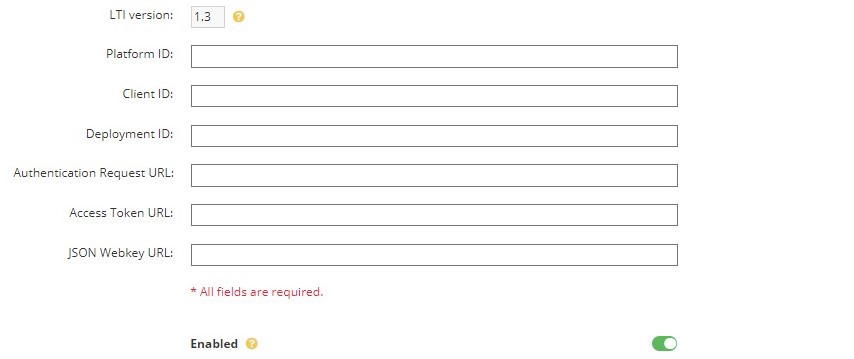
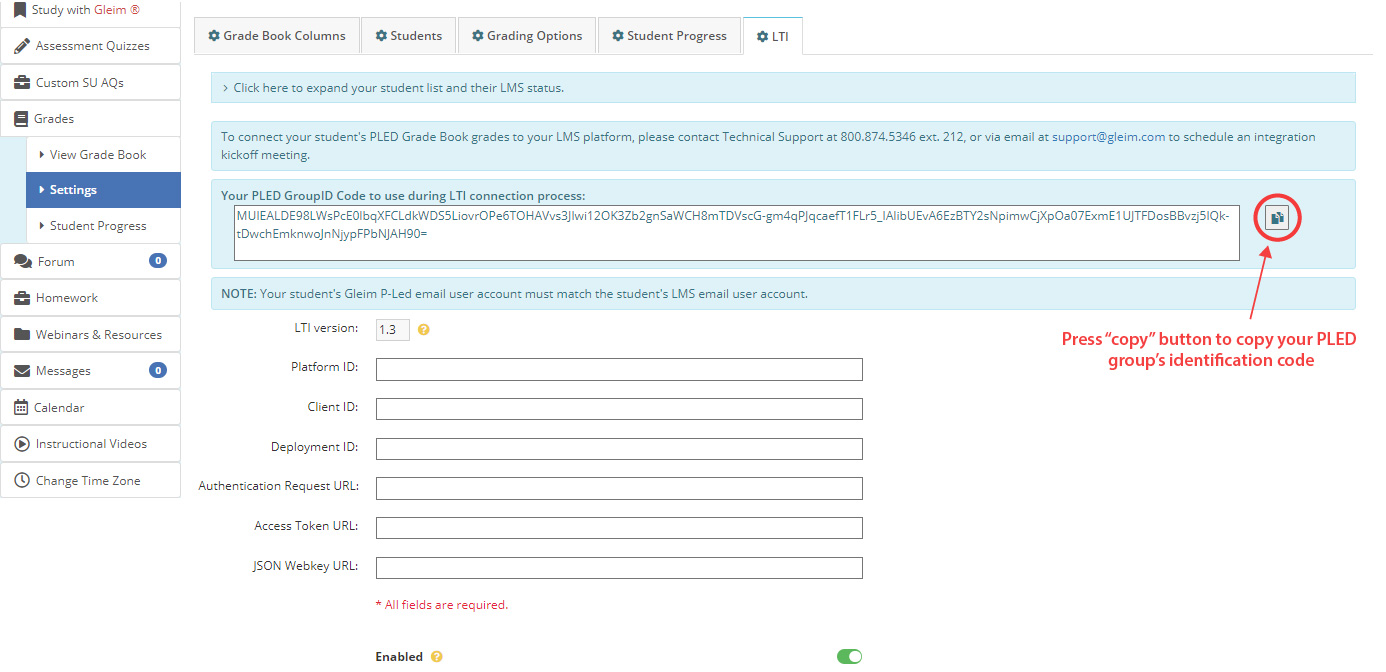
  6. Return to your Gleim Professor-Led Group. Navigate to the LTI Tab located under Grades > Settings > LTI. Fill in the form using the information provided below.

    You will need to use the Client ID from the Developer Key created by your administrator (Step 5 of Administrator Instructions) and the Deployment ID from the tool’s settings (Step 13 of Administrator Instructions.)

    If you are a returning user with an existing Developer Key, reuse your client ID and all of the other tool configuration values listed below other than the deployment ID. 

    Platform ID: https://canvas.instructure.com
    Client ID: Your client ID from the LMS integration setup.
    Deployment ID: Your deployment ID from the LMS integration setup
    Authentication Request URL: https:///api/lti/authorize_redirect
    Access Token URL: https:///login/oauth2/token
    JSON Webkey URL: https:///api/lti/security/jwks

    Ensure that the LTI tab is set to “Enabled.” Click the “Save Settings” button once the information has been entered.

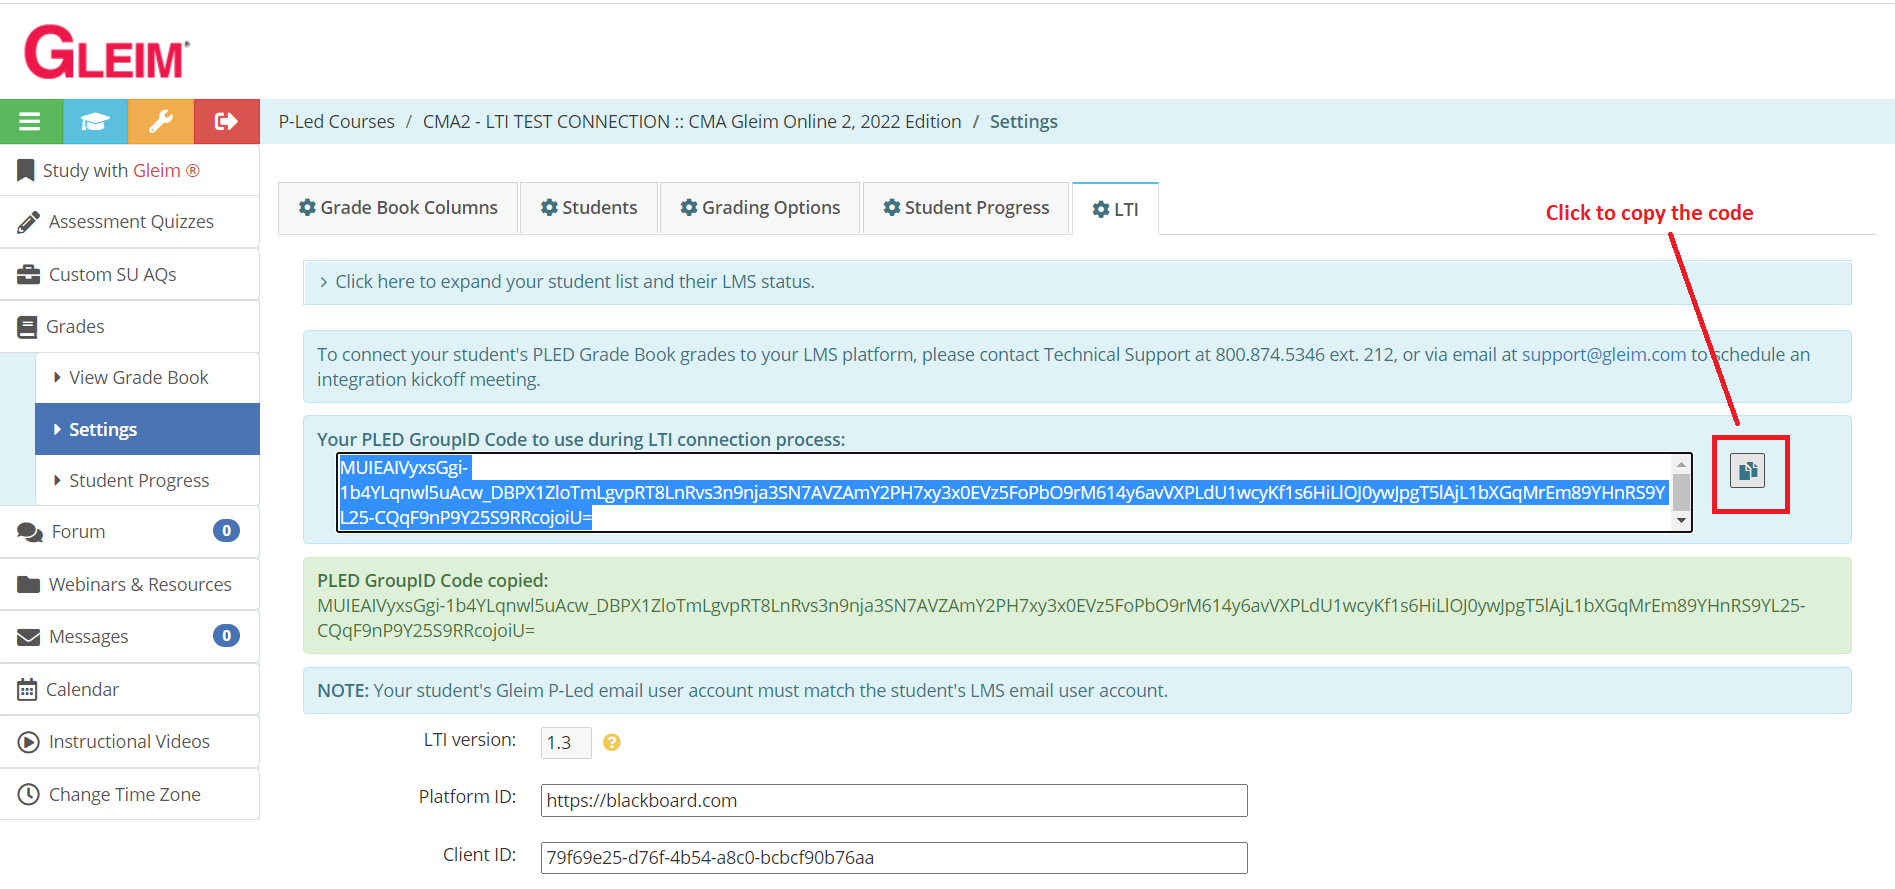
  7. Next, ensure you copy the “PLED GroupID Code,” which you will use to connect your LMS course to your Professor-Led group when you perform the launch.
  8. Return to the Canvas course. On the course ‘Home’ page, via the button under “Course Status” on the right side column, publish the “External Tool” module added in Step 3. This is so that the students would be able to connect their accounts. It is recommended to update the module requirements to require your students to view the item. This ensures that they will connect their account to the course.
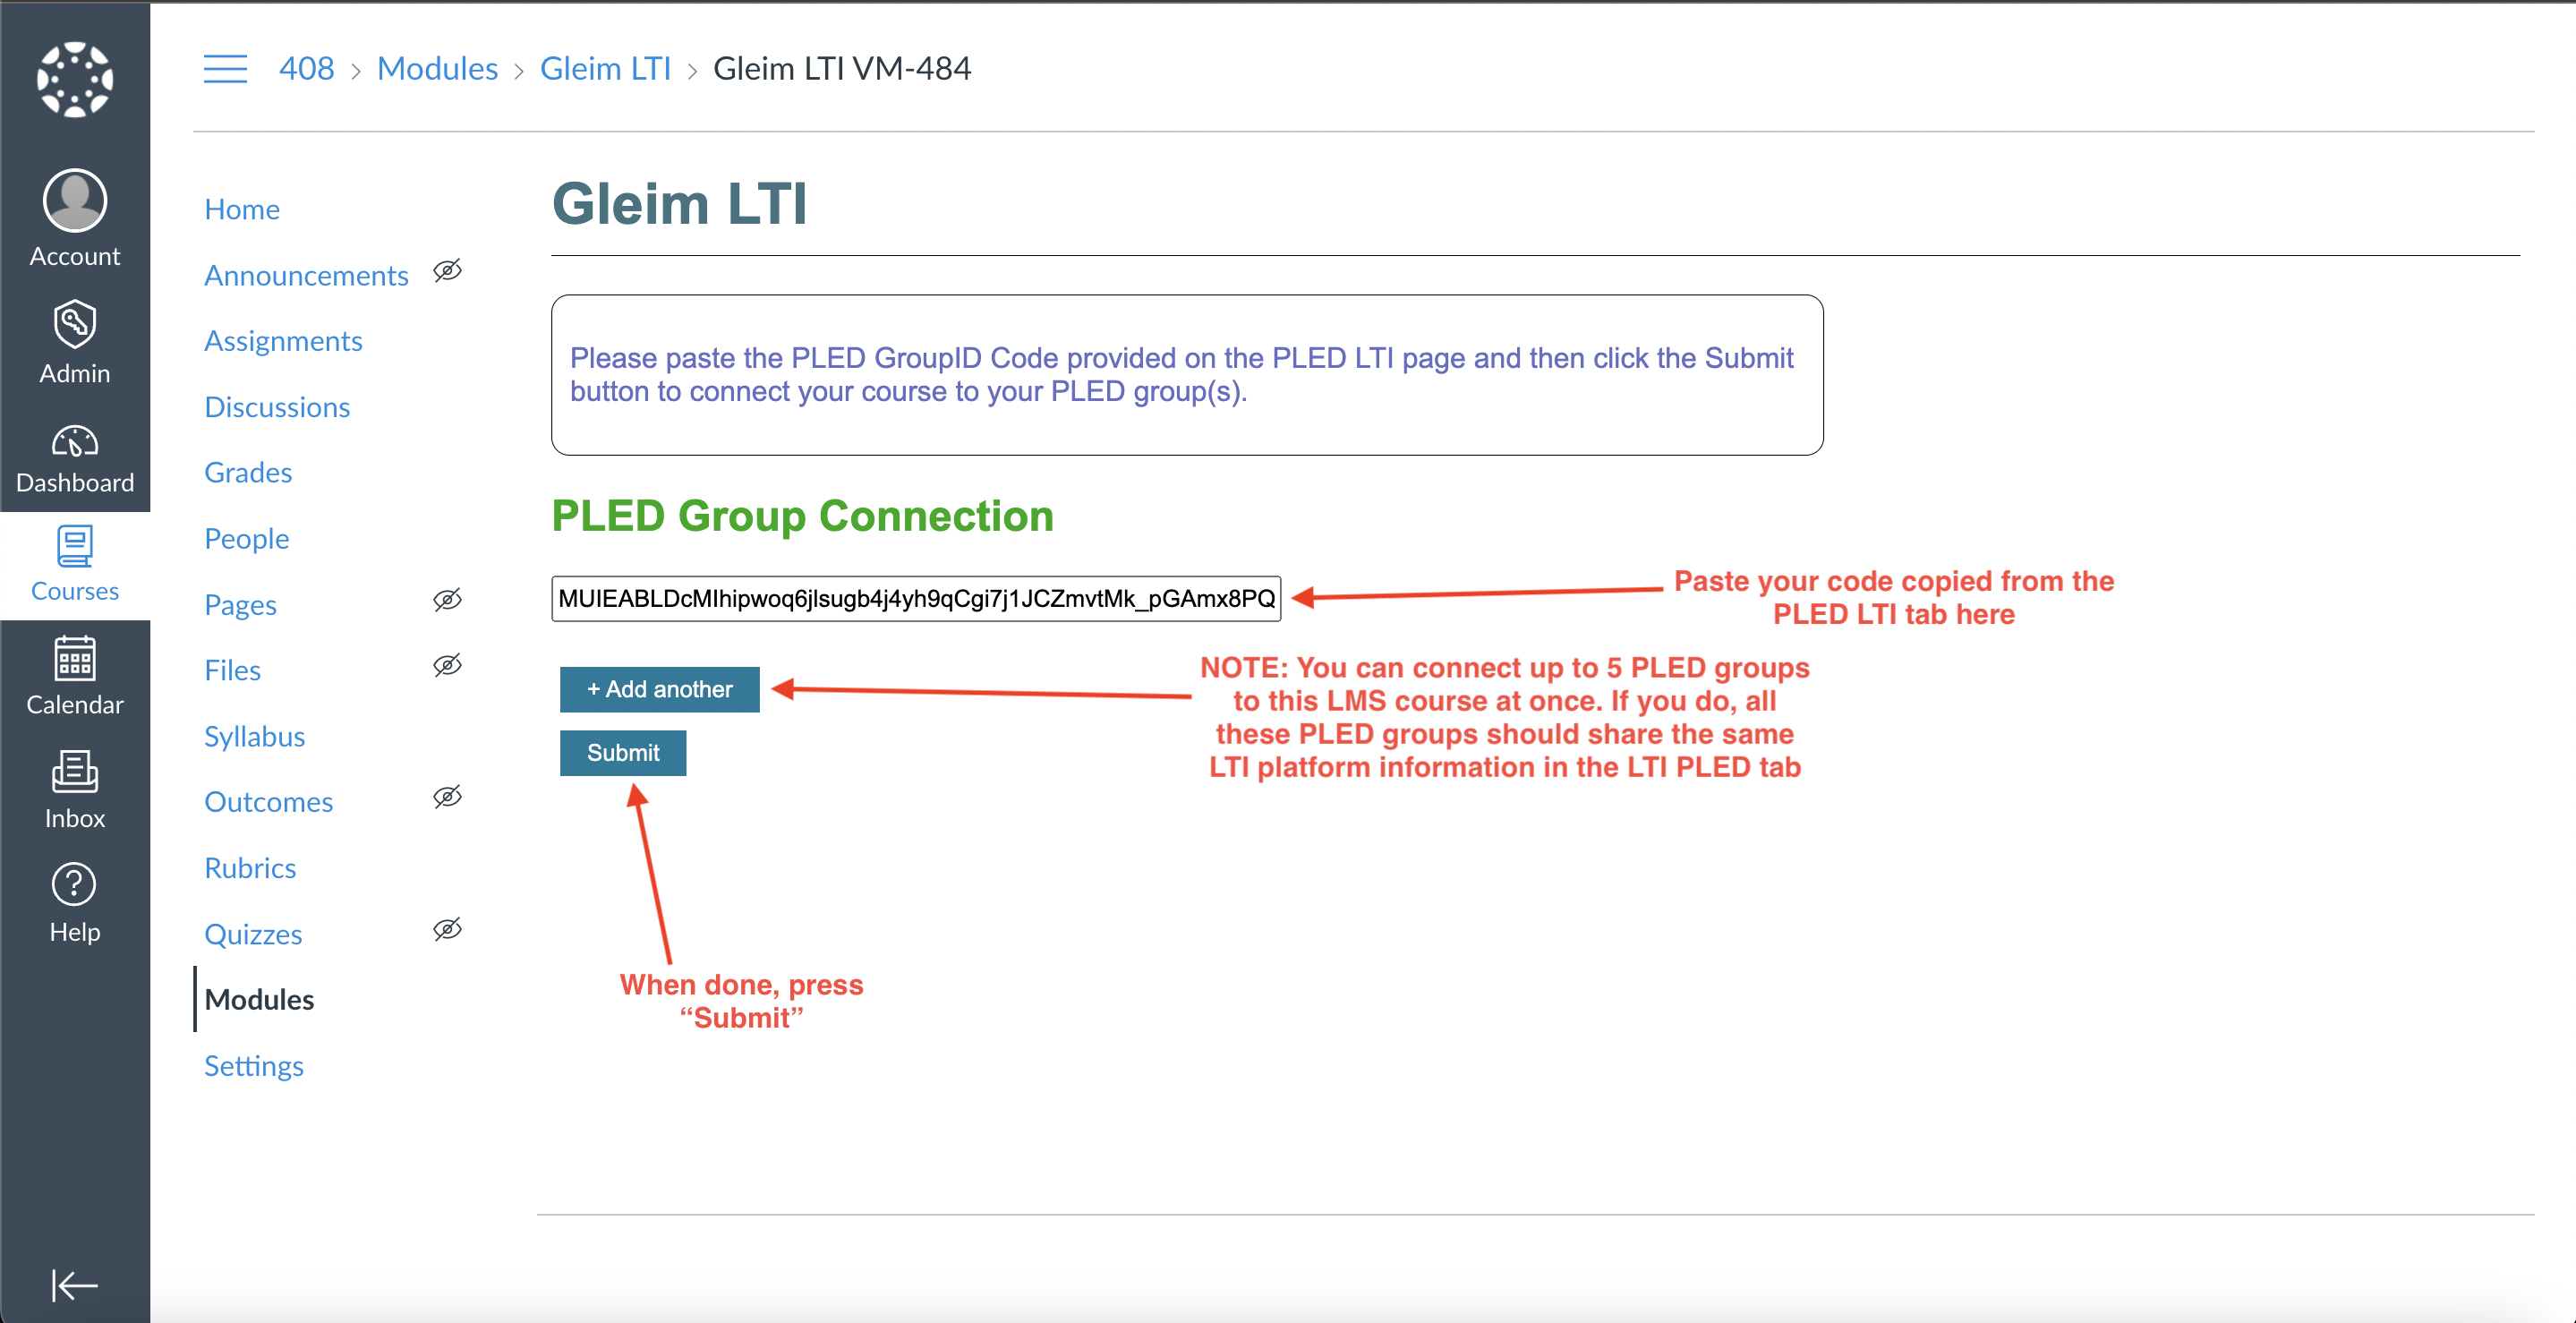
  9. When launching the “External Tool,” you will be prompted to enter the PLED GroupID Code copied in step 7 to connect your Professor-Led group to the LMS course. Paste the identification code from the Professor-Led LTI tab and press “Submit.” You should see a green “Success” message. Via the “Add another” button:
    • You may connect up to five Professor-Led groups to your LMS course at once, but note that a P-Led group can only be connected to one course at a time.
    • If you have already connected your group to another LMS course or are planning to do so, note that connecting a previously connected Professor-Led group to another LMS course will override the connection.
    • If you connect multiple groups, they must also share the same platform information in the “LTI” tab.
  10. Request your students to click the LTI module and connect their account. It is critical that your students complete this assignment to allow their grades to be transmitted from Gleim to Canvas.
     
  11. Once you have enrolled your students in your Professor-Led group, you can review each of your students’ connection status using the “Click here to expand your student list and their LMS status” dropdown on the LTI tab within your Professor-Led course. A table on the LTI tab provides each student’s name, email, and LMS connection status. The LMS status will display one of three symbols:
    • A green filled circle with the tool tip “Successfully synced to LMS grade book”, indicating that the student has been connected to the LMS;
    • A yellow triangle with the tool tip “An error has occurred during sync,” indicating that the student’s attempt to connect to the LMS was unsuccessful; or
    • An empty circle with the tool tip “LMS sync has not been initiated,” indicating that the student did not attempt to connect to the LMS.

Students

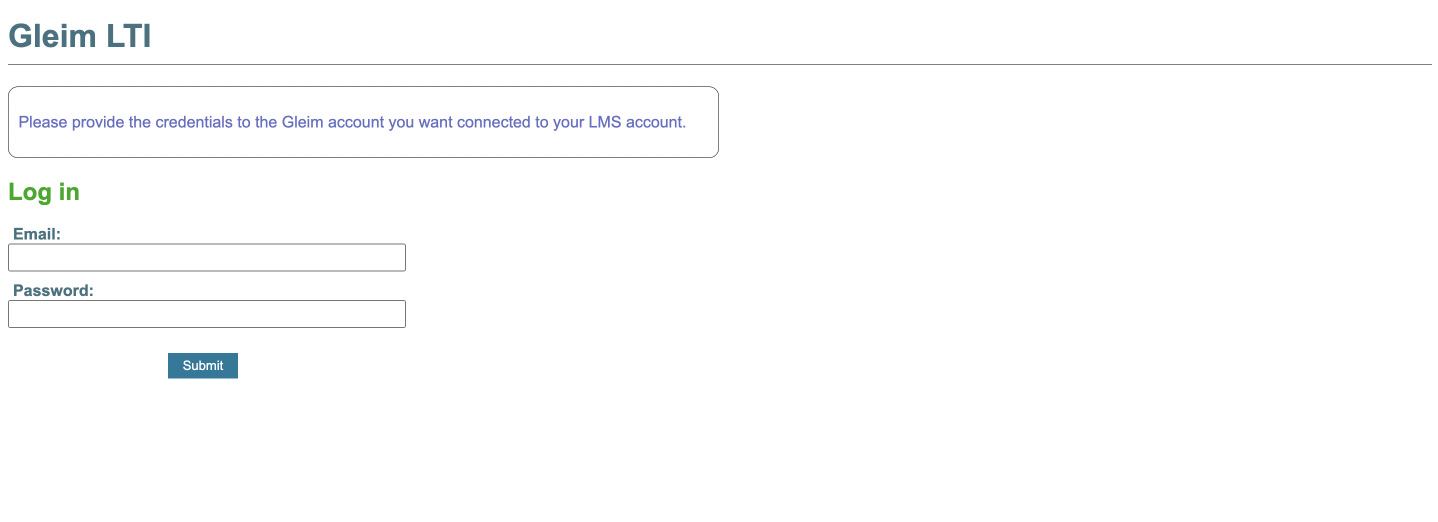
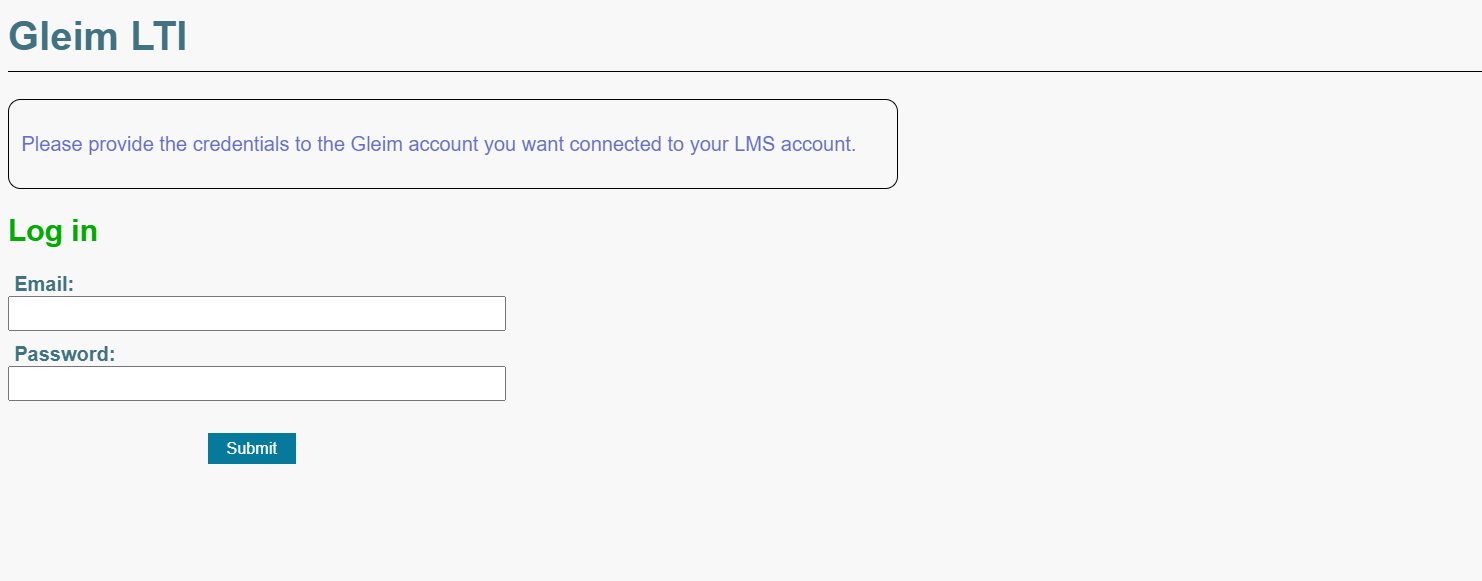
  1. In Canvas, launch the Gleim module requested by your instructor. Alternatively, click on the “Gleim LTI” assignment you see in your course. To connect your account to Gleim LTI, log in using your Gleim account credentials and press “Submit.”

      
    You should then see a green “Success!” message. You will not need to repeat this step unless you join a different P-Led group.

Moodle

LMS Administrators

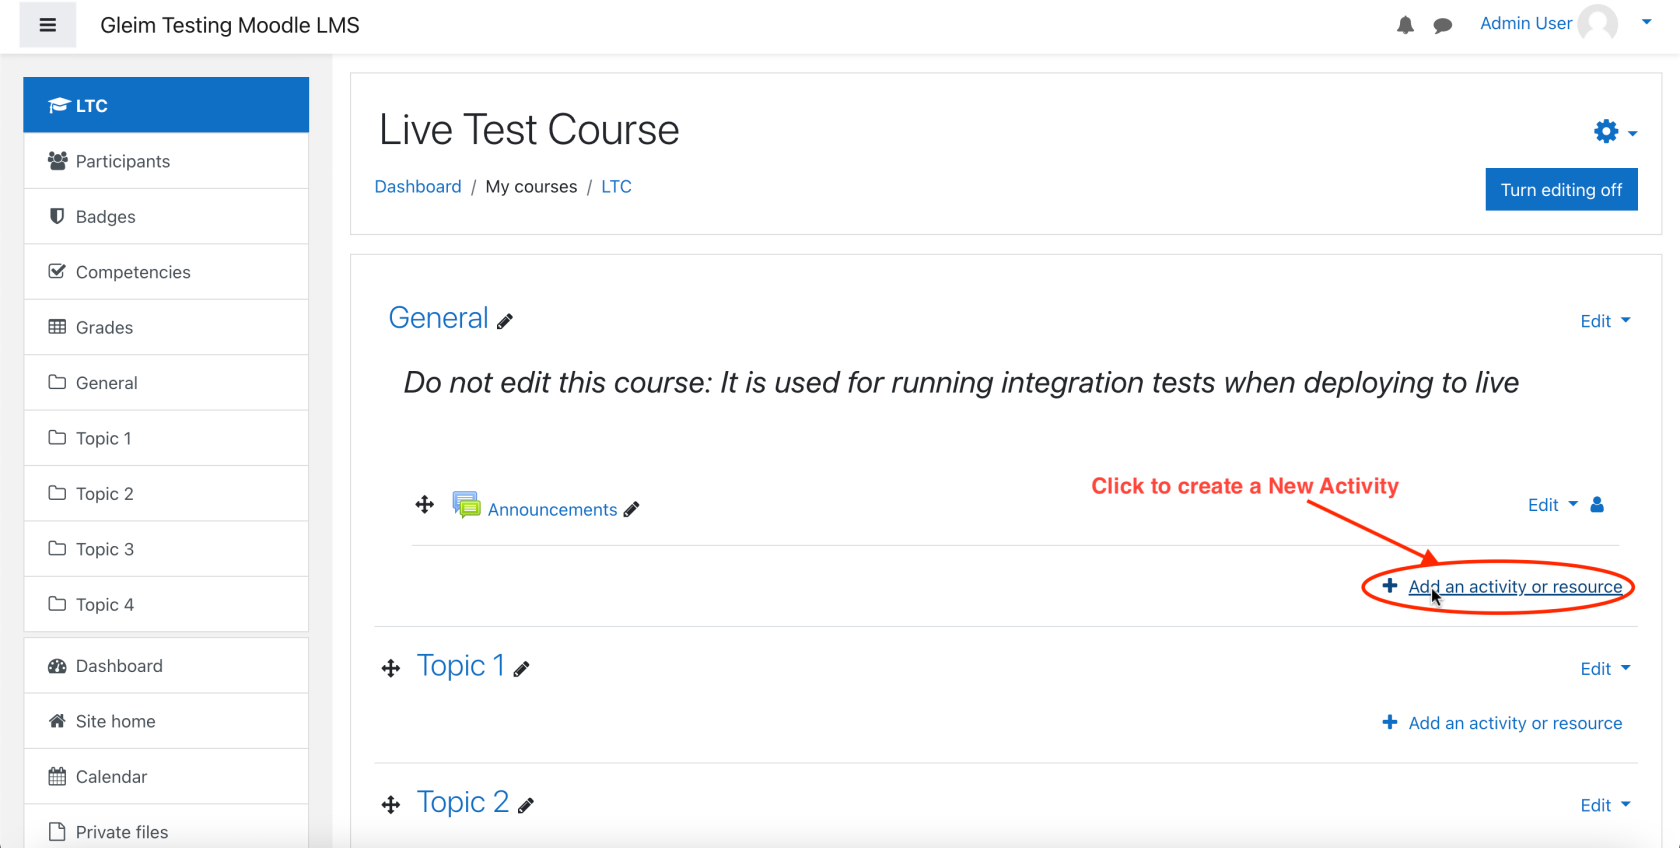
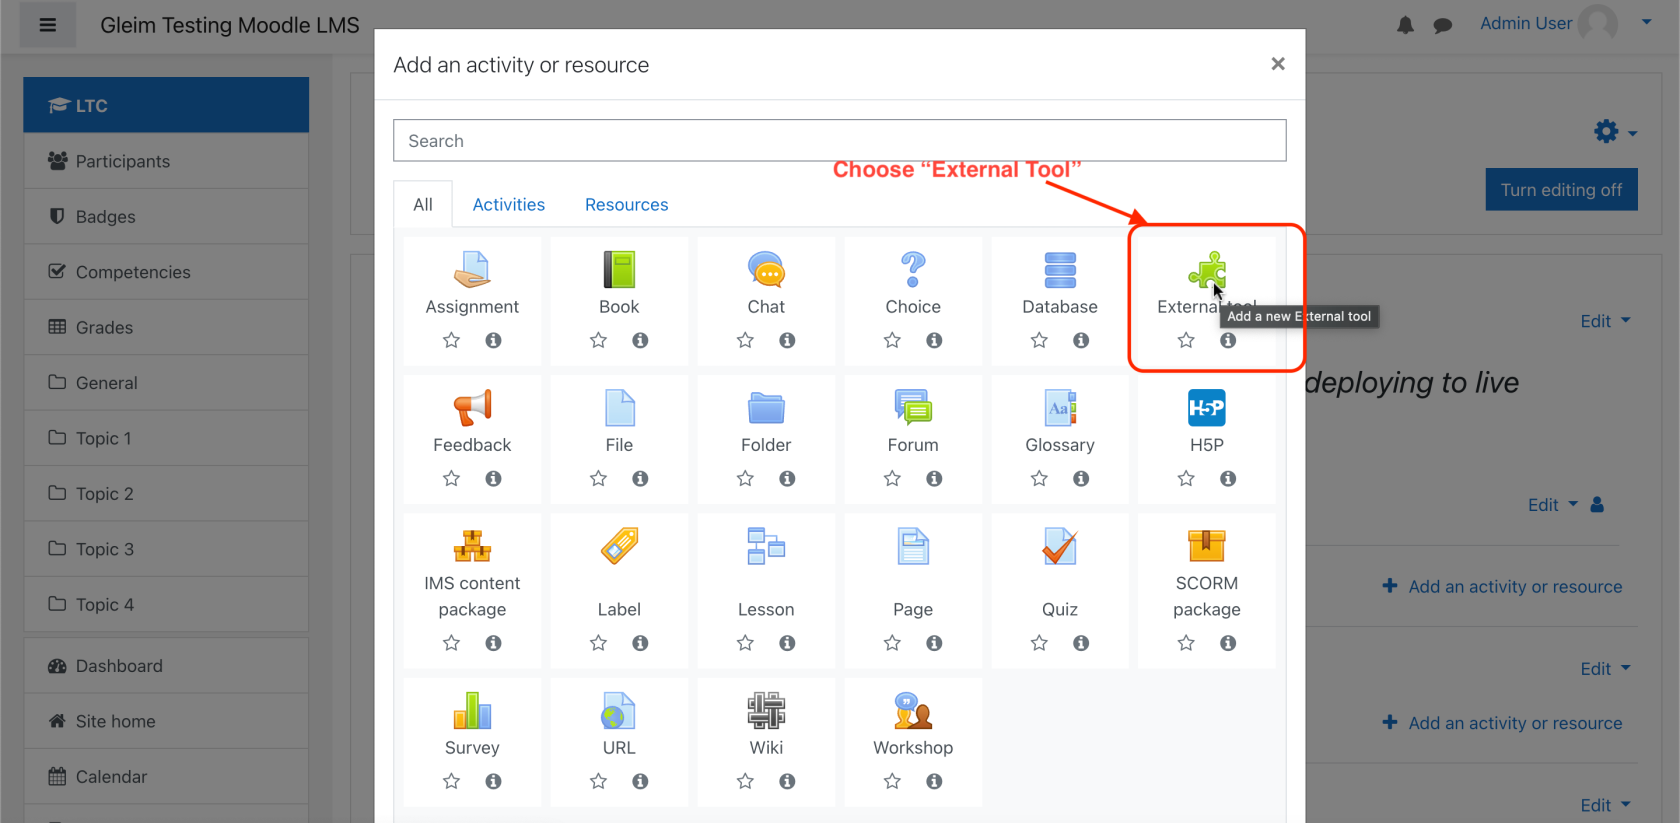
  1. In your Moodle course, ensure that editing is on in the top right corner of the page. If editing is off, toggle the blue “Turn editing off” button to enable editing. Then, click the “Add an activity or resource” link in the “General” subsection.
  2. Select “External Tool.”
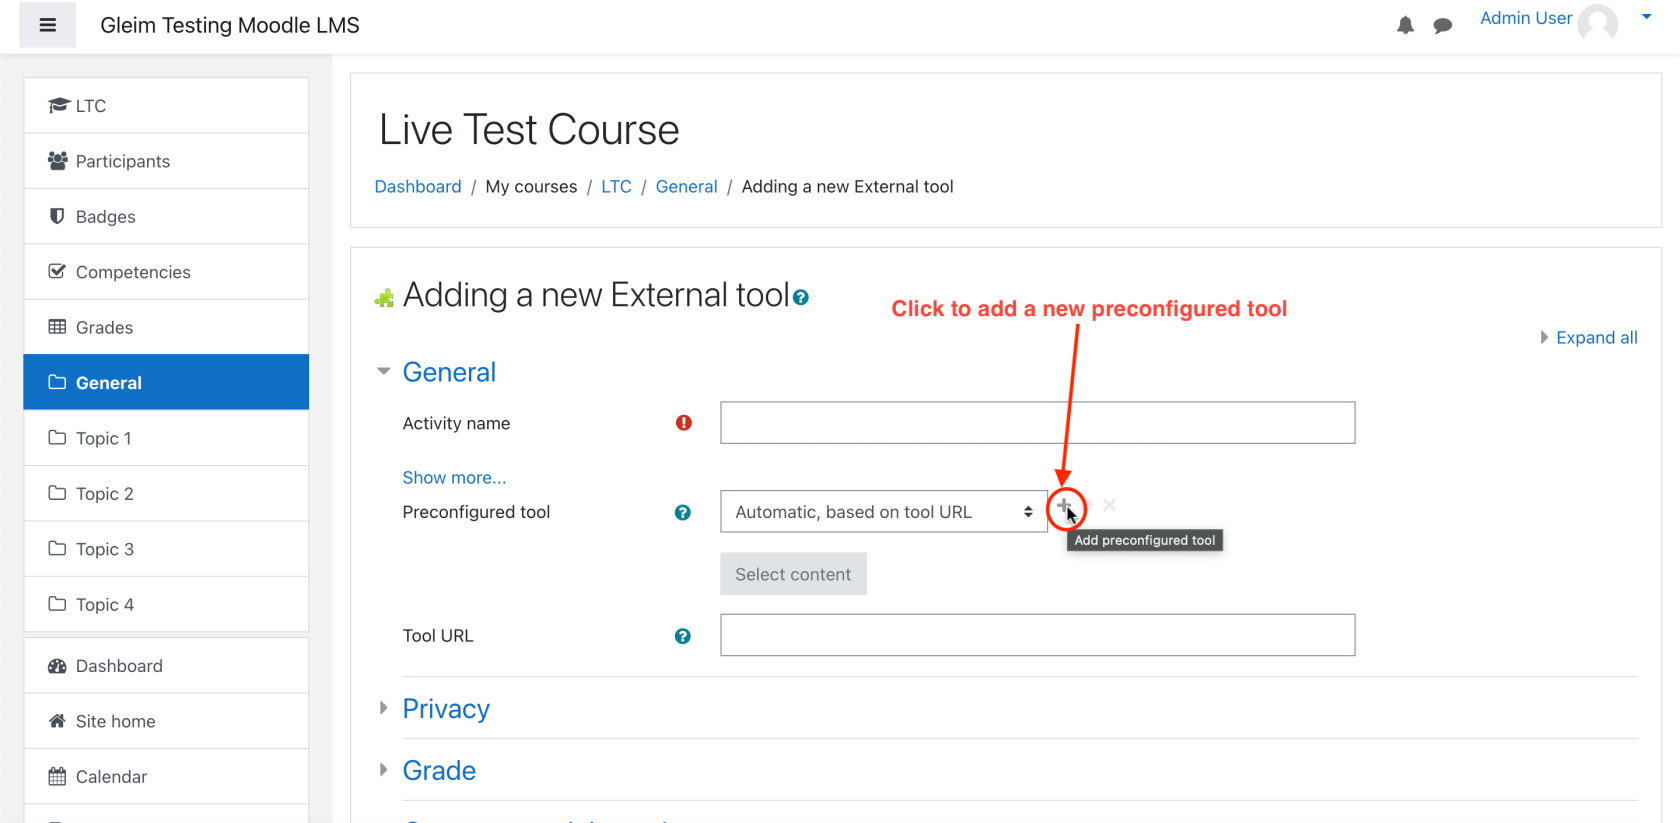
  3. Add a new tool to the course by clicking the “+” button next to the Preconfigured tool dropdown menu.
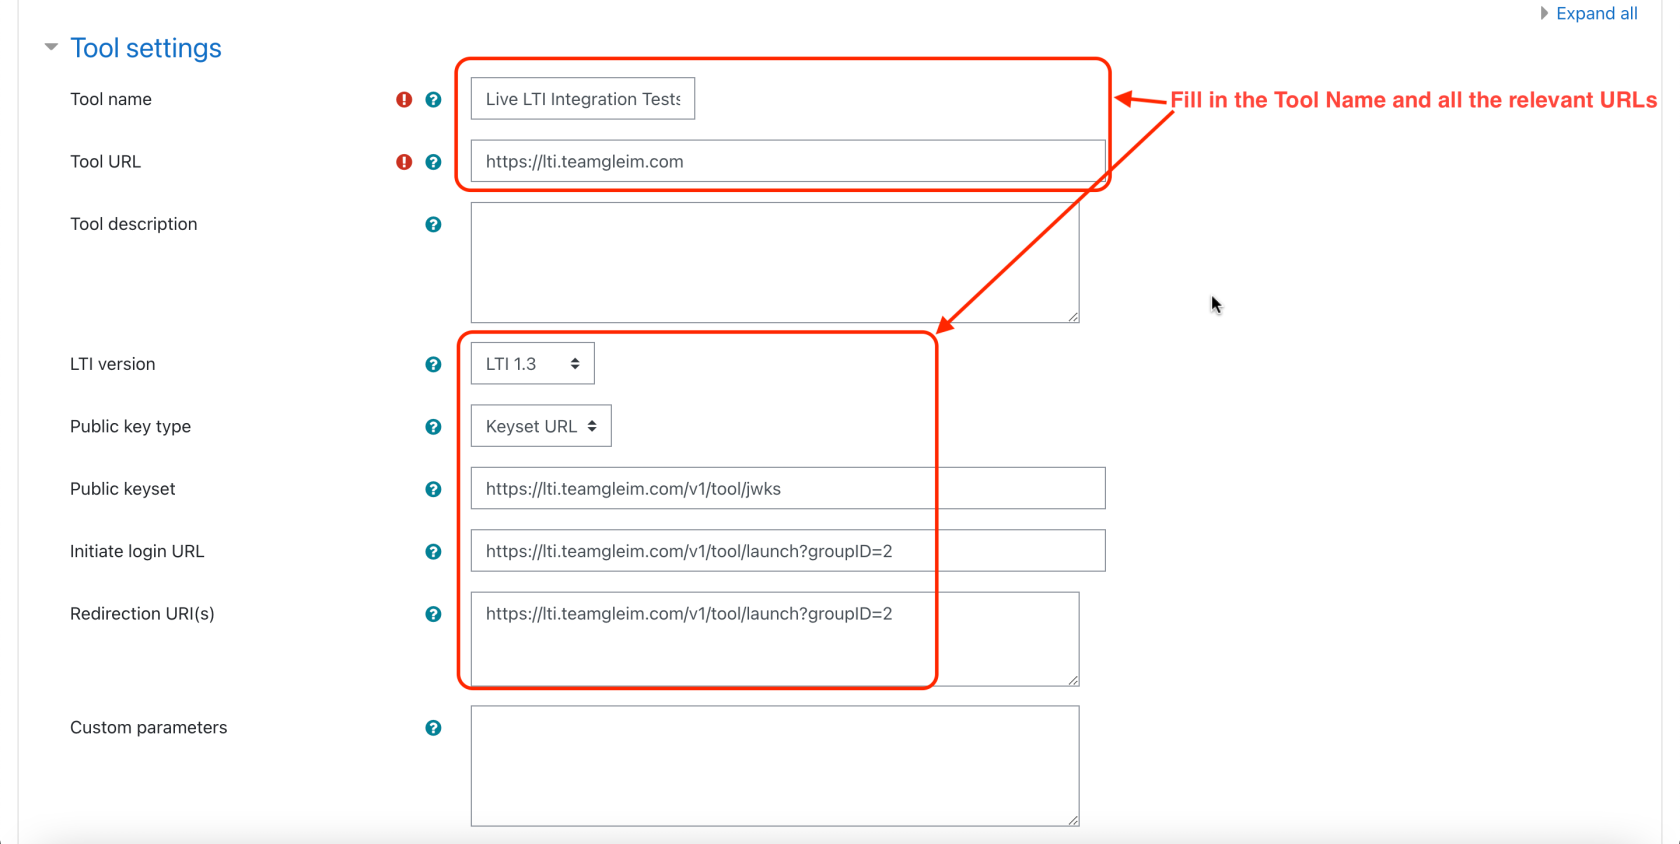
  4. Enter the Professor-Led AC / AvLearn LTI information using the following tool configuration values:

    Tool name: Live LTI Integration Tests
    Tool URL: https://lti.teamgleim.com
    LTI version: LTI 1.3
    Public key type: Keyset URL
    Public keyset: https://lti.teamgleim.com/v1/tool/jwks
    Initiate login URL: https://lti.teamgleim.com/v1/tool/launch?groupID=2
    Redirection URL(s): https://lti.teamgleim.com/v1/tool/launch?groupID=2

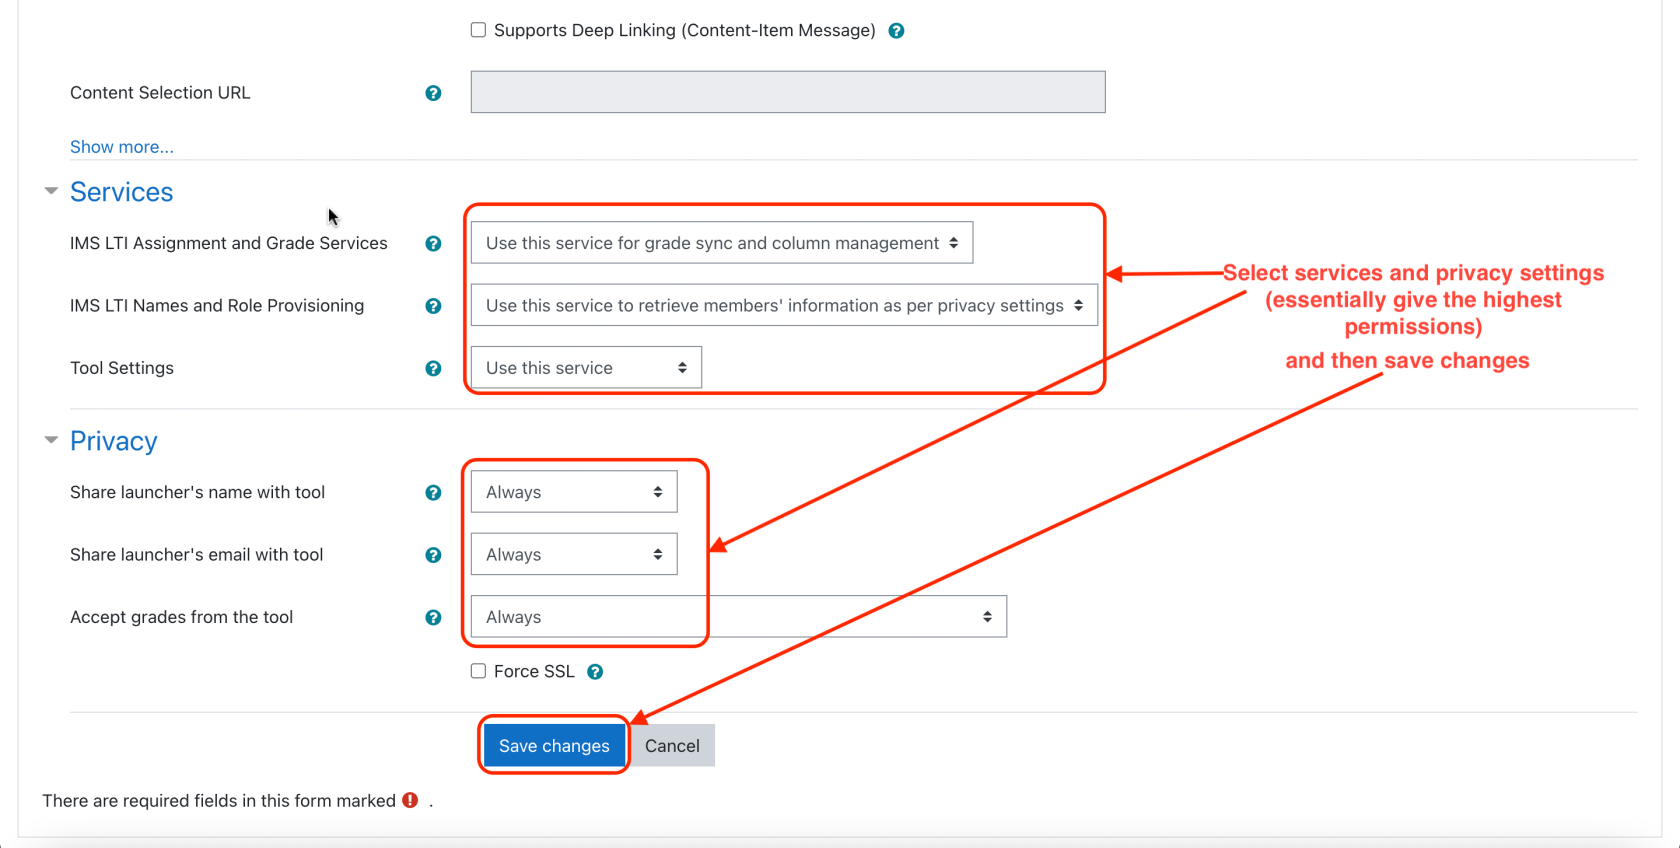
  5. Ensure that the required permissions in the “Services” and “Privacy” sections are enabled. These must be enabled for Gleim LTI services to work properly. Turn on the following settings and save changes.
     

    In the “Services” section:
    – IMS LTI Assignment and Grade Services:
    Use this service for grade sync and column management
    – IMS LTI Names and Role Provisioning: Use this service to retrieve members’ information as per privacy settings
    – Tool Settings: Use this service
     

    In the “Privacy” section:
    – Share launcher’s name with tool: Always
    – Share launcher’s email with tool: Always
    – Accept grades from the tool: Always

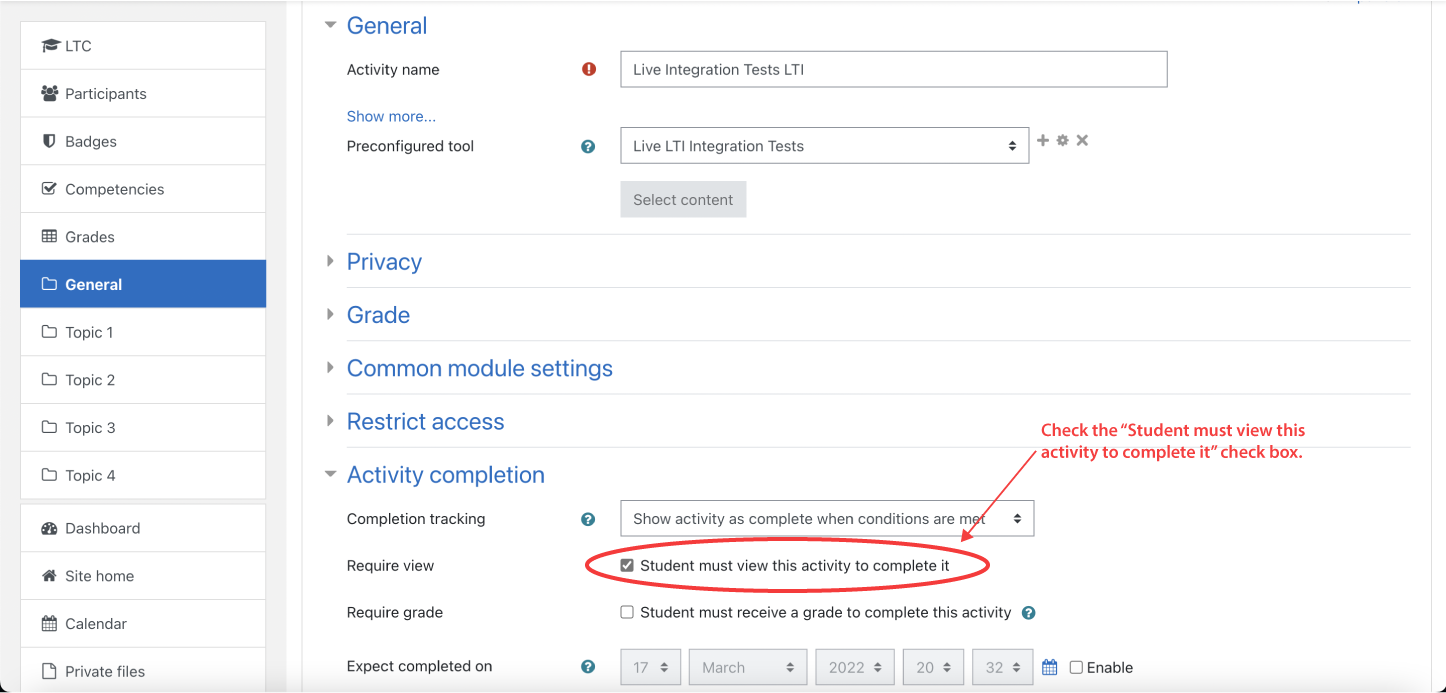
  6. Navigate to the “Activity completion” section. Under “Require view,” click on the check box next to “Student must view this activity to complete it” to turn on this setting.
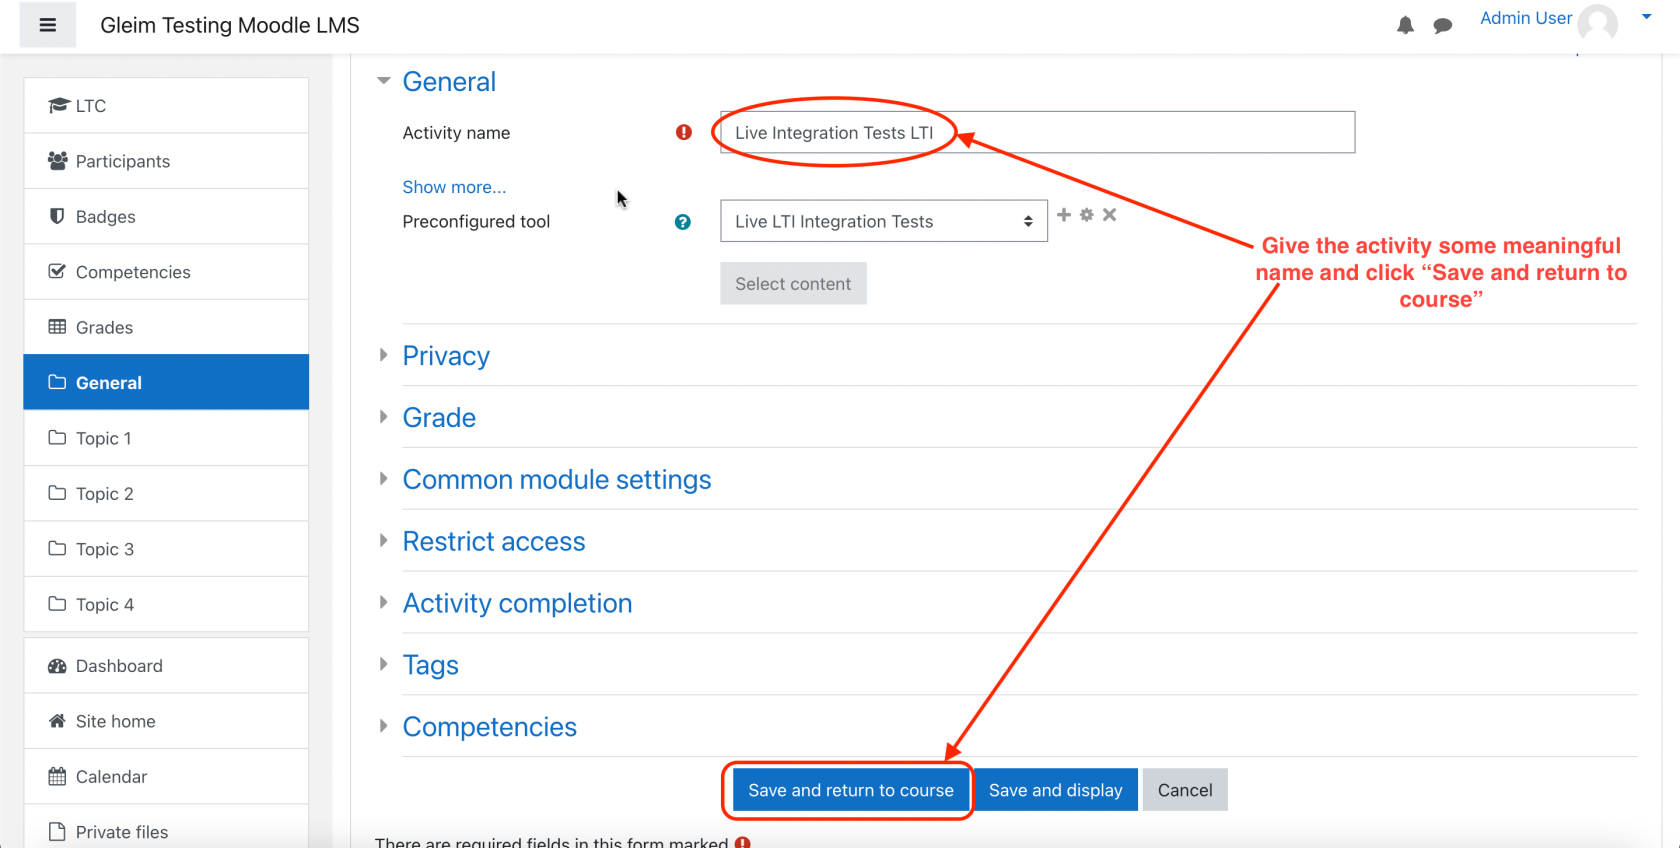
  7. In the “General” section, type in an activity name for this task and click the “Save and return to course” button.
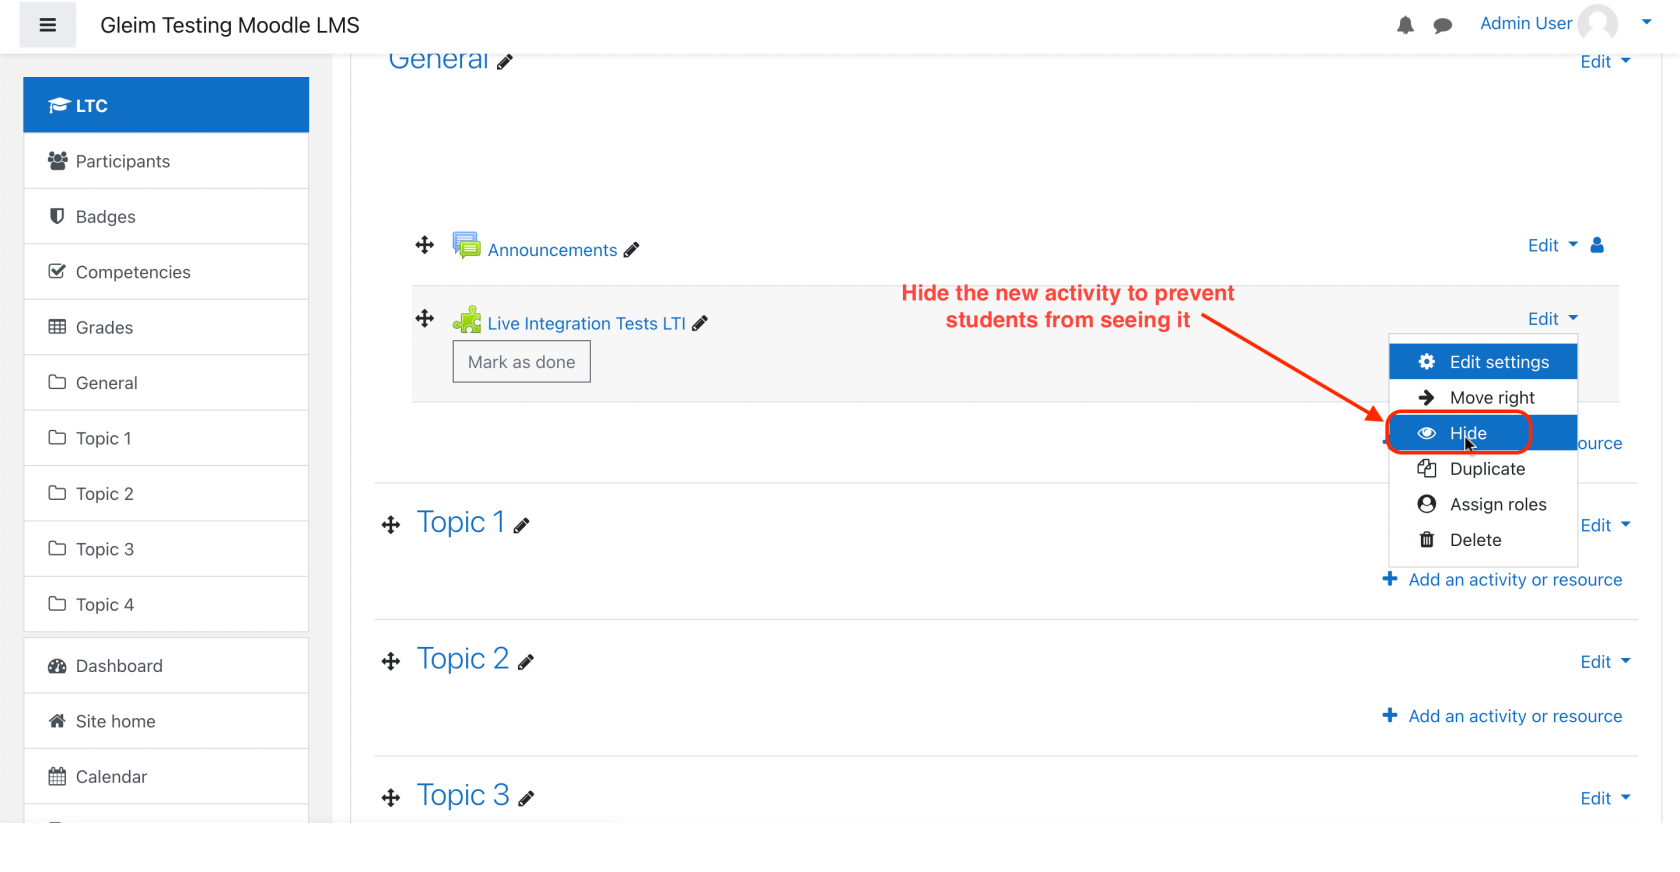
  8. Under the “Edit” dropdown menu on the right of the tool, click the option “Hide” accompanied with an “eye” icon to hide the activity from students to prevent confusion.
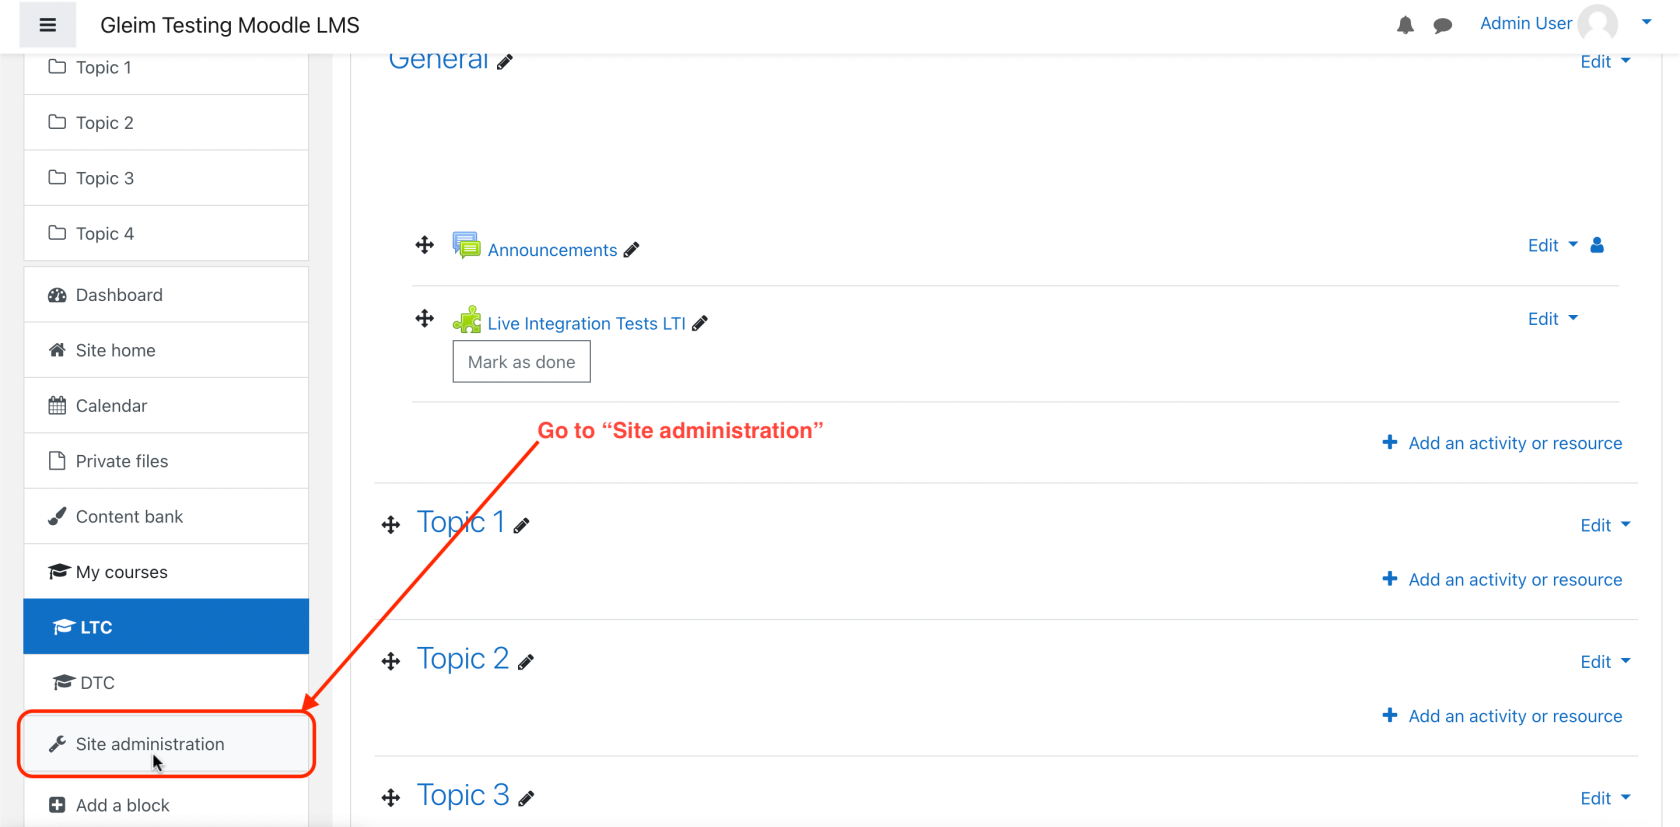
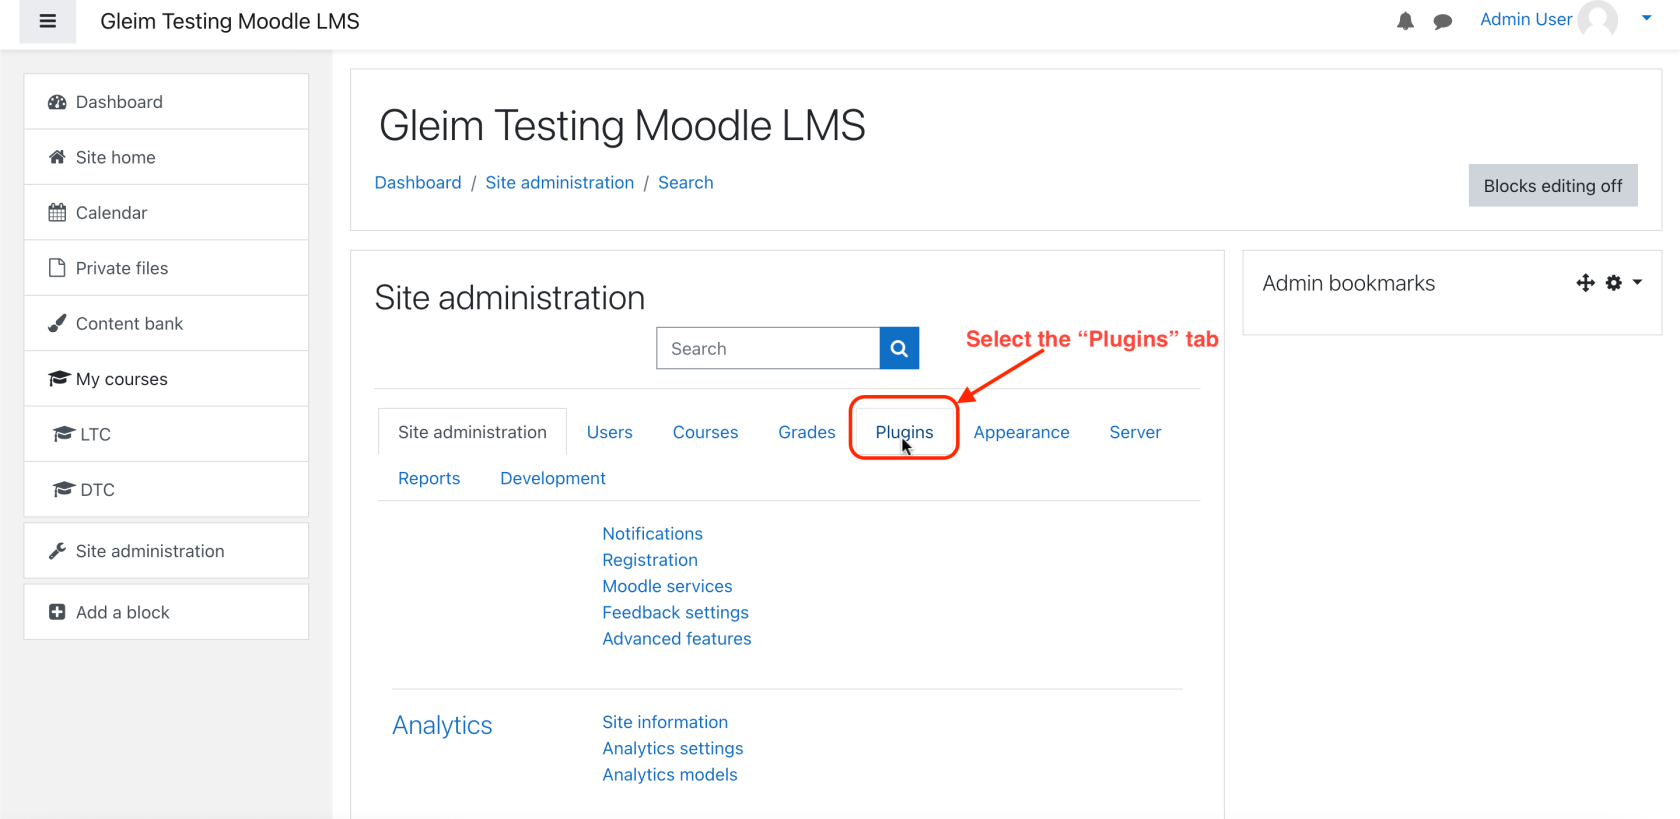
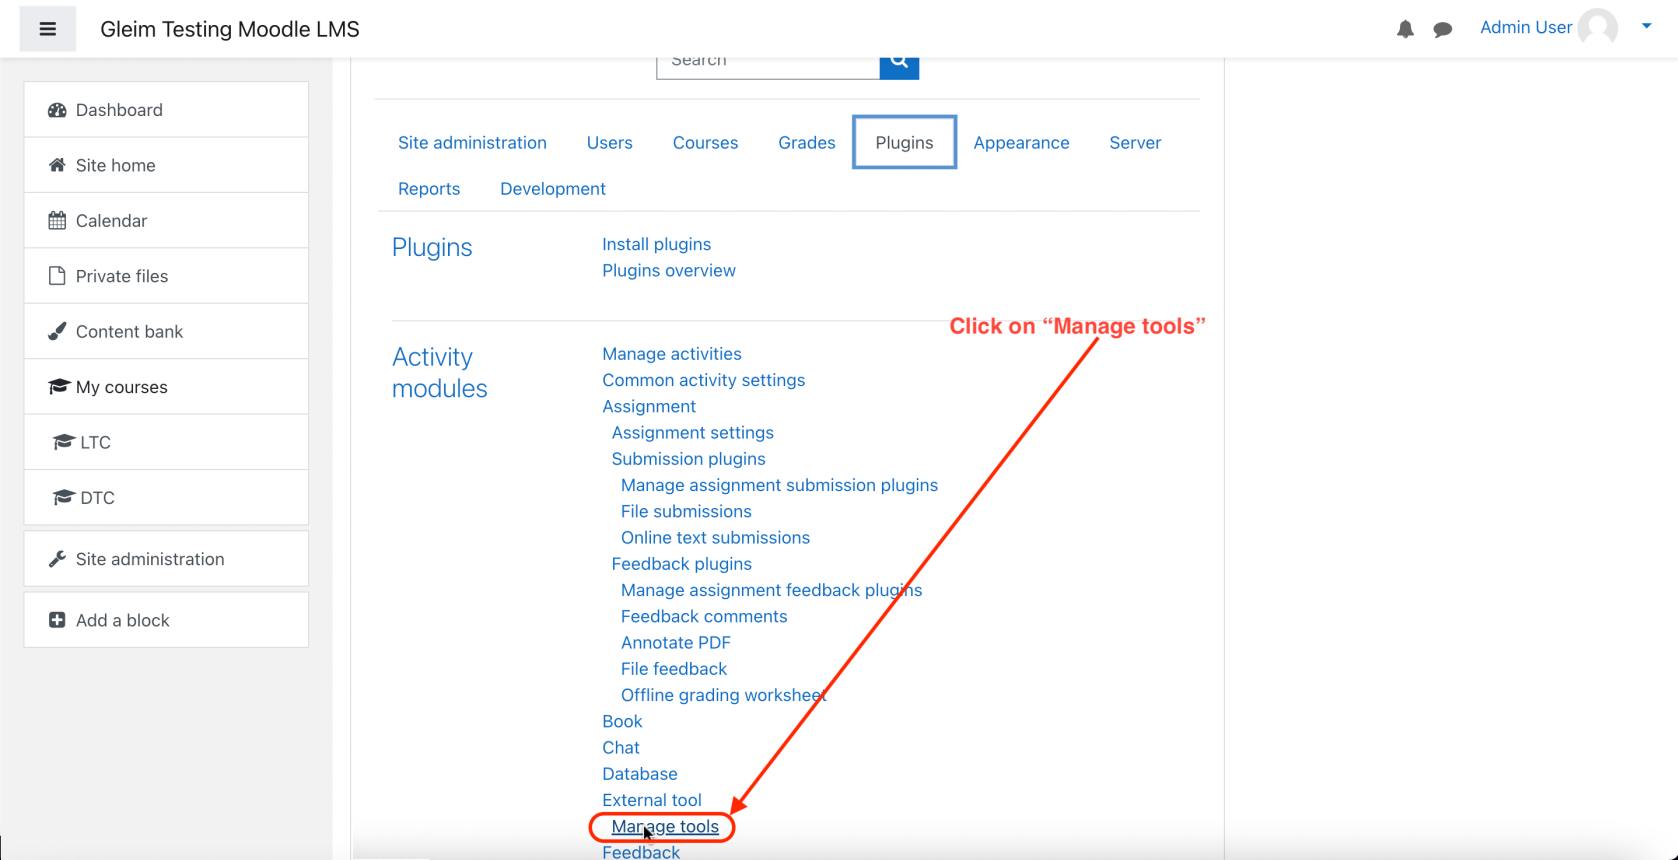
  9. On the lefthand navigation menu, navigate to “Site administration,” select the “Plugins” tab, and then select “Manage Tools.”


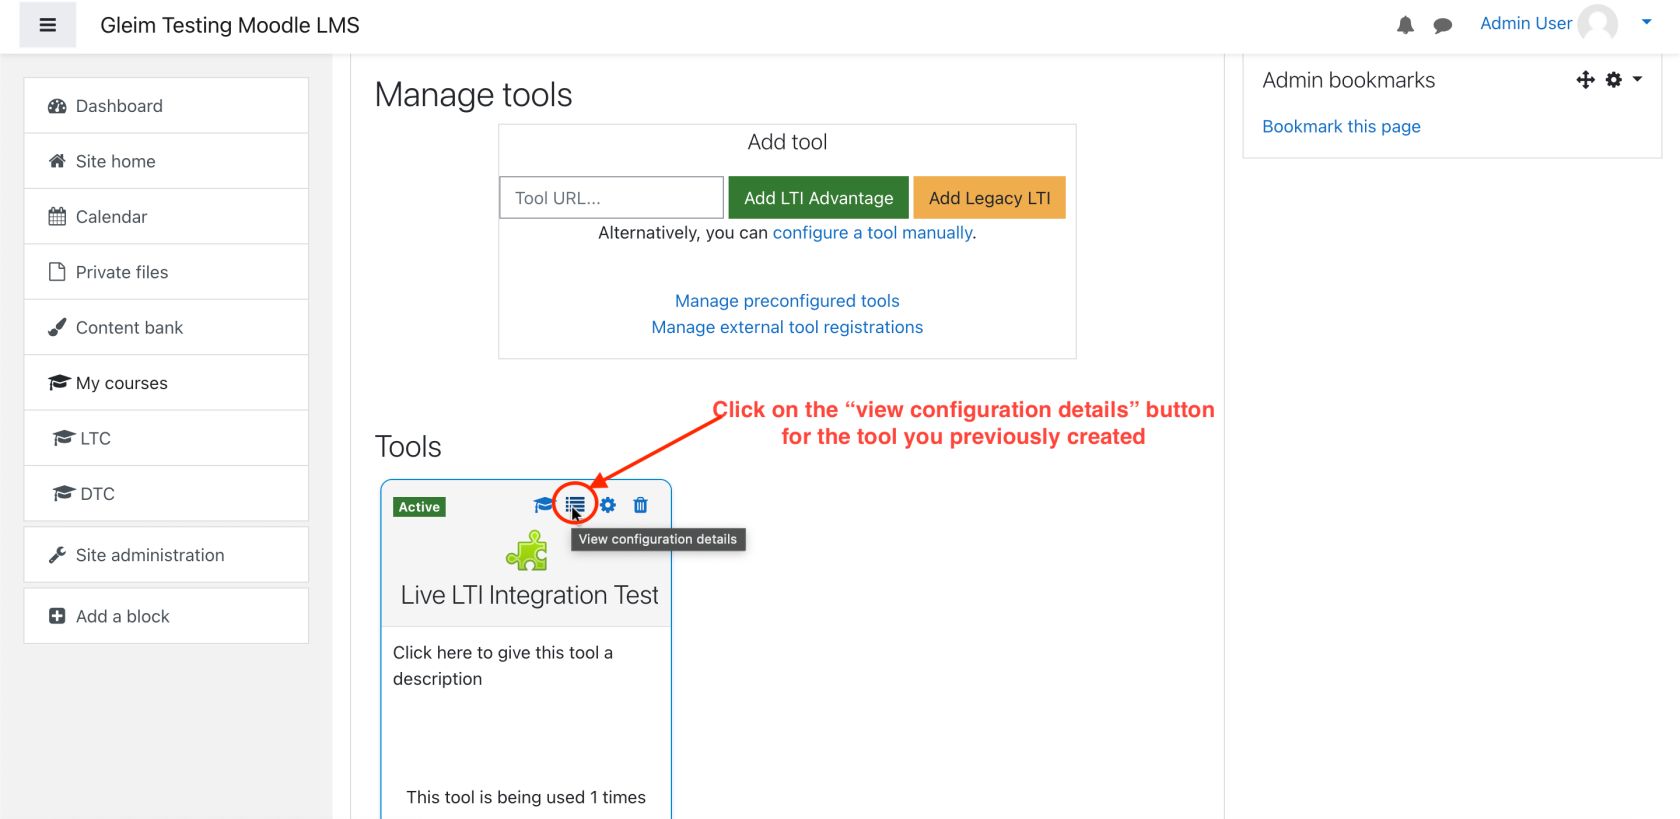
  10. For the tool you created, click the “View configuration details” button indicated by the “list” icon.
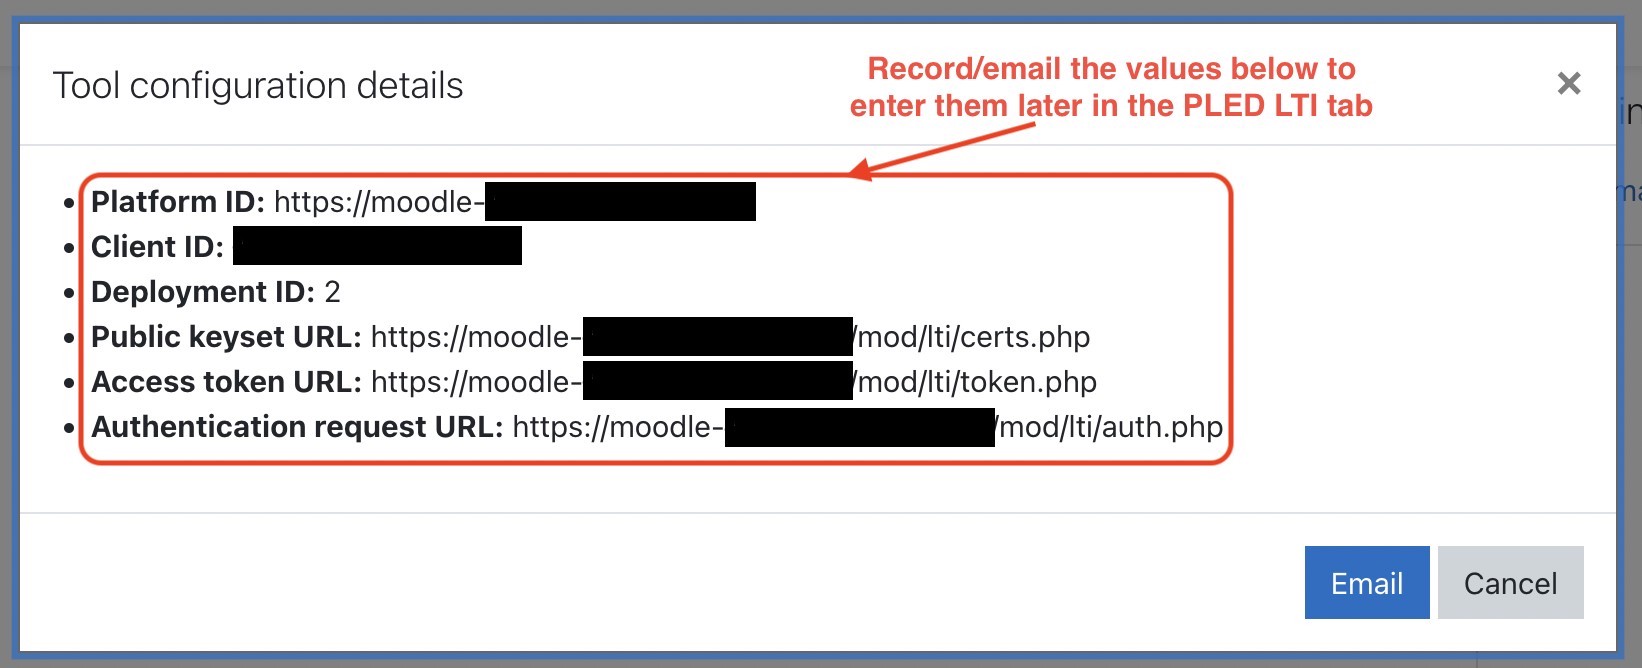
  11. Record the values displayed in the Tool configuration details. You will need to provide these values to the professor/instructor to enter in the LTI tab.

    Configuration details to record:

    – Platform ID
    – Client ID
    – Deployment ID
    – Public keyset URL
    – Access Token URL
    – Authentication request URL

Professors

  1. Go to the Gleim Professor-Led course and navigate to the LTI Tab located under Grades > Settings > LTI. Fill in the form with the values provided by your administrator. Make sure to record the PLED Group ID code for use in a later step and then click the “Save settings” button.
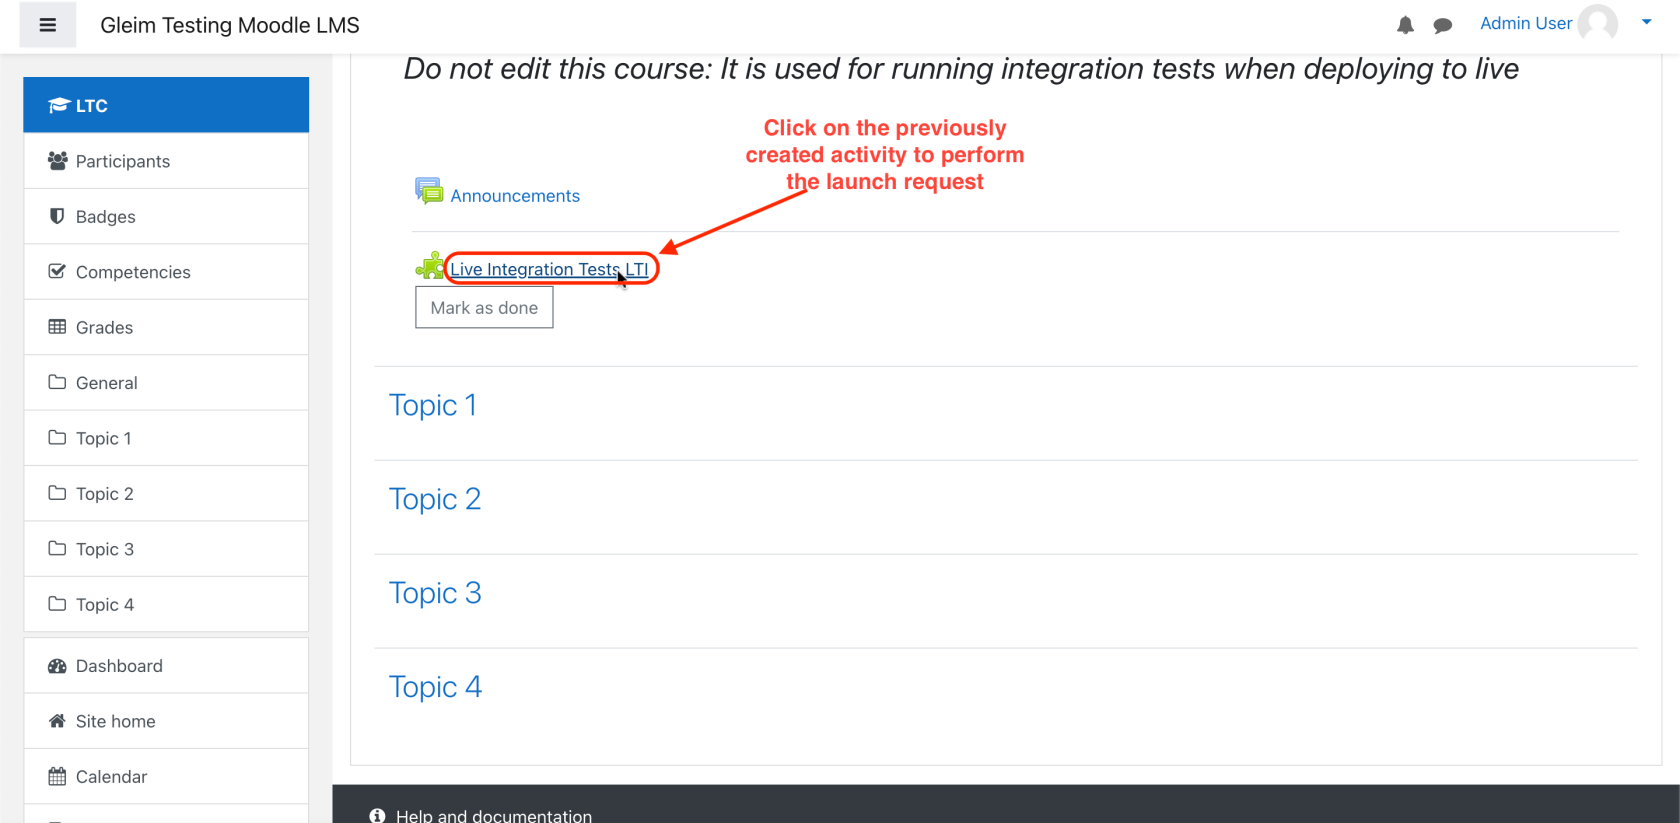
  2. Return to the Moodle course. Click the Gleim LTI activity your LMS administrator created to send a launch request to your students.
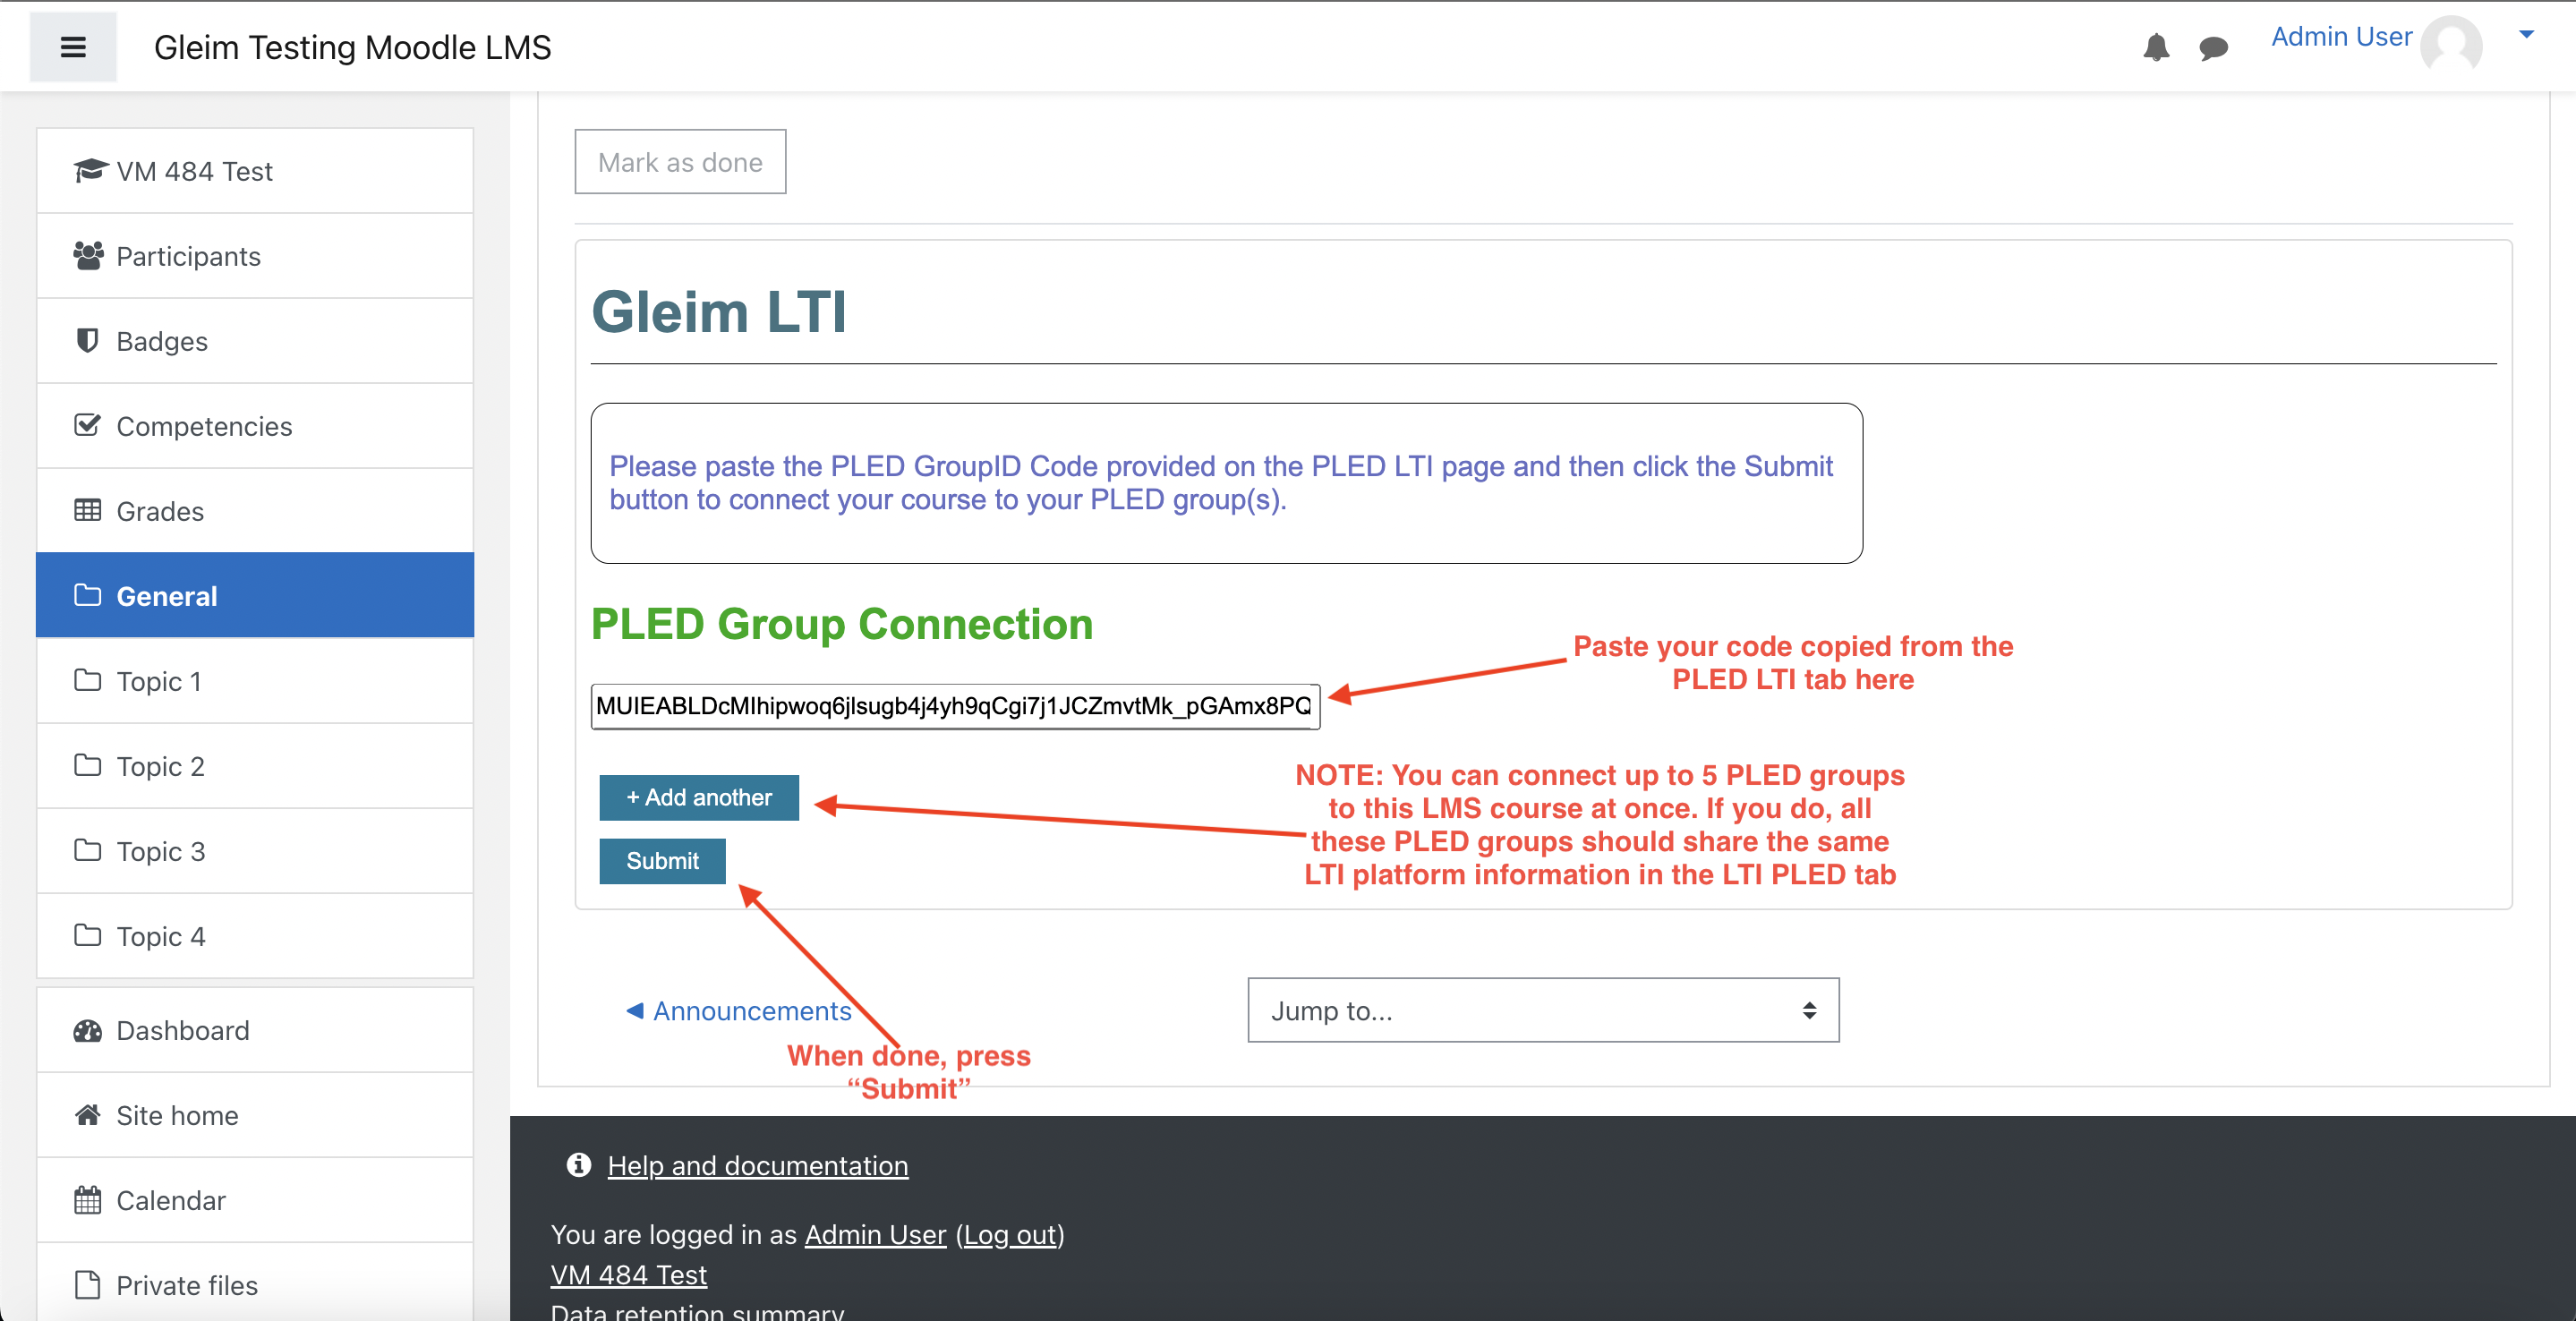
  3. When launching the activity, you will be prompted to enter the PLED group ID code (copied in step 1) to connect your Professor-Led group to the LMS course. Via the “Add another” button:
    • You may connect up to five Professor-Led groups to your LMS course at once, but note that a Professor-Led group can only be connected to one course at a time.
    • If you have already connected your group to another LMS course or are planning to do so, note that connecting a previously connected Professor-Led group to another LMS course will override the connection.
    • If you connect multiple groups, they must also share the same platform information in the “LTI” tab.
        
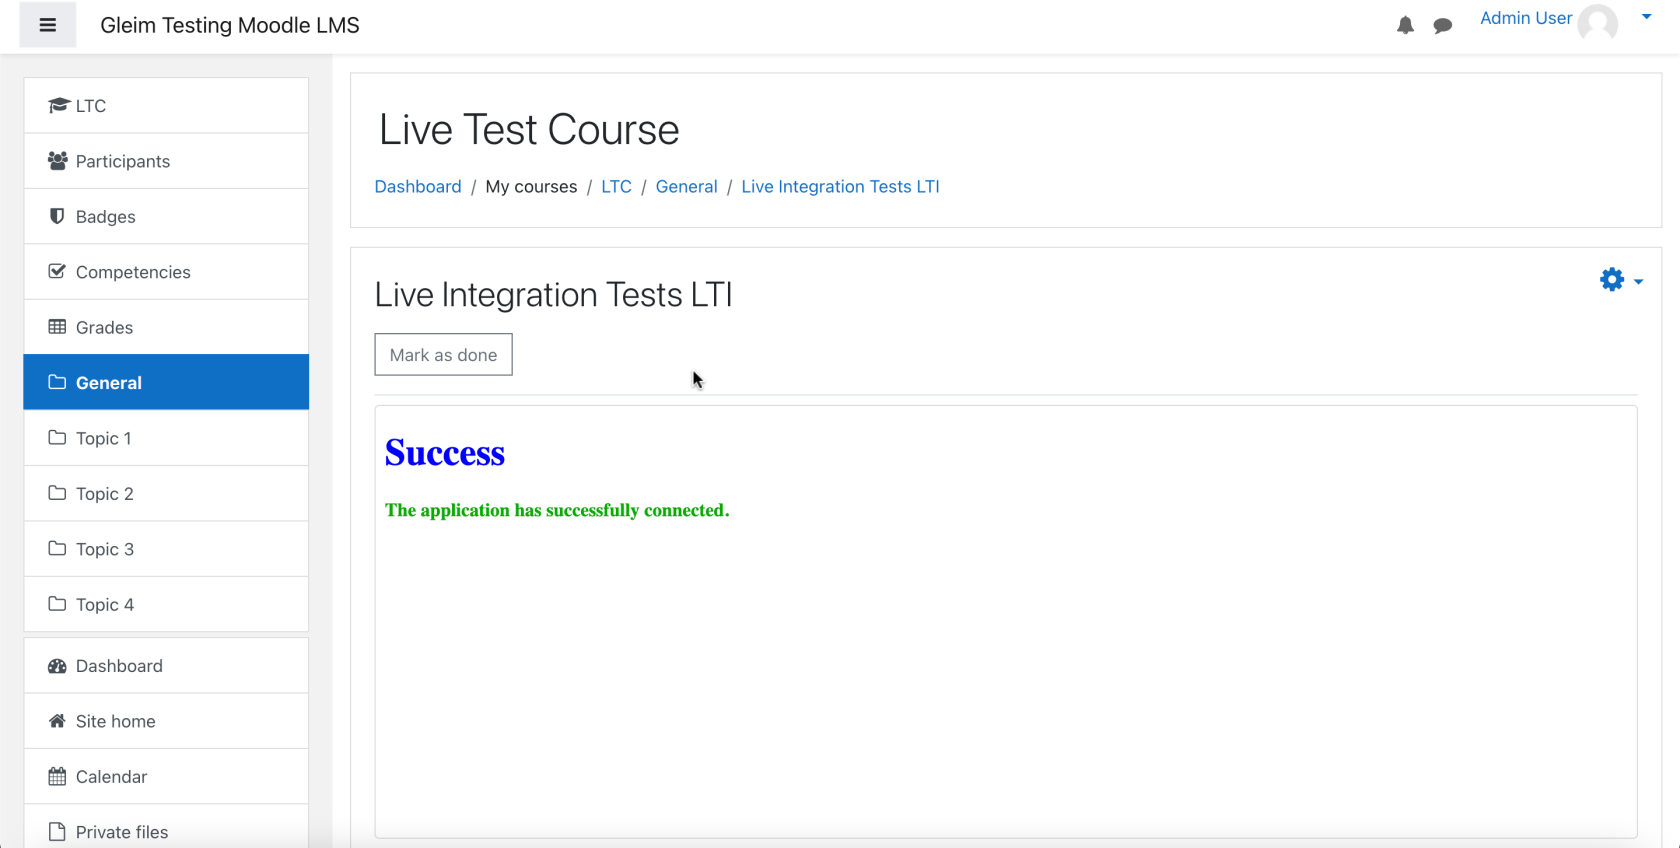
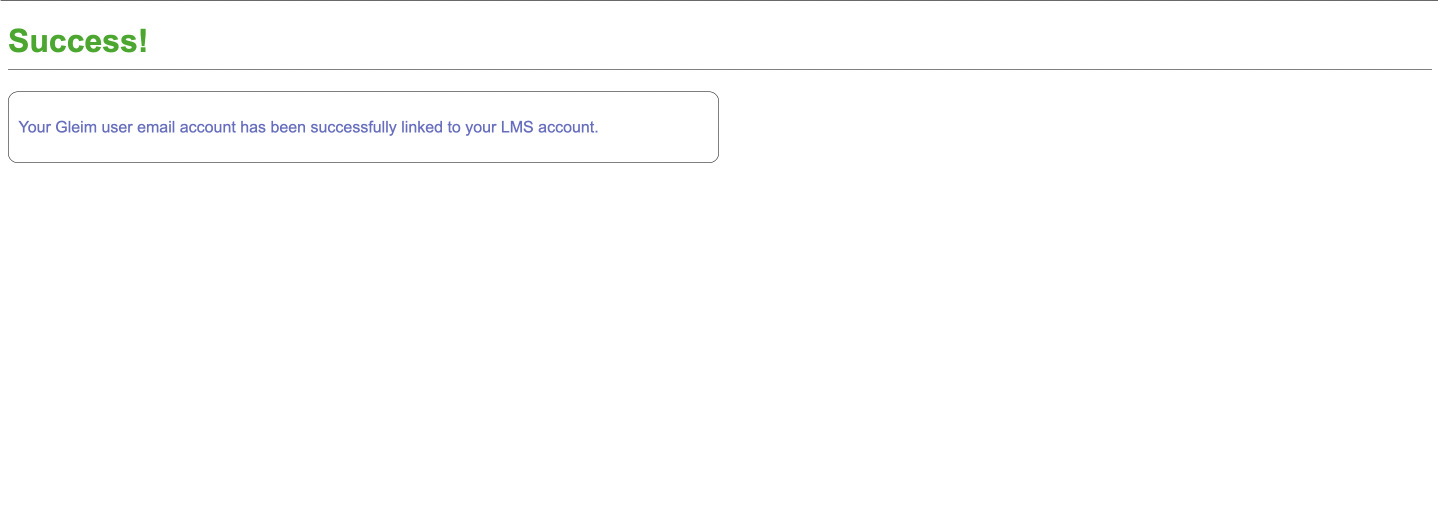
      Paste the identification code and press “Submit.” You should see a green “Success!” message as seen in the screenshot below.
  4. Request your students to click the LTI assignment and connect their account. It is critical that your students complete this assignment to allow their grades to be transmitted from Gleim to Moodle.
     
  5. Once you have enrolled your students in your Professor-Led group, you can review each of your students’ connection status using the “Click here to expand your student list and their LMS status” dropdown on the LTI tab within your Professor-Led course. A table on the LTI tab provides each student’s name, email, and LMS connection status. The LMS status will display one of three symbols:
    • A green filled circle with the tool tip “Successfully synced to LMS grade book”, indicating that the student has been connected to the LMS;
    • A yellow triangle with the tool tip “An error has occurred during sync,” indicating that the student’s attempt to connect to the LMS was unsuccessful; or
    • An empty circle with the tool tip “LMS sync has not been initiated,” indicating that the student did not attempt to connect to the LMS.

Students

  1. In Moodle, click on the Gleim module or assignment you see in your course, as requested by your instructor. To connect your account to Gleim LTI, log in using your Gleim account credentials and press “Submit.”

     
    You should then see a green “Success!” message. You will not need to repeat this step unless you join a different P-Led group.
     

Blackboard

LMS Administrators

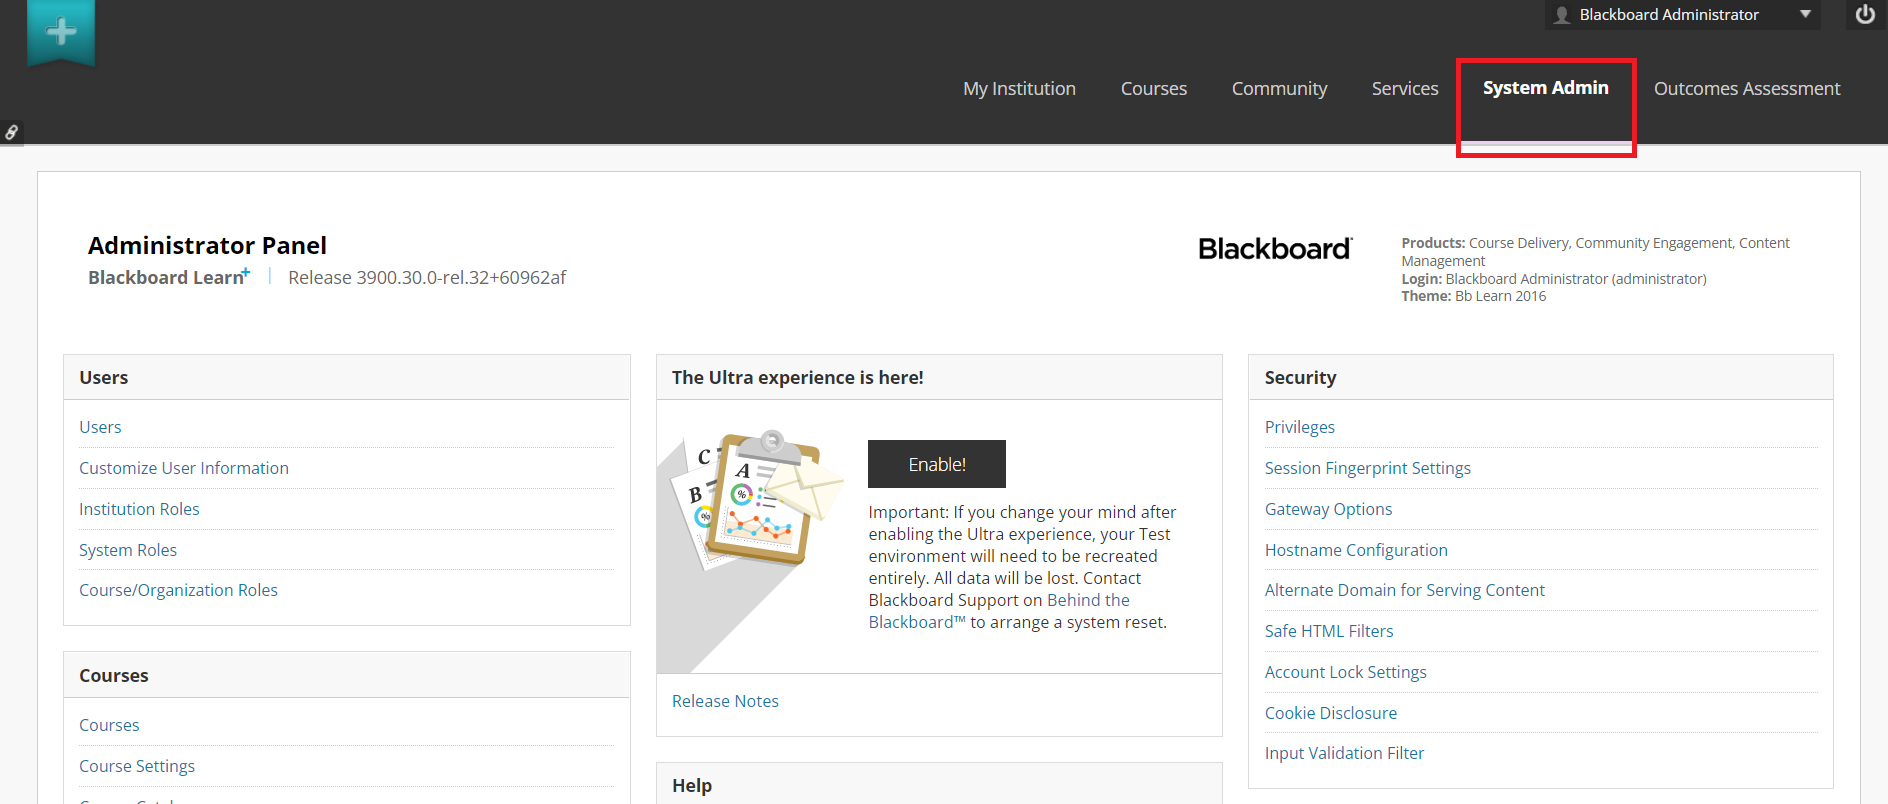
  1. Go to Blackboard. Navigate to the “System Admin” page.
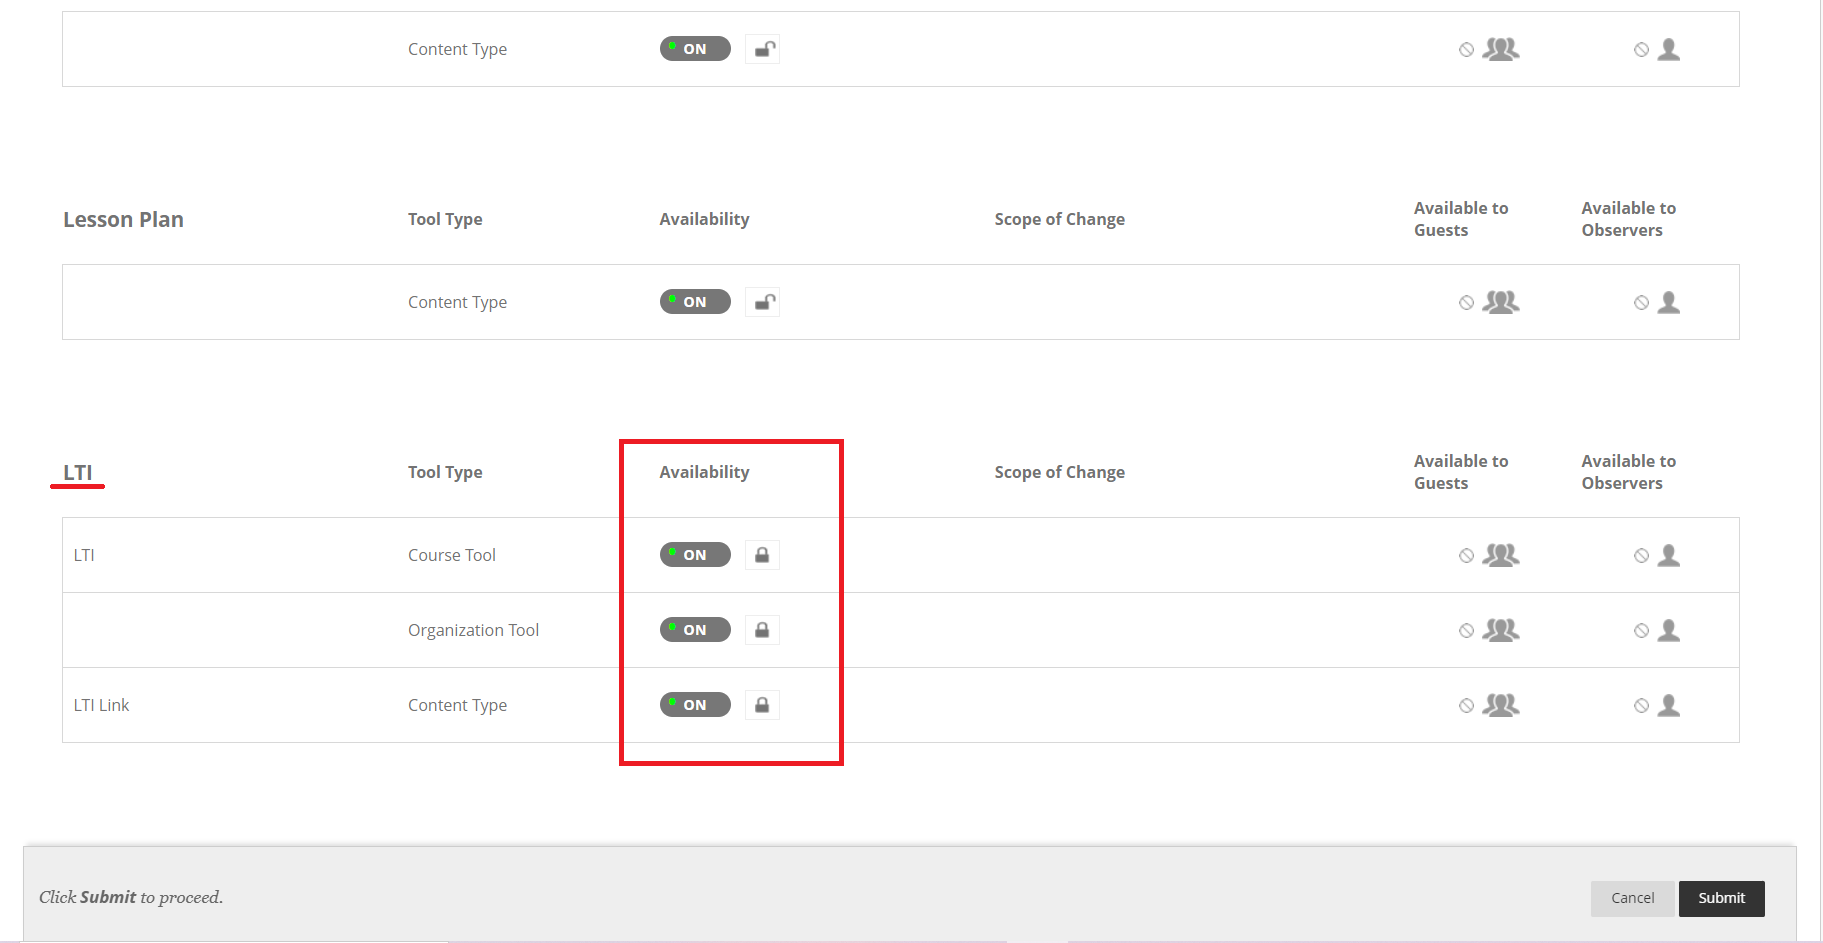
  2. Under the “Tools and Utilities” section on the “System Admin” page, click “Tools.” Make sure that each tool type under the “LTI” section have “Availability” set to “ON.” If you change any settings, press the “Submit” button. If not, click “cancel.”
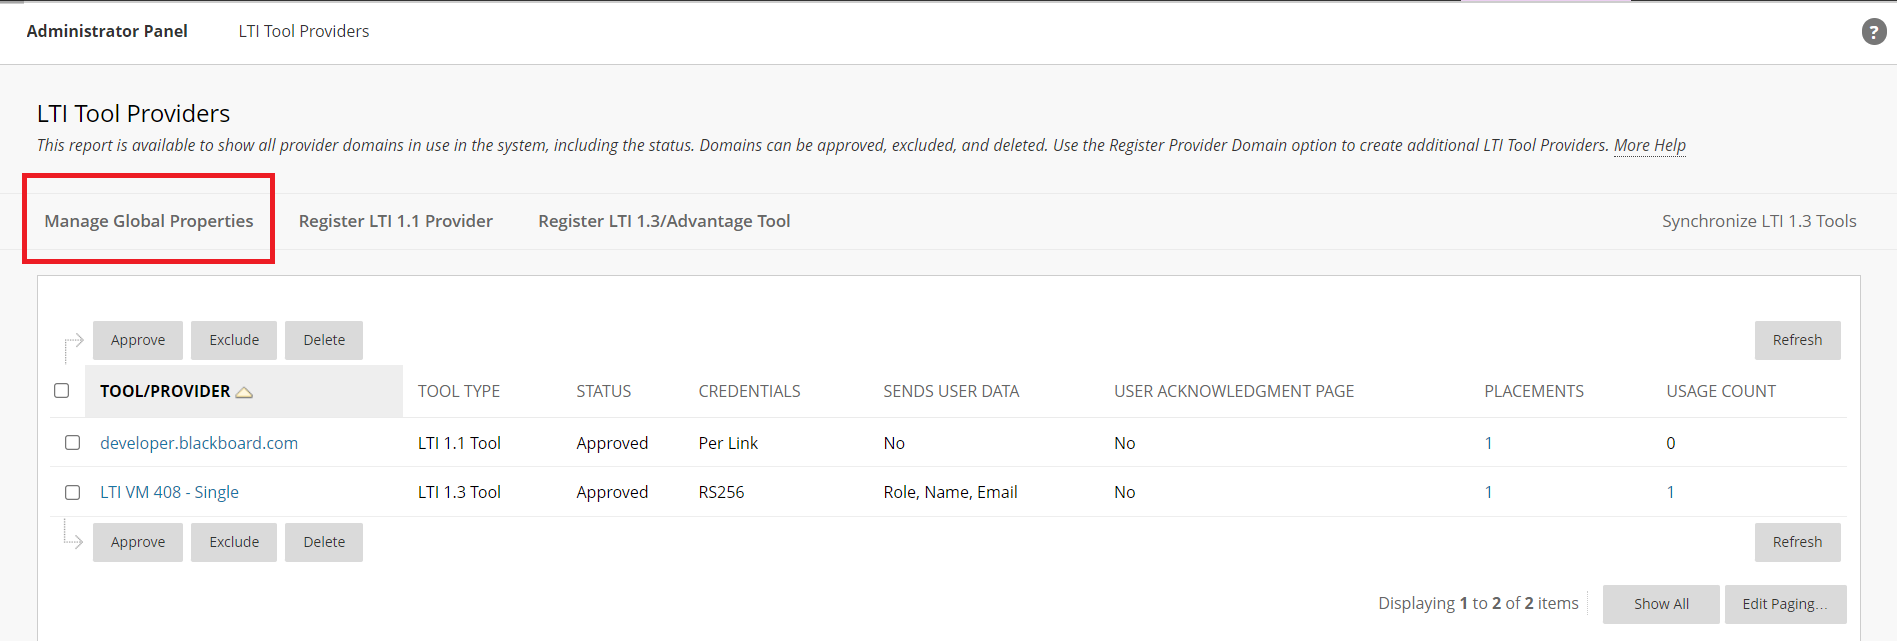
  3. Navigate to the “System Admin” page and select “LTI Tool Providers” in the “Integrations” section. Then, click the “Manage Global Properties” button.
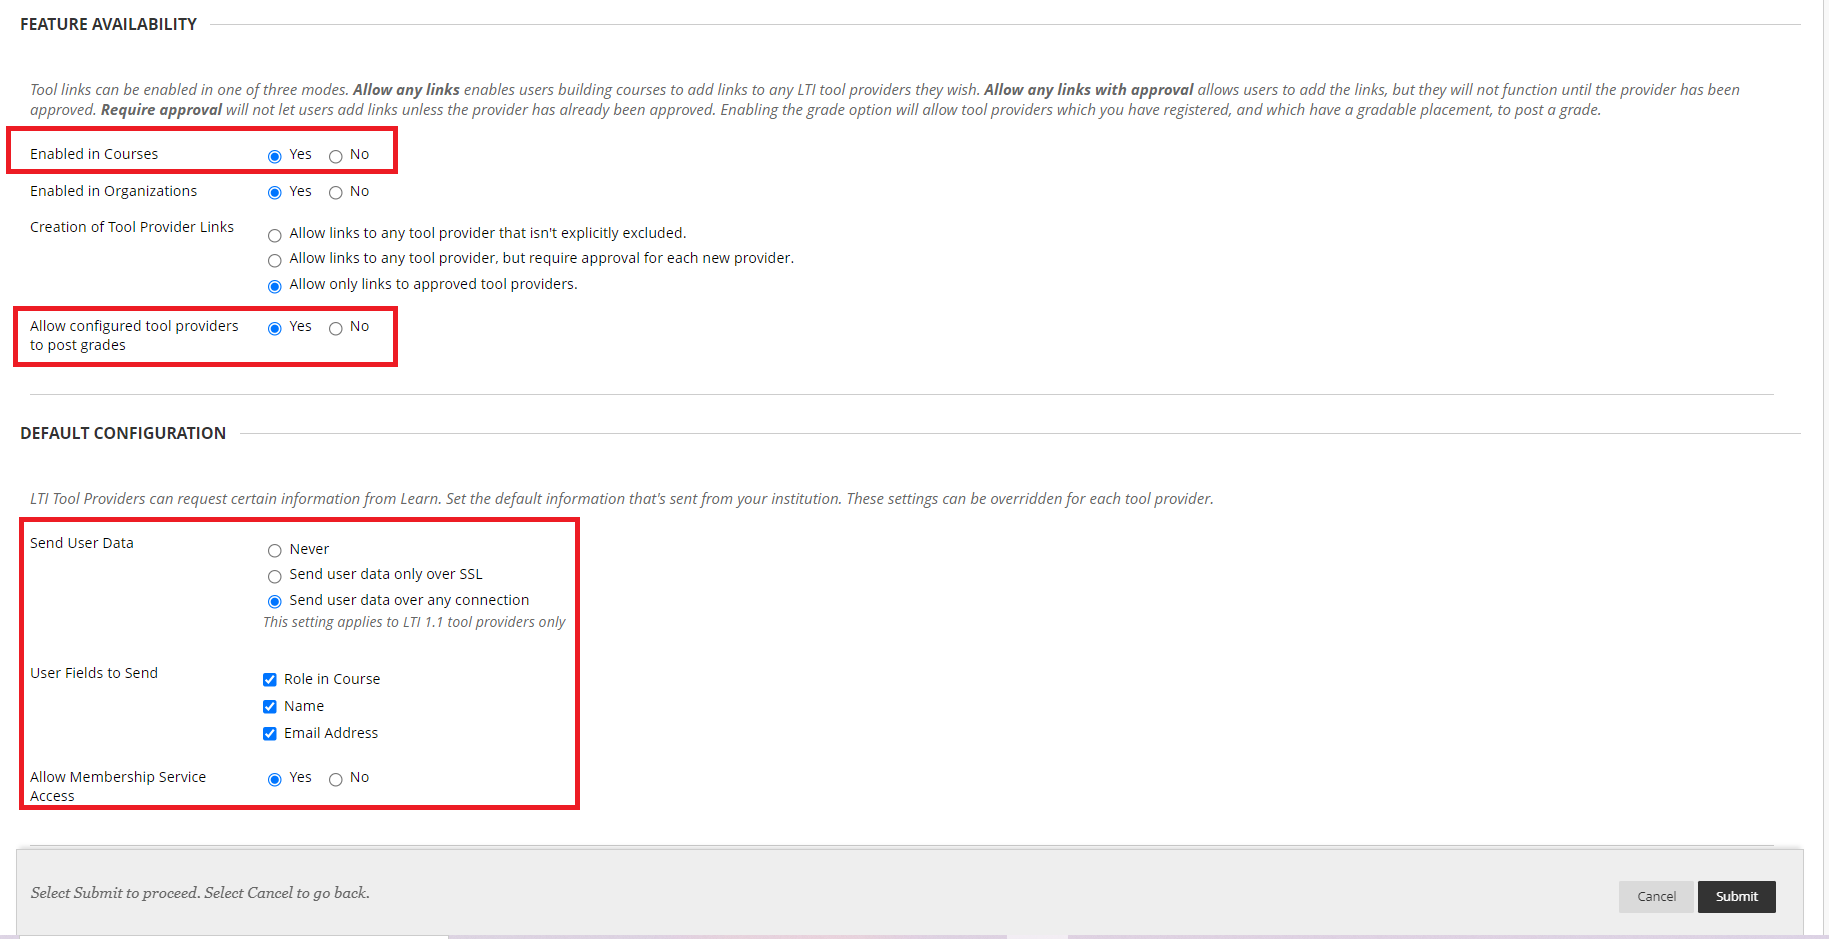
  4. On the “Manage Global Properties” page, make sure to enable all of the following settings:
     
    Feature Availability
    • Enabled in Courses: Yes
    • Allow configured tool providers to post grades: Yes

    Default Configuration

    • Send User Data: Send user data over any connection
    • User Fields to Send: All checkboxes checked
    • Allow membership service access: Yes

    Confirm the above settings. If you change any settings, make sure to press the “Submit” button. If not, click “Cancel.”
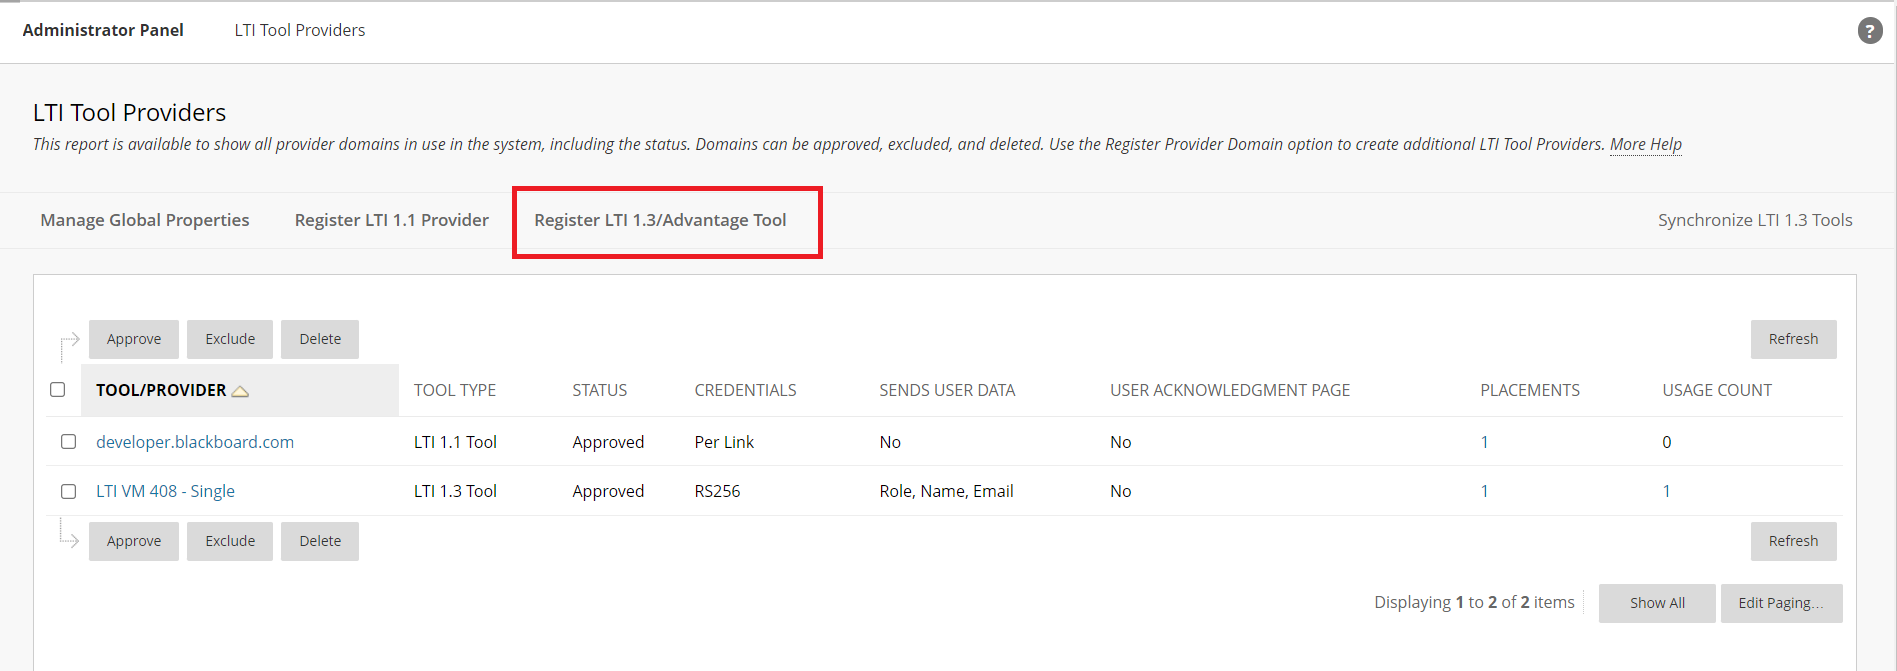
  5. Return to the “LTI Tool Providers” page and click the “Register LTI 1.3/Advantage Tool” button.
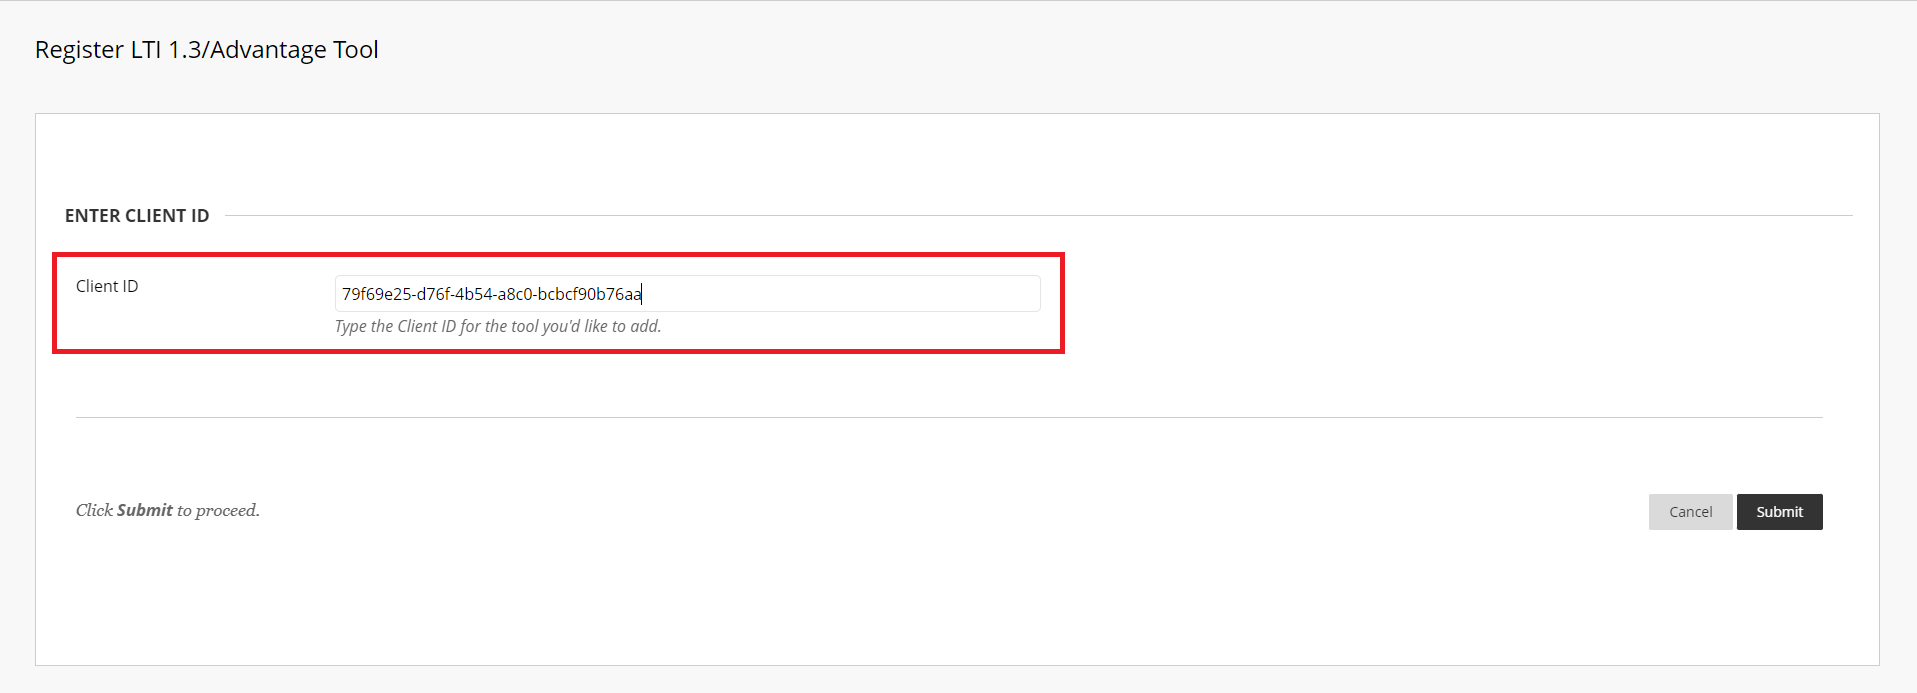
  6. Input the client ID listed below and press “Submit”.
    Client ID: 2b21b20a-6476-4c73-aac1-cfbeb3745e2e
  7. The web page will then direct you to another form page containing read-only information about the Gleim LTI application. Verify that this information is correct using the following bullet points:
    • Take note of the Deployment ID.
    • “Tool Status” should be set to “Approved.”
    • “User Fields to Send” should have all checkboxes checked.
    • “Allow grade service access” should be set to “Yes.”
    • “Allow membership service access” should be set to “Yes.”

      If anything is incorrect, return to the “Manage Global Properties” page and adjust the settings as needed.
      If all the entries are correct, press “Submit” to proceed.
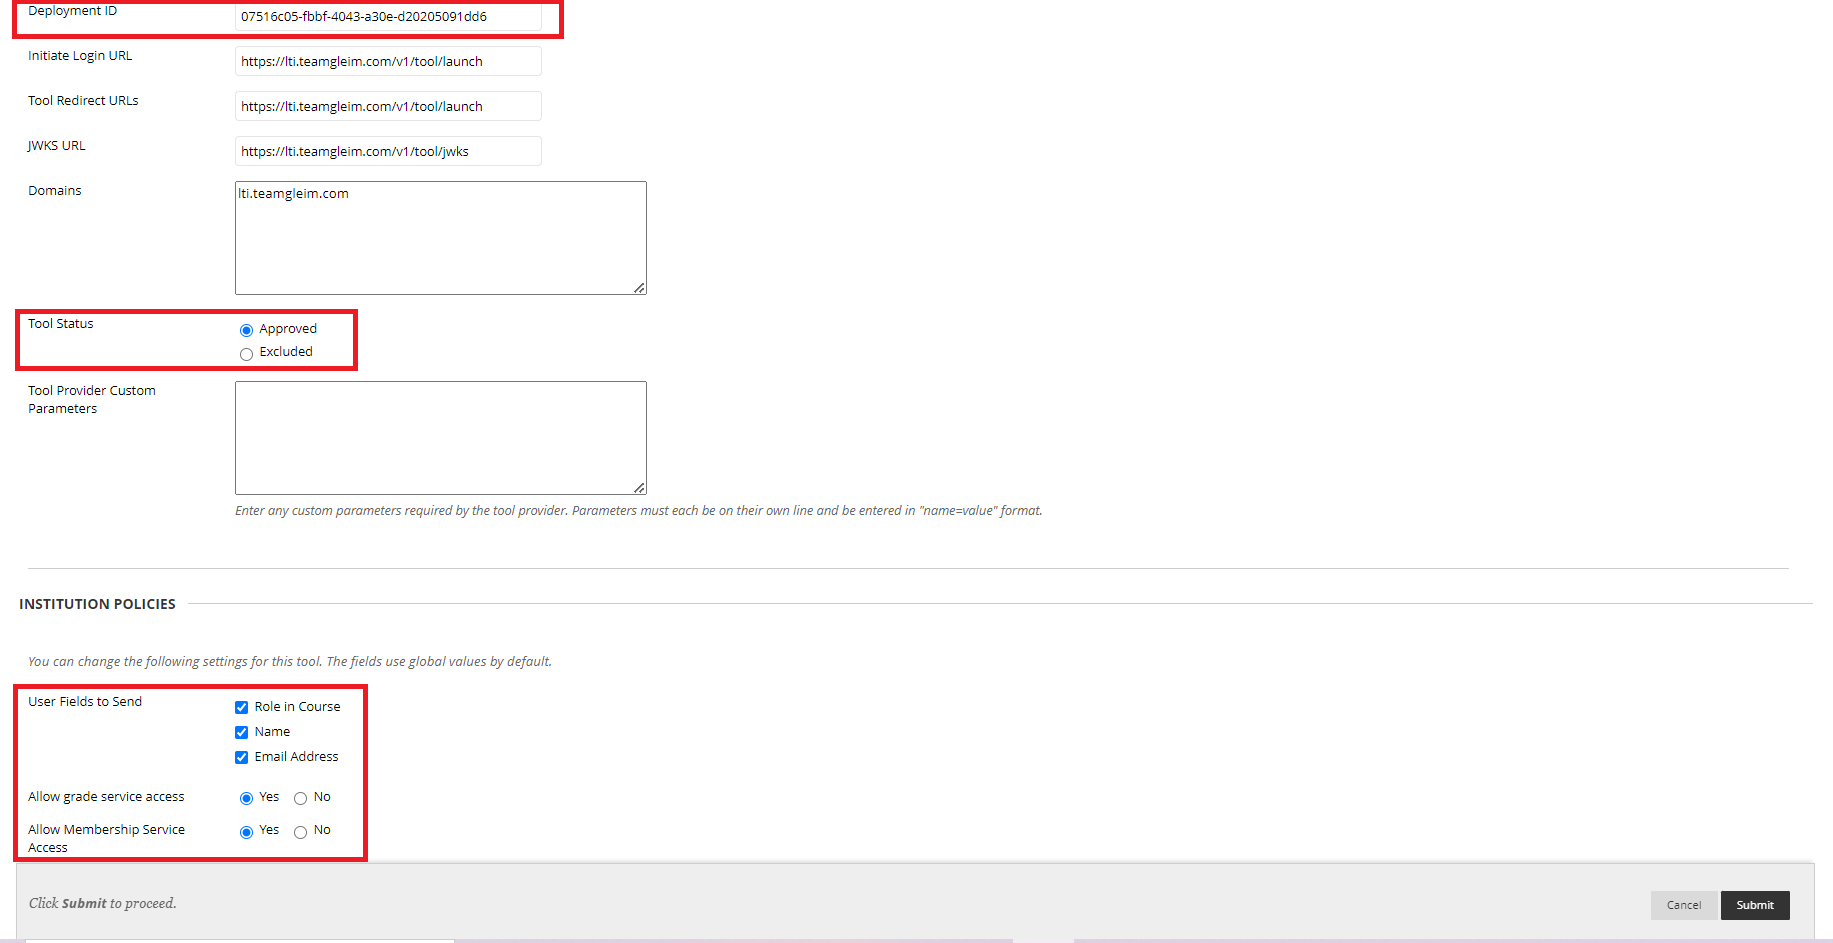
  8. After clicking the “Submit” button for the previous step, the application should be successfully added to the “LTI Tool Providers” page.
  9. Navigate to the LTI Tab located in your Gleim course under Grades > Settings > LTI.

    Fill in the form using the information provided below. Click the “Save Settings” button when you have completed the form.

    Platform ID: https://blackboard.com
    Client ID: 2b21b20a-6476-4c73-aac1-cfbeb3745e2e
    Authentication Request URL: https://developer.blackboard.com/api/v1/gateway/oidcauth
    Access Token URL: https://developer.blackboard.com/api/v1/gateway/oauth2/jwttoken
    JSON Webkey URL: https://developer.blackboard.com/api/v1/management/applications/2b21b20a-6476-4c73-aac1-cfbeb3745e2e/jwks.json
    Enabled: ON
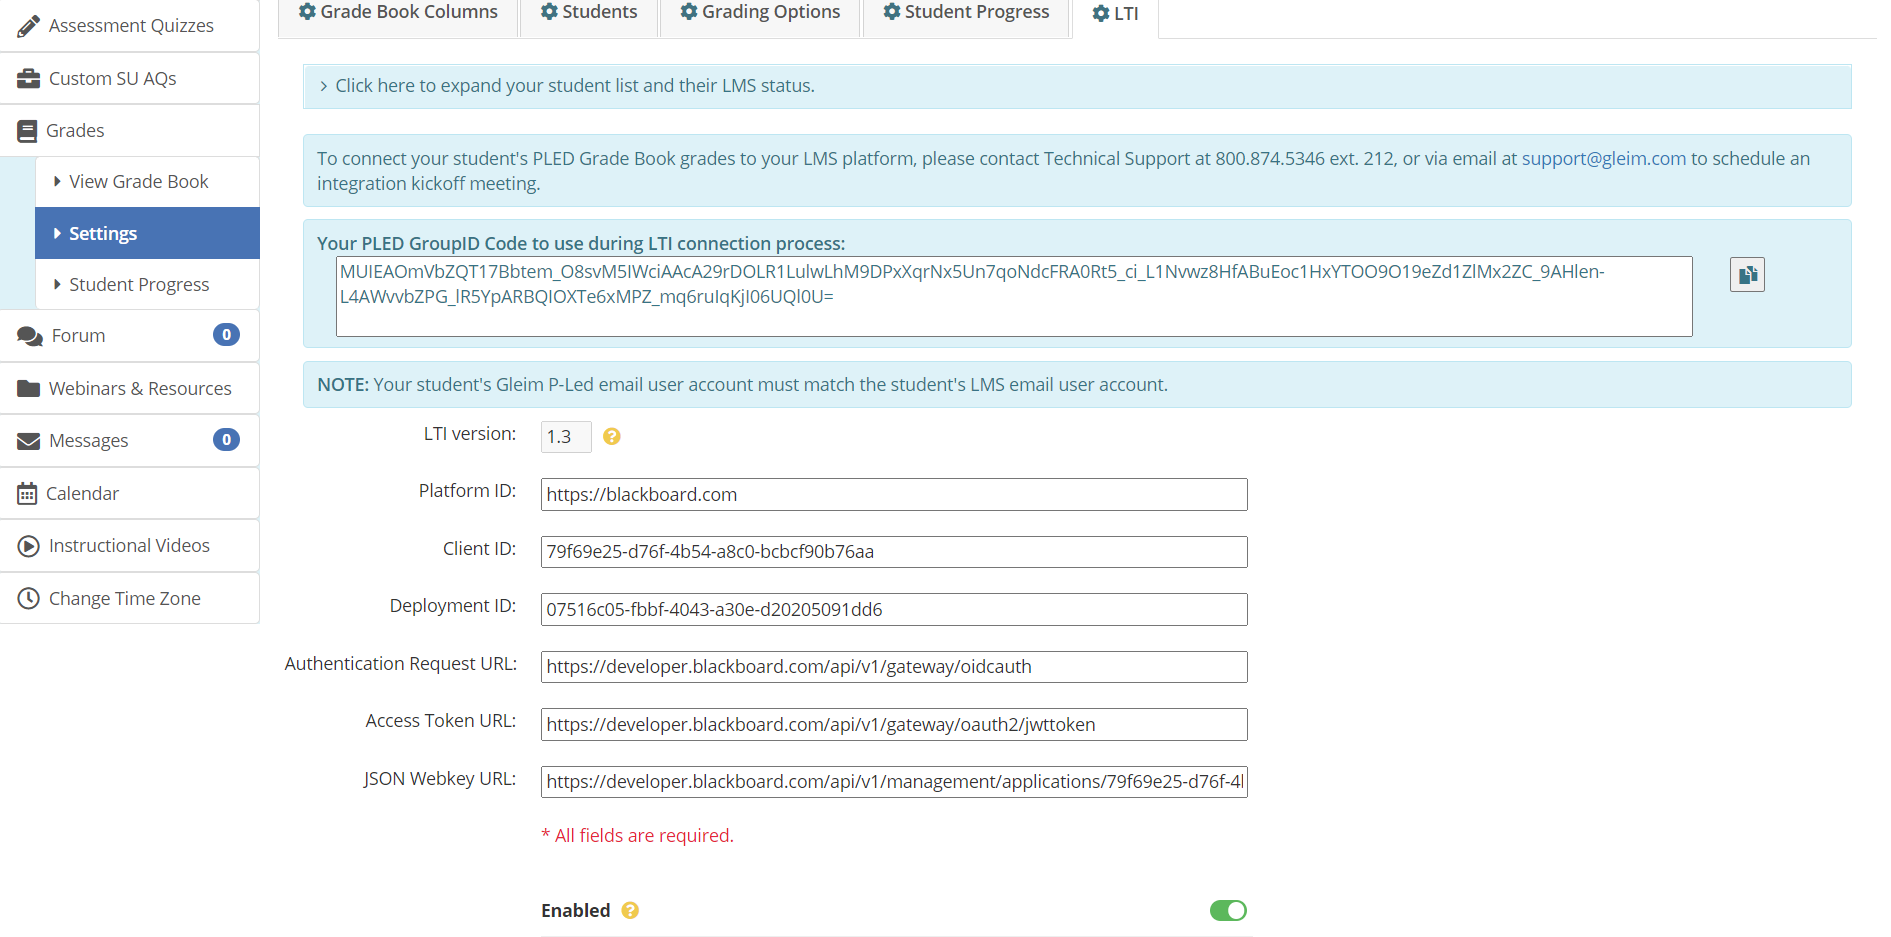
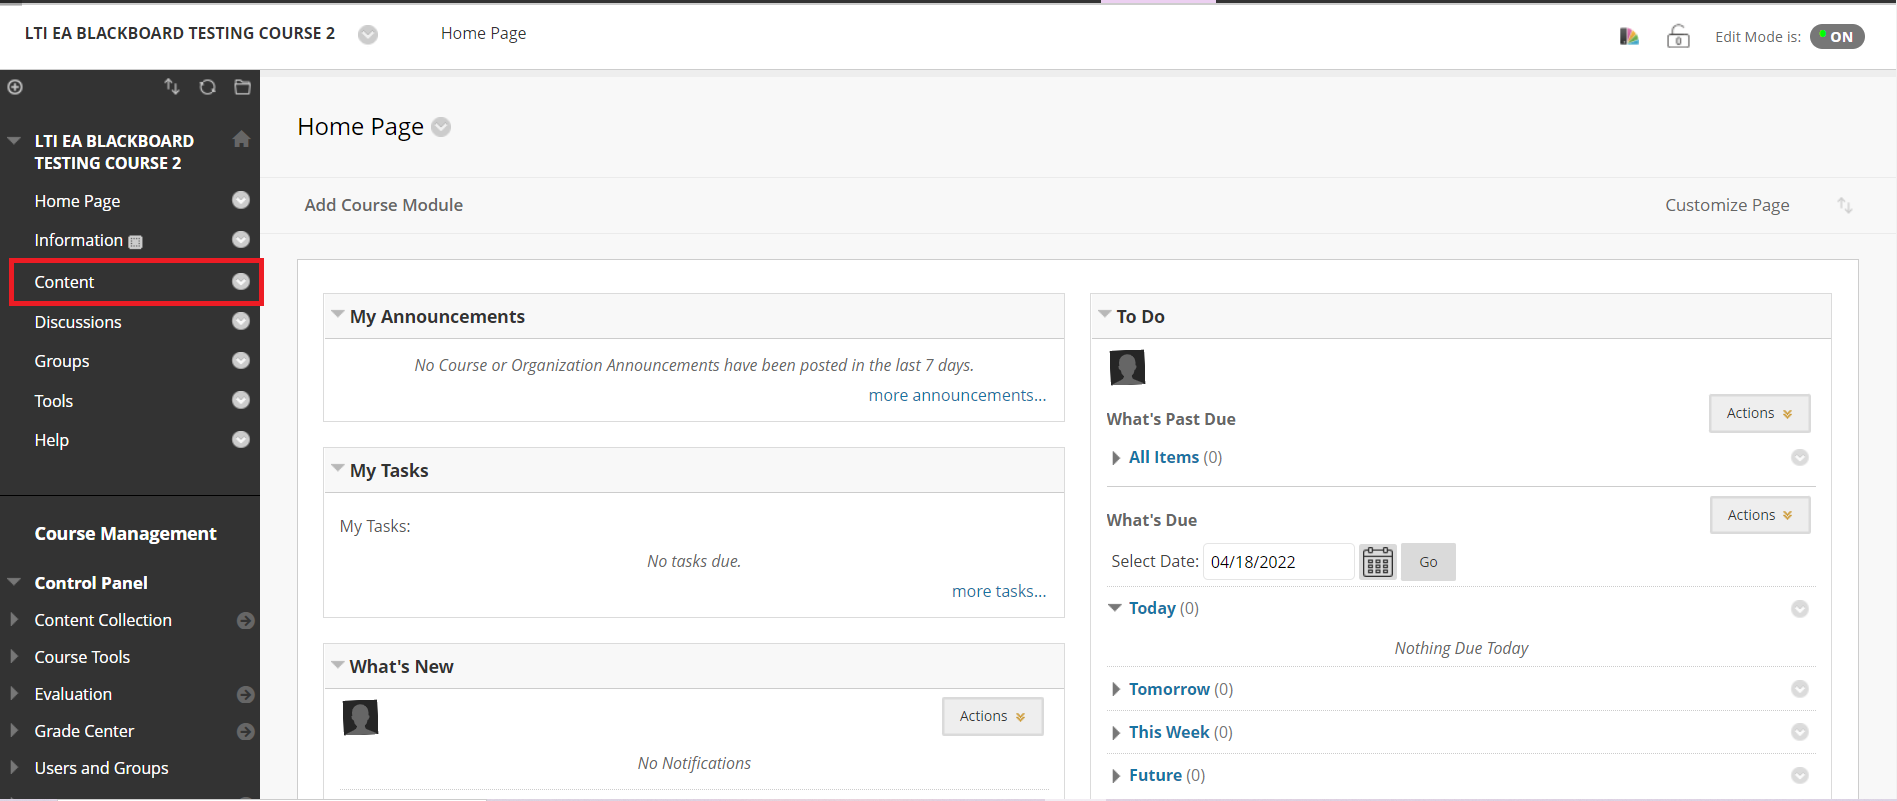
  10. Go back to the home page and navigate to the course to be integrated. Then, click “Content” from the left-hand side navigation bar in the course.
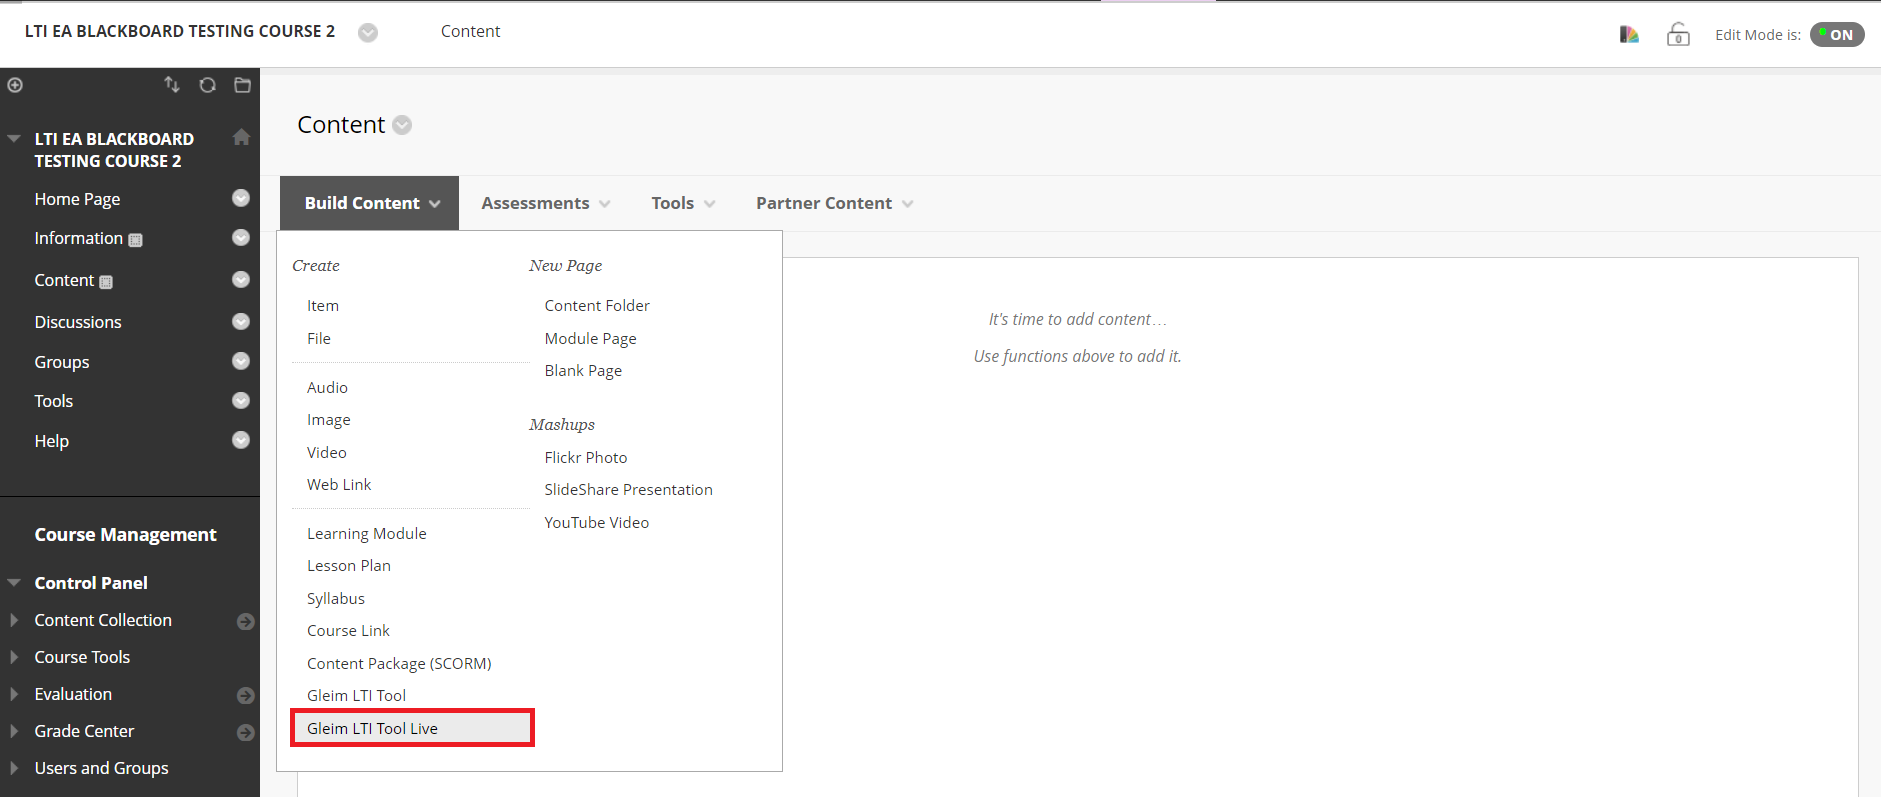
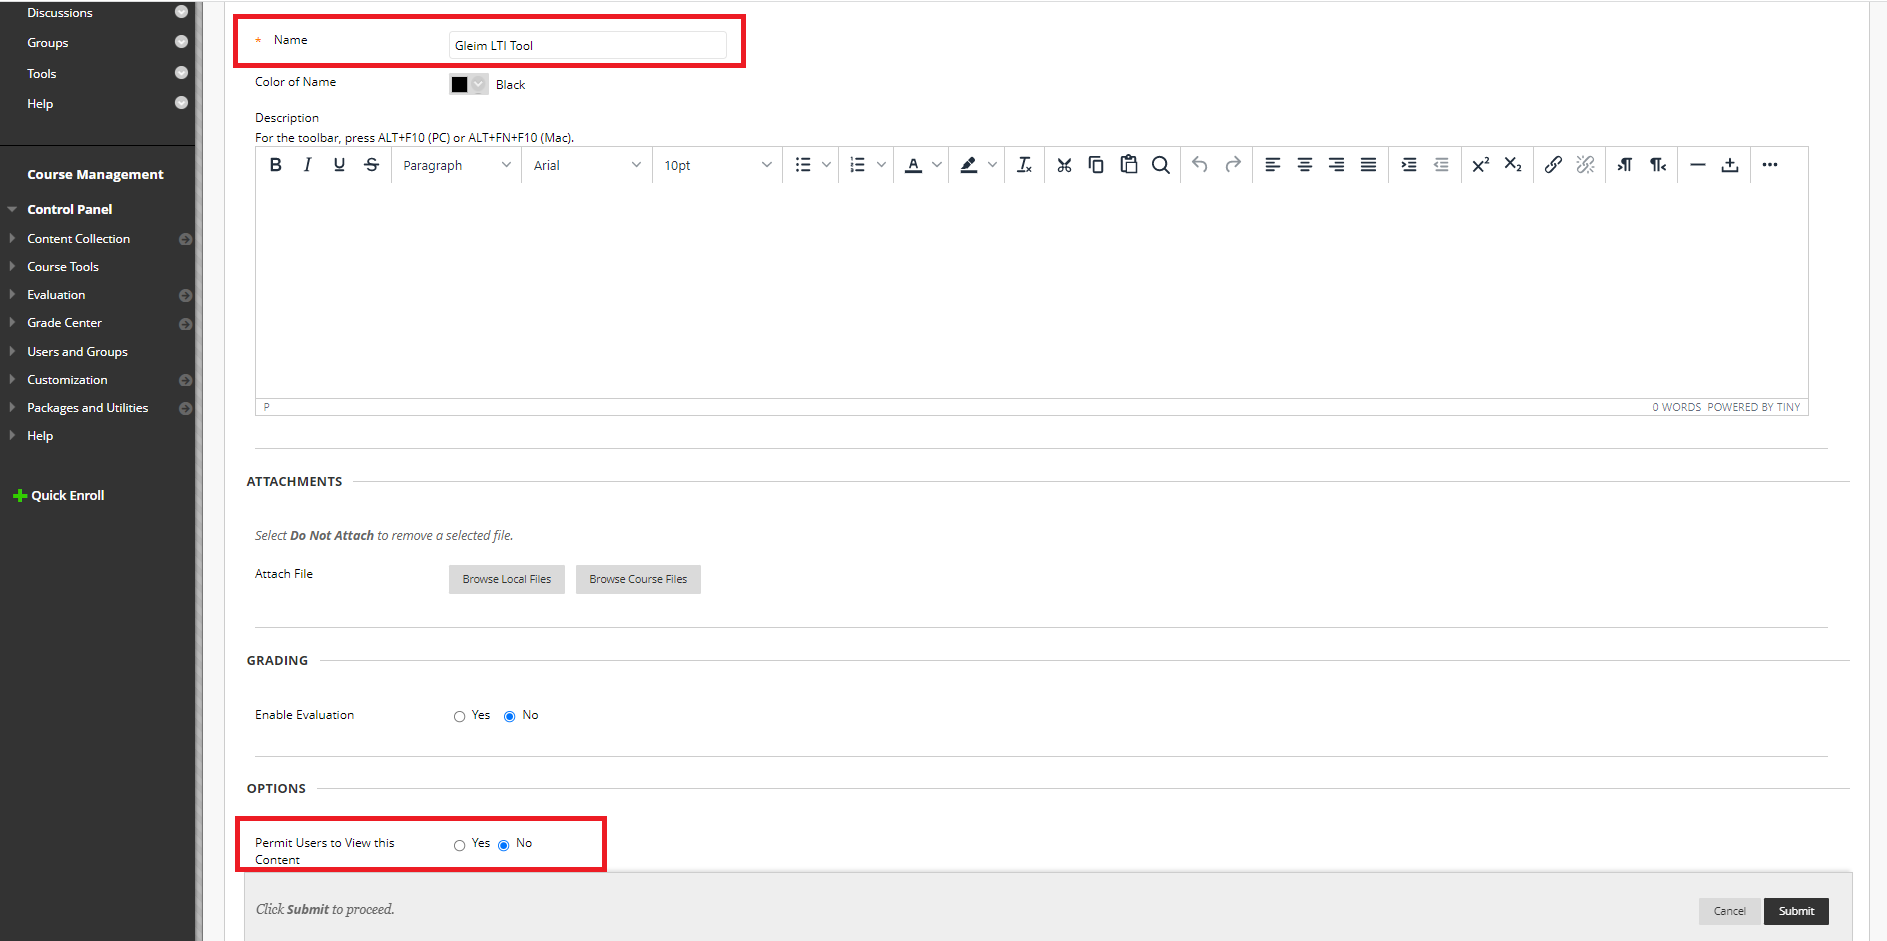
  11. Hover your cursor over the “Build Content” tab and select our application’s placement name (e.g., “Gleim LTI Tool”).
    • Give the application a meaningful name (e.g., “Gleim LTI Tool”).
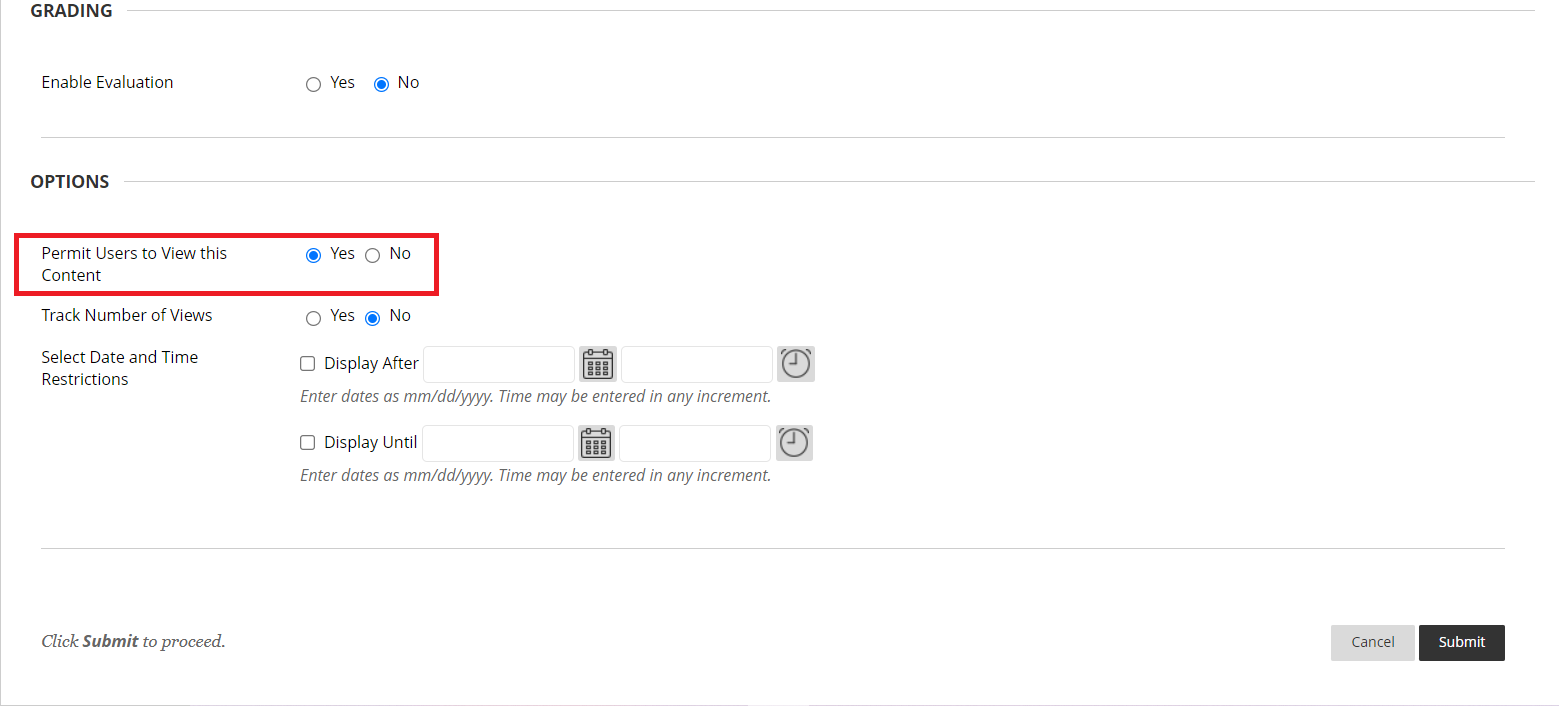
    • Initially set “Permit Users to View this Content” to “No” under the “Options” section to avoid confusing students.
    • Click the “Submit” button.
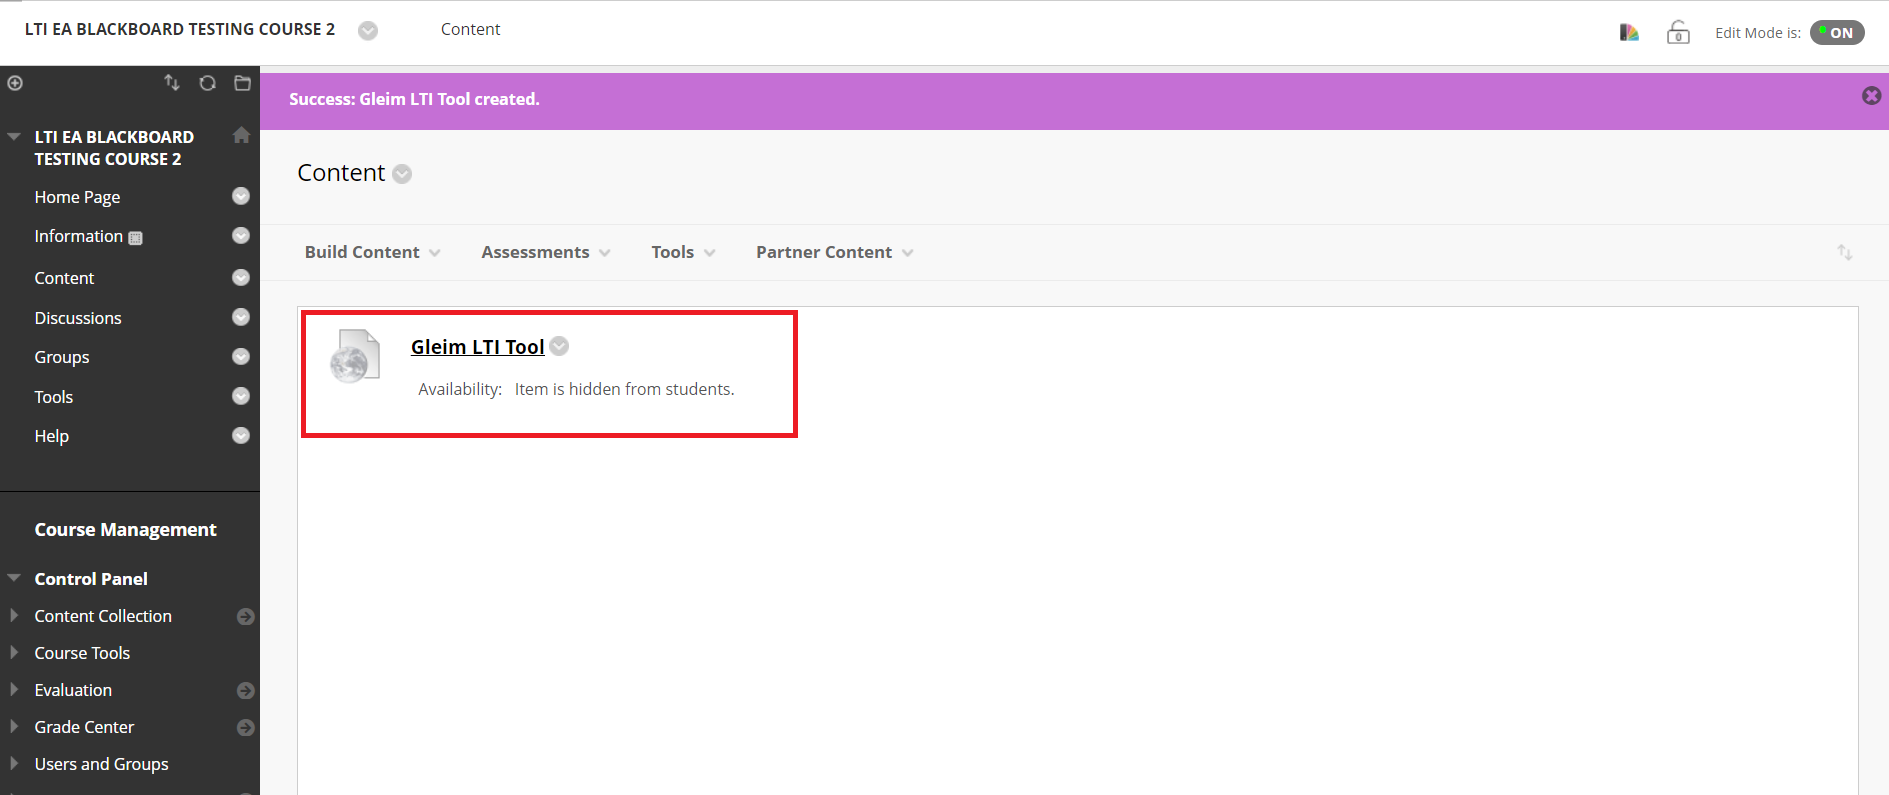
  12. The Gleim LTI application should now be displayed on the “Content” page.

Professors

  1. Navigate to the LTI Tab located in your Gleim course under Grades > Settings > LTI. Copy the PLED GroupID code from the “PLED/AvLearn LTI Settings” page (Gleim Course > Grades > Settings > LTI Tab.)
  2. Click the Gleim LTI Tool to start the launch request. Input the PLED GroupID code(s) for the PLED/AvLearn group(s) you wish to connect to the Blackboard course.

  3. Click the “Submit” button after you input the copied code(s). You should see a green success message after completing this step.Via the “Add another” button:
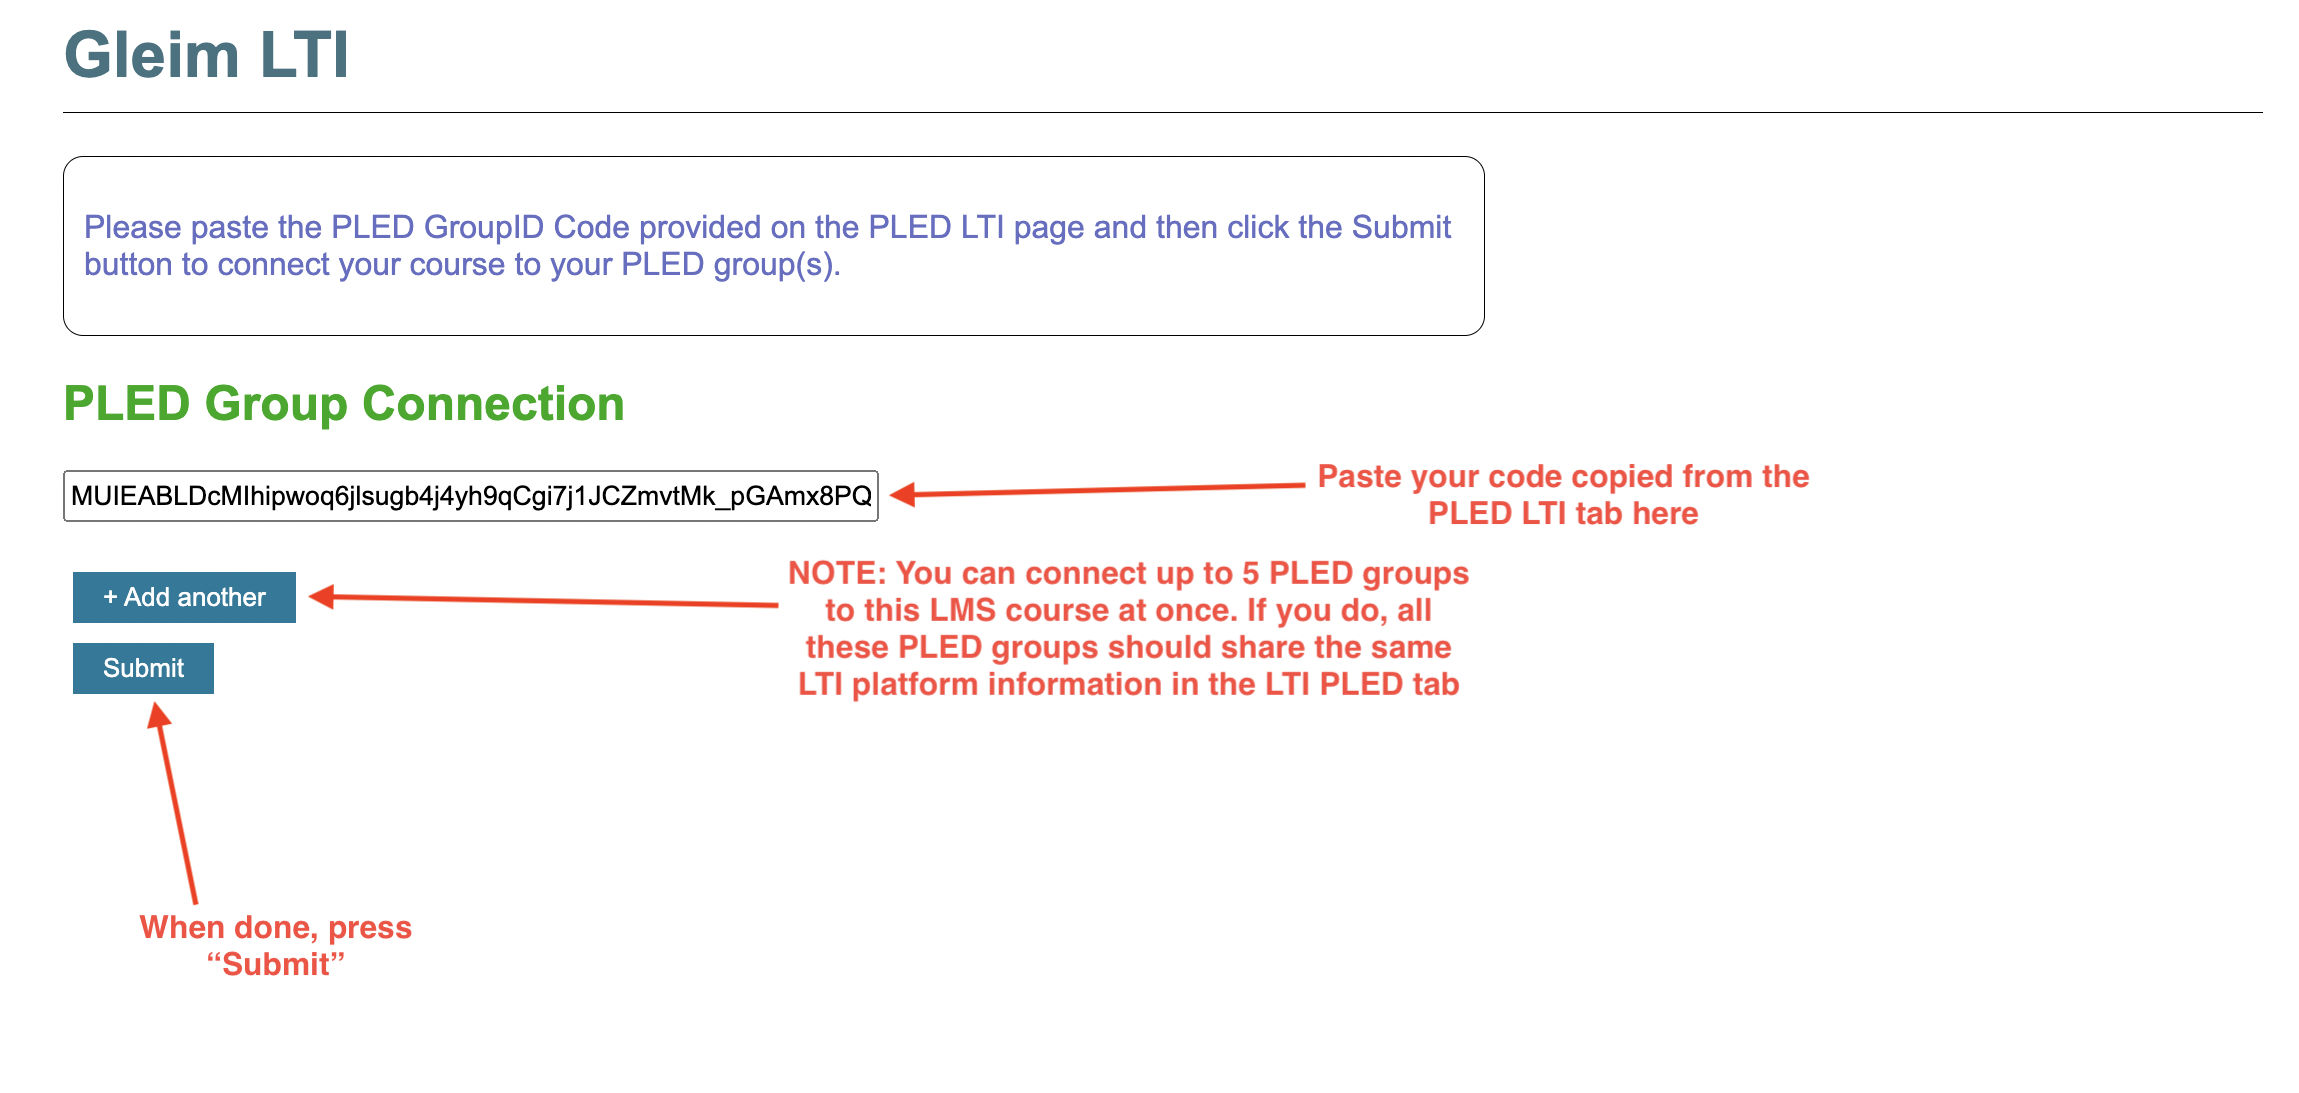
    • You may connect up to five P-Led groups to your LMS course at once, but note that a P-Led group can only be connected to one course at a time.
    • If you have already connected your group to another LMS course or are planning to do so, note that connecting a previously connected P-Led group to another LMS course will override the connection.
    • If you connect multiple groups, they must also share the same platform information in the “P-Led LTI” tab.
  4.  Navigate to the “Content” page for the relevant Blackboard course and edit the Gleim LTI application by clicking the downward arrow button next to it. Set “Permit Users to View this Content” to “Yes,” and then click the “Submit” button.
  5. Request your students to click the LTI tool link on the “Content” page and provide their Gleim credentials to connect their account. It is critical that your students complete this assignment to allow their grades to be transmitted from Gleim to Blackboard
     
  6. Confirm student connections: once you have enrolled your students in your P-Led group, you can review each of your students’ connection status using the “Click here to expand your student list and their LMS status” dropdown on the LTI tab within your P-Led course. A table on the LTI tab provides each student’s name, email, and LMS connection status. The LMS status will display one of three symbols:
    • A green filled circle with the tool tip “Successfully synced to LMS grade book”, indicating that the student has been connected to the LMS;
    • A yellow triangle with the tool tip “An error has occurred during sync,” indicating that the student’s attempt to connect to the LMS was unsuccessful; or
    • An empty circle with the tool tip “LMS sync has not been initiated,” indicating that the student did not attempt to connect to the LMS.

Students

  1. In Blackboard, click the Gleim LTI tool link on the “Content” page of your course and log in with your credentials to connect your account to Gleim LTI. You should now see a green success message.